It is thought to date to the 11th century, within a few years after the battle. It tells the story from the point of view of the conquering Normans.
According to Sylvette Lemagnen, conservator of the tapestry, in her 2005 book La Tapisserie de Bayeux:
The Bayeux tapestry is one of the supreme achievements of the Norman Romanesque …. Its survival almost intact over nine centuries is little short of miraculous … Its exceptional length, the harmony and freshness of its colours, its exquisite workmanship, and the genius of its guiding spirit combine to make it endlessly fascinating.
The tapestry consists of some fifty scenes with Latin tituli, embroidered on linen with coloured woollen yarns. It is likely that it was commissioned by Bishop Odo, William’s half-brother, and made in England—not Bayeux—in the 1070s.
In 1729 the hanging was rediscovered by scholars at a time when it was being displayed annually in Bayeux Cathedral. The tapestry is now exhibited at the Musée de la Tapisserie de Bayeux in Bayeux, Normandy,
The designs on the Bayeux Tapestry are embroidered rather than woven, so that it is not technically a tapestry.
Nevertheless, it has always been referred to as a tapestry until recent years, when the name “Bayeux Embroidery” has gained ground among certain art historians. The tapestry can be seen as a perfect example of secular Norman art. Tapestries adorned both churches and wealthy houses in Medieval western Europe, though at 0.5 by 68.38 metres (1.6 by 224.3 ft, and apparently incomplete) the Bayeux Tapestry is exceptionally large. Only the figures and decoration are embroidered, on a background left plain, which shows the subject very clearly and was necessary to cover large areas.
The Six-Day War (Hebrew: מלחמת ששת הימים, Milhemet Sheshet Ha Yamim; Arabic: النكسة, an-Naksah, “The Setback” or حرب ۱۹٦۷, Ḥarb 1967, “War of 1967”), also known as the June War, 1967 Arab–Israeli War, or Third Arab–Israeli War, was fought between June 5 and 10, 1967 by Israel and the neighboring states of Egypt (known at the time as the United Arab Republic), Jordan, and Syria.
Territory held by Israel before and after the Six Day War. The Straits of Tiran are circled, between the Gulf of Aqaba to the north and the Red Sea to the south.
Relations between Israel and its neighbours had never fully normalised following the 1948 Arab–Israeli War. In the period leading up to June 1967, tensions became dangerously heightened. Israel reiterated its 1950s statement that the closure of the straits of Tiran to its shipping would be a casus belli and in late May Nasser announced the straits would be closed to Israeli vessels.
Egypt then mobilised its forces along its border with Israel, and on 5 June Israel launched what it claimed were a series of preemptive airstrikes against Egyptian airfields. Claims and counterclaims relating to this series of events are one of a number of controversies relating to the conflict.
The Egyptians were caught by surprise, and nearly the entire Egyptian air force was destroyed with few Israeli losses, giving the Israelis air superiority. Simultaneously, the Israelis launched a ground offensive into the Gaza Strip and the Sinai, which again caught the Egyptians by surprise. After some initial resistance, Egyptian leader Gamal Abdel Nasser ordered the evacuation of the Sinai. Israeli forces rushed westward in pursuit of the Egyptians, inflicted heavy losses, and conquered the Sinai.
Nasser induced Syria and Jordan to begin attacks on Israel by using the initially confused situation to claim that Egypt had defeated the Israeli air strike. Israeli counterattacks resulted in the seizure of East Jerusalem as well as the West Bank from the Jordanians, while Israel’s retaliation against Syria resulted in its occupation of the Golan Heights.
On June 11, a ceasefire was signed. Arab casualties were far heavier than those of Israel: fewer than a thousand Israelis had been killed compared to over 20,000 from the Arab forces. Israel’s military success was attributed to the element of surprise, an innovative and well-executed battle plan, and the poor quality and leadership of the Arab forces. Israel seized control of the Gaza Strip and the Sinai Peninsula from Egypt, the West Bank and East Jerusalem from Jordan, and the Golan Heights from Syria. Israeli morale and international prestige was greatly increased by the outcome of the war and the area under Israeli control tripled.
Israel Defense Forces emblem
However, the speed and ease of Israel’s victory would lead to a dangerous overconfidence within the ranks of the Israel Defense Forces (IDF), contributing to initial Arab successes in the subsequent 1973 Yom Kippur War. The displacement of civilian populations resulting from the war would have long-term consequences, as 300,000 Palestinians fled the West Bank and about 100,000 Syrians left the Golan to become refugees. Across the Arab world, Jewish minority communities were expelled, with refugees going to Israel or Europe.
Background
On 22 May 1967, President Nasser addressed his pilots at Bir Gafgafa airbase in Sinai:
“The Jews are threatening war – we say to them ahlan wa-sahlan (welcome)!”
After the 1956 Suez Crisis, Egypt agreed to the stationing of a United Nations Emergency Force (UNEF) in the Sinai to ensure all parties would comply with the 1949 Armistice Agreements. In the following years there were numerous minor border clashes between Israel and its Arab neighbors, particularly Syria. In early November 1966, Syria signed a mutual defense agreement with Egypt.
Jordanian units that engaged the Israelis were quickly beaten back. King Hussein of Jordan criticized Egyptian President Gamal Abdel Nasser for failing to come to Jordan’s aid, and “hiding behind UNEF skirts”.
In May 1967, Nasser received false reports from the Soviet Union that Israel was massing on the Syrian border. Nasser began massing his troops in two defensive lines in the Sinai Peninsula on Israel’s border (May 16), expelled the UNEF force from Gaza and Sinai (May 19) and took up UNEF positions at Sharm el-Sheikh, overlooking the Straits of Tiran.
Israel reiterated declarations made in 1957 that any closure of the Straits would be considered an act of war, or justification for war, and Nasser declared the Straits closed to Israeli shipping on May 22–23. The U.S. President at the time, Lyndon Johnson, later had this to say about closure of these straits being a cause of the war:
If a single act of folly was more responsible for this explosion than any other, it was the arbitrary and dangerous announced decision that the Straits of Tiran would be closed. The right of innocent, maritime passage must be preserved for all nations.
On May 30, Jordan and Egypt signed a defense pact. The following day, at Jordan’s invitation, the Iraqi army began deploying troops and armoured units in Jordan. They were later reinforced by an Egyptian contingent. On June 1, Israel formed a National Unity Government by widening its cabinet, and on June 4 the decision was made to go to war. The next morning, Israel launched Operation Focus, a large-scale surprise air strike that was the opening of the Six-Day War.
Military preparation
Before the war, Israeli pilots and ground crews had trained extensively in rapid refitting of aircraft returning from sorties, enabling a single aircraft to sortie up to four times a day (as opposed to the norm in Arab air forces of one or two sorties per day). This enabled the Israeli Air Force (IAF) to send several attack waves against Egyptian airfields on the first day of the war, overwhelming the Egyptian Air Force, and allowed it to knock out other Arab air forces on the same day.
This has contributed to the Arab belief that the IAF was helped by foreign air forces (see Controversies relating to the Six-Day War). Pilots were extensively schooled about their targets, and were forced to memorize every single detail, and rehearsed the operation multiple times on dummy runways in total secrecy.
The Egyptians had constructed fortified defenses in the Sinai. These designs were based on the assumption that an attack would come along the few roads leading through the desert, rather than through the difficult desert terrain. The Israelis chose not to risk attacking the Egyptian defenses head-on, and instead surprised them from an unexpected direction.
“In discipline, training, morale, equipment and general competence his [Nasser’s] army and the other Arab forces, without the direct assistance of the Soviet Union, are no match for the Israelis. … Even with 50,000 troops and the best of his generals and air force in Yemen, he has not been able to work his way in that small and primitive country, and even his effort to help the Congo rebels was a flop.”
On May 26, 1967, the CIA estimated:
“The Israelis … If they attack now they … would still be able to drive the Egyptians away from the entrance to the Strait of Tiran, but it would certainly cost them heavy losses of men and materiel.”
On the eve of the war, Israel believed it could win a war in 3–4 days. The United States estimated Israel would need 7–10 days to win, with British estimates supporting the U.S. view.
Armies and weapons
Armies
The Israeli army had a total strength, including reservists, of 264,000, though this number could not be sustained, as the reservists were vital to civilian life.
Against Jordan’s forces on the West Bank, Israel deployed about 40,000 troops and 200 tanks (eight brigades). Israeli Central Command forces consisted of five brigades. The first two were permanently stationed near Jerusalem and were called the Jerusalem Brigade and the mechanized Harel Brigade. Mordechai Gur‘s 55th Paratroopers Brigade was summoned from the Sinai front. The 10th Armored Brigade was stationed north of the West Bank. The Israeli Northern Command provided a division (three brigades) led by Major-General Elad Peled, which was stationed in the Jezreel Valley to the north of the West Bank.
On the eve of the war, Egypt massed approximately 100,000 of its 160,000 troops in the Sinai, including all of its seven divisions (four infantry, two armoured and one mechanized), four independent infantry brigades and four independent armoured brigades. No fewer than a third of them were veterans of Egypt’s continuing intervention into the North Yemen Civil War and another third were reservists. These forces had 950 tanks, 1,100 APCs, and more than 1,000 artillery pieces.
Syria’s army had a total strength of 75,000 and was deployed along the Syrian border.
Emblem of the Jordanian Armed Forces
The Jordanian Armed Forces included 11 brigades, totalling 55,000 troops and equipped with some 300 modern Western tanks, 250 of which were U.S. M48 Pattons. Nine brigades (45,000 troops, 270 tanks, 200 artillery pieces) were deployed in the West Bank, including the elite armoured 40th, and two in the Jordan Valley. They possessed sizable numbers of M113 APCs, a new battalion of mechanized infantry, and a paratrooper battalion trained in the new U.S.-built school.
They also had 12 battalions of artillery and six batteries of 81 mm and 120 mm mortars. The Jordanian Army, then known as the Arab Legion, was a long-term-service, professional army, relatively well-equipped and well-trained. Furthermore, Israeli post-war briefings said that the Jordanian staff acted professionally as well, but was always left “half a step” behind by the Israeli moves. The small Royal Jordanian Air Force consisted of only 24 British-made Hawker Hunter fighters, six transports, and two helicopters. According to the Israelis, the Hawker Hunter was essentially on par with the French-built Dassault Mirage III – the IAF’s best plane.
100 Iraqi tanks and an infantry division were readied near the Jordanian border. Two squadrons of fighter-aircraft, Hawker Hunters and MiG 21s, were rebased adjacent to the Jordanian border.
The Arab air forces were aided by volunteer pilots from the Pakistan Air Force acting in an independent capacity, and by some aircraft from Libya, Algeria, Morocco, Kuwait, and Saudi Arabia to make up for the massive losses suffered on the first day of the war. PAF pilots shot down several Israeli planes.
Weapons
With the exception of Jordan, the Arabs relied principally on Soviet weaponry. Jordan’s army was equipped with American weaponry, and its air force was composed of British aircraft.
Egypt had by far the largest and the most modern of all the Arab air forces, consisting of about 420 combat aircraft, all of them Soviet-built and with a heavy quota of top-of-the-line MiG-21s. Of particular concern to the Israelis were the 30 Tu-16 “Badger”medium bombers, capable of inflicting heavy damage on Israeli military and civilian centers.
Israeli weapons were mainly of Western origin. Its air force was composed principally of French aircraft, while its armoured units were mostly of British and American design and manufacture. Some infantry weapons, including the ubiquitous Uzi, were of Israeli origin.
Egypt, Syria and Iraq used T-34/85, T-54, T-55, PT-76, and SU-100/152 World War II-vintage self-propelled guns. Jordan used M-47, M-48, and M-48A1 Patton tanks. Panzer IV (used by Syria)
M50 and M51 Shermans, M48A3 Patton, Centurion, AMX-13. The Centurion was upgraded with the British 105 mm L7 gun prior to the war. The Sherman also underwent extensive modifications including a larger 105 mm medium velocity, French gun, redesigned turret, wider tracks, more armour, and upgraded engine and suspension.
Dassault Mirage at the Israeli Air Force Museum. Operation Focus was mainly conducted using French built aircraft.
Israel’s first and most critical move was a surprise attack on the Egyptian Air Force. Initially, both Egypt and Israel announced that they had been attacked by the other country.
On June 5 at 7:45 Israeli time, as civil defense sirens sounded all over Israel, the IAF launched Operation Focus (Moked). All but 12 of its nearly 200 operational jets launched a mass attack against Egypt’s airfields. The Egyptian defensive infrastructure was extremely poor, and no airfields were yet equipped with hardened aircraft shelters capable of protecting Egypt’s warplanes. Most of the Israeli warplanes headed out over the Mediterranean Sea, flying low to avoid radar detection, before turning toward Egypt. Others flew over the Red Sea.
Meanwhile, the Egyptians hindered their own defense by effectively shutting down their entire air defense system: they were worried that rebel Egyptian forces would shoot down the plane carrying Field Marshal Abdel Hakim Amer and Lt-Gen. Sidqi Mahmoud, who were en route from al Maza to Bir Tamada in the Sinai to meet the commanders of the troops stationed there. In any event, it did not make a great deal of difference as the Israeli pilots came in below Egyptian radar cover and well below the lowest point at which its SA-2 surface-to-air missile batteries could bring down an aircraft.
Although the powerful Jordanian radar facility at Ajloun detected waves of aircraft approaching Egypt and reported the code word for “war” up the Egyptian command chain, Egyptian command and communications problems prevented the warning from reaching the targeted airfields. The Israelis employed a mixed-attack strategy: bombing and strafing runs against planes parked on the ground, and bombing to disable runways with special tarmac-shredding penetration bombs developed jointly with France, leaving surviving aircraft unable to take off. The runway at the Arish airfield was spared, as the Israelis expected to turn it into a military airport for their transports after the war. Surviving aircraft were taken out by later attack waves. The operation was more successful than expected, catching the Egyptians by surprise and destroying virtually all of the Egyptian Air Force on the ground, with few Israeli losses. Only four unarmed Egyptian training flights were in the air when the strike began.
A total of 338 Egyptian aircraft were destroyed and 100 pilots were killed,although the number of aircraft lost by the Egyptians is disputed.
Among the Egyptian planes lost were all 30 Tu-16 bombers, 27 out of 40 Il-28 bombers, 12 Su-7 fighter-bombers, over 90 MiG-21s, 20 MiG-19s, 25 MiG-17 fighters, and around 32 assorted transport planes and helicopters. In addition, Egyptian radars and SAM missiles were also attacked and destroyed. The Israelis lost 19 planes, including two destroyed in air-to-air combat and 13 downed by anti-aircraft artillery.
One Israeli plane, which was damaged and unable to break radio silence, was shot down by Israeli Hawk missiles after it strayed over the Negev Nuclear Research Center. Another was destroyed by an exploding Egyptian bomber.
The attack guaranteed Israeli air superiority for the rest of the war. Attacks on other Arab air forces by Israel took place later in the day as hostilities broke out on other fronts.
The large numbers of Arab aircraft claimed destroyed by Israel on that day were at first regarded as “greatly exaggerated” by the Western press. However, the fact that the Egyptian Air Force, along with other Arab air forces attacked by Israel, made practically no appearance for the remaining days of the conflict proved that the numbers were most likely authentic. Throughout the war, Israeli aircraft continued strafing Arab airfield runways to prevent their return to usability. Meanwhile, Egyptian state-run radio had reported an Egyptian victory, falsely claiming that 70 Israeli planes had been downed on the first day of fighting.
The Egyptian forces consisted of seven divisions: four armoured, two infantry, and one mechanized infantry. Overall, Egypt had around 100,000 troops and 900–950 tanks in the Sinai, backed by 1,100 APCs and 1,000 artillery pieces. This arrangement was thought to be based on the Soviet doctrine, where mobile armour units at strategic depth provide a dynamic defense while infantry units engage in defensive battles.
Israeli forces concentrated on the border with Egypt included six armoured brigades, one infantry brigade, one mechanized infantry brigade, three paratrooper brigades, giving a total of around 70,000 men and 700 tanks, who were organized in three armoured divisions. They had massed on the border the night before the war, camouflaging themselves and observing radio silence before being ordered to advance.
The Israeli plan was to surprise the Egyptian forces in both timing (the attack exactly coinciding with the IAF strike on Egyptian airfields), location (attacking via northern and central Sinai routes, as opposed to the Egyptian expectations of a repeat of the 1956 war, when the IDF attacked via the central and southern routes) and method (using a combined-force flanking approach, rather than direct tank assaults).
On June 5, at 7:50 a.m., the northernmost Israeli division, consisting of three brigades and commanded by Major General Israel Tal, one of Israel’s most prominent armour commanders, crossed the border at two points, opposite Nahal Oz and south of Khan Yunis. They advanced swiftly, holding fire to prolong the element of surprise. Tal’s forces assaulted the “Rafah Gap”, a seven-mile stretch containing the shortest of three main routes through the Sinai towards El-Qantarah el-Sharqiyya and the Suez Canal.
The Egyptians had four divisions in the area, backed by minefields, pillboxes, underground bunkers, hidden gun emplacements and trenches. The terrain on either side of the route was impassable. The Israeli plan was to hit the Egyptians at selected key points with concentrated armour.
Tal’s advance was led by the 7th Armored Brigade under Colonel Shmuel Gonen. The Israeli plan called for the 7th Brigade to outflank Khan Yunis from the north and the 60th Armored Brigade under Colonel Menachem Aviram would advance from the south. The two brigades would link up and surround Khan Yunis, while the paratroopers would take Rafah. Gonen entrusted the breakthrough to a single battalion of his brigade.
Initially, the advance was met with light resistance, as Egyptian intelligence had concluded that it was a diversion for the main attack. However, as Gonen’s lead battalion advanced, it suddenly came under intense fire and took heavy losses. A second battalion was brought up, but was also pinned down. Meanwhile, the 60th Brigade became bogged down in the sand, while the paratroopers had trouble navigating through the dunes. The Israelis continued to press their attack, and despite heavy losses, cleared the Egyptian positions and reached the Khan Yunis railway junction in little over four hours.
Gonen’s brigade then advanced nine miles to Rafah in twin columns. Rafah itself was circumvented, and the Israelis attacked Sheikh Zuweid, eight miles to the southwest, which was defended by two brigades. Though inferior in numbers and equipment, the Egyptians were deeply entrenched and camouflaged. The Israelis were pinned down by fierce Egyptian resistance, and called in air and artillery support to enable their lead elements to advance. Many Egyptians abandoned their positions after their commander and several of his staff were killed.
The Israelis broke through with tank-led assaults. However, Aviram’s forces misjudged the Egyptians’ flank, and were pinned between strongholds before they were extracted after several hours. By nightfall, the Israelis had finished mopping up resistance. Israeli forces had taken significant losses, with Colonel Gonen later telling reporters that “we left many of our dead soldiers in Rafah, and many burnt-out tanks.” The Egyptians suffered some 2,000 casualties and lost 40 tanks.
Advance on Arish
Israeli reconnaissance forces from the “Shaked” unit in Sinai during the war.
On June 5, with the road open, Israeli forces continued advancing towards Arish. Already by late afternoon, elements of the 79th Armored Battalion had charged through the seven-mile long Jiradi defile, a narrow pass defended by well-emplaced troops of the Egyptian 112th Infantry Brigade. In fierce fighting, which saw the pass change hands several times, the Israelis charged through the position. The Egyptians suffered heavy casualties and tank losses, while Israeli losses stood at 66 dead, 93 wounded and 28 tanks.
Emerging at the western end, Israeli forces advanced to the outskirts of Arish.As it reached the outskirts of Arish, Tal’s division also consolidated its hold on Rafah and Khan Yunis.
The following day, June 6, the Israeli forces on the outskirts of Arish were reinforced by the 7th Brigade, which fought its way through the Jiradi pass. After receiving supplies via an airdrop, the Israelis entered the city and captured the airport at 7:50 am. The Israelis entered the city at 8:00 am. Company commander Yossi Peled recounted that “Al-Arish was totally quiet, desolate. Suddenly, the city turned into a madhouse. Shots came at us from every alley, every corner, every window and house.” An IDF record stated that “clearing the city was hard fighting.
The Egyptians fired from the rooftops, from balconies and windows. They dropped grenades into our half-tracks and blocked the streets with trucks. Our men threw the grenades back and crushed the trucks with their tanks.” Gonen sent additional units to Arish, and the city was eventually taken.
Brigadier-General Avraham Yoffe‘s assignment was to penetrate Sinai south of Tal’s forces and north or Sharon’s. Yoffe’s attack allowed Tal to complete the capture of the Jiradi defile, Khan Yunis. All of them were taken after fierce fighting. Gonen subsequently dispatched a force of tanks, infantry and engineers under Colonel Yisrael Granit to continue down the Mediterranean coast towards the Suez Canal, while a second force led by Gonen himself turned south and captured Bir Lahfan and Jabal Libni.
Further south, on June 6, the Israeli 38th Armored Division under Major-General Ariel Sharon assaulted Um-Katef, a heavily fortified area defended by the Egyptian 2nd Infantry Division under Major-General Sa’adi Nagib, and consisting of some 16,000 troops. The Egyptians also had a battalion of tank destroyers and a tank regiment, formed of Soviet World War II armour, which included 90 T-34-85 tanks, 22 SU-100 tank destroyers, and about 16,000 men. The Israelis had about 14,000 men and 150 post-World War II tanks including the AMX-13, Centurions, and M50 Super Shermans (modified M-4 Sherman tanks).
Two armoured brigades in the meantime, under Avraham Yoffe, slipped across the border through sandy wastes that Egypt had left undefended because they were considered impassable. Simultaneously, Sharon’s tanks from the west were to engage Egyptian forces on Um-Katef ridge and block any reinforcements. Israeli infantry would clear the three trenches, while heliborne paratroopers would land behind Egyptian lines and silence their artillery. An armoured thrust would be made at al-Qusmaya to unnerve and isolate its garrison.
Israeli Armor of the Six Day War: pictured here the AMX 13
As Sharon’s division advanced into the Sinai, Egyptian forces staged successful delaying actions at Tarat Umm, Umm Tarfa, and Hill 181. An Israeli jet was downed by anti-aircraft fire, and Sharon’s forces came under heavy shelling as they advanced from the north and west. The Israeli advance, which had to cope with extensive minefields, took a large number of casualties. A column of Israeli tanks managed to penetrate the northern flank of Abu Ageila, and by dusk, all units were in position.
The Israelis then brought up ninety 105 mm and 155 mm artillery guns for a preparatory barrage, while civilian buses brought reserve infantrymen under Colonel Yekutiel Adam and helicopters arrived to ferry the paratroopers. These movements were unobserved by the Egyptians, who were preoccupied with Israeli probes against their perimeter.
As night fell, the Israeli assault troops lit flashlights, each battalion a different color, to prevent friendly fire incidents. At 10:00 pm, Israeli artillery began a barrage on Um-Katef, firing some 6,000 shells in less than twenty minutes, the most concentrated artillery barrage in Israel’s history.
Israeli tanks assaulted the northernmost Egyptian defenses and were largely successful, though an entire armoured brigade was stalled by mines, and had only one mine-clearance tank. Israeli infantrymen assaulted the triple line of trenches in the east. To the west, paratroopers commanded by Colonel Danny Matt landed behind Egyptian lines, though half the helicopters got lost and never found the battlefield, while others were unable to land due to mortar fire.
Those that successfully landed on target destroyed Egyptian artillery and ammunition dumps and separated gun crews from their batteries, sowing enough confusion to significantly reduce Egyptian artillery fire. Egyptian reinforcements from Jabal Libni advanced towards Um-Katef to counterattack, but failed to reach their objective, being subjected to heavy air attacks and encountering Israeli lodgements on the roads. Egyptian commanders then called in artillery attacks on their own positions. The Israelis accomplished and sometimes exceeded their overall plan, and had largely succeeded by the following day. The Egyptians took heavy casualties, while the Israelis lost 40 dead and 140 wounded.
Yoffe’s attack allowed Sharon to complete the capture of the Um-Katef, after fierce fighting. The main thrust at Um-Katef was stalled due to mines and craters. After IDF engineers had cleared a path by 4:00 pm, Israeli and Egyptian tanks engaged in fierce combat, often at ranges as close as ten yards. The battle ended in an Israeli victory, with 40 Egyptian and 19 Israeli tanks destroyed. Meanwhile, Israeli infantry finished clearing out the Egyptian trenches, with Israeli casualties standing at 14 dead and 41 wounded and Egyptian casualties at 300 dead and 100 taken prisoner.
Other Israeli forces
Emblem of the 8th Brigade
Further south, on June 5, the 8th Armored Brigade under Colonel Albert Mandler, initially positioned as a ruse to draw off Egyptian forces from the real invasion routes, attacked the fortified bunkers at Kuntilla, a strategically valuable position whose capture would enable Mandler to block reinforcements from reaching Um-Katef and to join Sharon’s upcoming attack on Nakhl. The defending Egyptian battalion, outnumbered and outgunned, fiercely resisted the attack, hitting a number of Israeli tanks. However, most of the defenders were killed, and only three Egyptian tanks, one of them damaged, survived. By nightfall, Mendler’s forces had taken Kuntilla.
With the exceptions of Rafah and Khan Yunis, Israeli forces had initially avoided entering the Gaza Strip. Israeli Defense Minister Moshe Dayan had expressly forbidden entry into the area. After Palestinian positions in Gaza opened fire on the Negev settlements of Nirim and Kissufim, IDF Chief of Staff Yitzhak Rabin overrode Dayan’s instructions and ordered the 11th Mechanized Brigade under Colonel Yehuda Reshef to enter the Strip. The force was immediately met with heavy artillery fire and fierce resistance from Palestinian forces and remnants of the Egyptian forces from Rafah.
By sunset, the Israelis had taken the strategically vital Ali Muntar ridge, overlooking Gaza City, but were beaten back from the city itself. Some 70 Israelis were killed, along with Israeli journalist Ben Oyserman and American journalist Paul Schutzer. Twelve members of UNEF were also killed. On the war’s second day, June 6, the Israelis were bolstered by the 35th Paratroopers Brigade under Colonel Rafael Eitan, and took Gaza City along with the entire Strip. The fighting was fierce, and accounted for nearly half of all Israeli casualties on the southern front. However, Gaza rapidly fell to the Israelis.
Meanwhile, on June 6, two Israeli reserve brigades under Yoffe, each equipped with 100 tanks, penetrated the Sinai south of Tal’s division and north of Sharon’s, capturing the road junctions of Abu Ageila, Bir Lahfan, and Arish, taking all of them before midnight. Two Egyptian armoured brigades counterattacked, and a fierce battle took place until the following morning. The Egyptians were beaten back by fierce resistance coupled with airstrikes, sustaining heavy tank losses. They fled west towards Jabal Libni.
The Egyptian Army
Egyptian Air Force emblem
During the ground fighting, remnants of the Egyptian Air Force attacked Israeli ground forces, but took losses from the Israeli Air Force and from Israeli anti-aircraft units. Throughout the last four days, Egyptian aircraft flew 150 sorties against Israeli units in the Sinai.
Many of the Egyptian units remained intact and could have tried to prevent the Israelis from reaching the Suez Canal or engaged in combat in the attempt to reach the canal. However, when the Egyptian Field Marshal Abdel Hakim Amer heard about the fall of Abu-Ageila, he panicked and ordered all units in the Sinai to retreat. This order effectively meant the defeat of Egypt.
President Nasser, having learned of the results of the air strike, decided together with Field Marshal Amer to pull out the troops from Sinai within 24 hours. No detailed instructions were given concerning the manner and sequence of withdrawal.
Next fighting days
As Egyptian columns retreated, Israeli aircraft and artillery attacked them. Israeli jets used napalm bombs during their sorties. The attacks destroyed hundreds of vehicles and caused heavy casualties. At Jabal Libni, retreating Egyptian soldiers were fired upon by their own artillery. At Bir Gafgafa, the Egyptians fiercely resisted advancing Israeli forces, knocking out three tanks and eight half-tracks, and killing 20 soldiers. Due to the Egyptians’ retreat, the Israeli High Command decided not to pursue the Egyptian units but rather to bypass and destroy them in the mountainous passes of West Sinai.
Therefore, in the following two days (June 6 and 7), all three Israeli divisions (Sharon and Tal were reinforced by an armoured brigade each) rushed westwards and reached the passes. Sharon’s division first went southward then westward, via An-Nakhl, to Mitla Pass with air support. It was joined there by parts of Yoffe’s division, while its other units blocked the Gidi Pass. These passes became killing grounds for the Egyptians, who ran right into waiting Israeli positions and suffered heavy losses. According to Egyptian diplomat Mahmoud Riad, 10,000 men were killed in one day alone, and many others died from hunger and thirst. Tal’s units stopped at various points to the length of the Suez Canal.
Israel’s blocking action was partially successful. Only the Gidi pass was captured before the Egyptians approached it, but at other places, Egyptian units managed to pass through and cross the canal to safety. Due to the haste of the Egyptian retreat, soldiers often abandoned weapons, military equipment, and hundreds of vehicles. Many Egyptian soldiers were cut off from their units had to walk about 200 kilometers on foot before reaching the Suez Canal with limited supplies of food and water and were exposed to intense heat. Thousands of soldiers died as a result. Many Egyptian soldiers chose instead to surrender to the Israelis. However, the Israelis eventually exceeded their capabilities to provide for prisoners. As a result, they began directing soldiers towards the Suez Canal and only taking prisoner high-ranking officers, who were expected to be exchanged for captured Israeli pilots.
During the offensive, the Israeli Navy landed six combat divers from the Shayetet 13 naval commando unit to infiltrate Alexandria harbour. The divers sank an Egyptian minesweeper before being taken prisoner. Shayetet 13 commandos also infiltrated into Port Said harbour, but found no ships there. A planned commando raid against the Syrian Navy never materialized. Both Egyptian and Israeli warships made movements at sea to intimidate the other side throughout the war, but did not engage each other. However, Israeli warships and aircraft did hunt for Egyptian submarines throughout the war.
On June 7, Israel began the conquest of Sharm el-Sheikh. The Israeli Navy started the operation with a probe of Egyptian naval defenses. An aerial reconnaissance flight found that the area was less defended than originally thought. At about 4:30 am, three Israeli missile boats opened fire on Egyptian shore batteries, while paratroopers and commandos boarded helicopters and Nord Noratlas transport planes for an assault on Al-Tur, as Chief of Staff Rabin was convinced it was too risky to land them directly in Sharm el-Sheikh.
However, the city had been largely abandoned the day before, and reports from air and naval forces finally convinced Rabin to divert the aircraft to Sharm el-Sheikh. There, the Israelis engaged in a pitched battle with the Egyptians and took the city, killing 20 Egyptian soldiers and taking 8 prisoner. At 12:15 pm, Defense Minister Dayan announced that the Straits of Tiran constituted an international waterway open to all ships without restriction.
On June 8, Israel completed the capture of the Sinai by sending infantry units to Ras Sudar on the western coast of the peninsula.
Several tactical elements made the swift Israeli advance possible: first, the surprise attack that quickly gave the Israeli Air Force complete air superiority over the Egyptian Air Force; second, the determined implementation of an innovative battle plan; third, the lack of coordination among Egyptian troops. These factors would prove to be decisive elements on Israel’s other fronts as well.
West Bank
Jordan was reluctant to enter the war. Nasser used the confusion of the first hours of the conflict to convince King Hussein that he was victorious; he claimed as evidence a radar sighting of a squadron of Israeli aircraft returning from bombing raids in Egypt, which he said was an Egyptian aircraft en route to attack Israel. One of the Jordanian brigades stationed in the West Bank was sent to the Hebron area in order to link with the Egyptians. Hussein decided to attack.
The IDF’s strategic plan was to remain on the defensive along the Jordanian front, to enable focus in the expected campaign against Egypt.
Intermittent machine-gun exchanges began taking place in Jerusalem at 9:30 am, and the fighting gradually escalated as the Jordanians introduced mortar and recoilless rifle fire. Under the orders from General Narkis, the Israelis responded only with small-arms fire, firing in a flat trajectory to avoid hitting civilians, holy sites or the Old City. At 10:00 am on June 5, the Jordanian Army began shelling Israel. Two batteries of 155mm Long Tom cannons opened fire on the suburbs of Tel Aviv and Ramat David Airbase. The commanders of these batteries were instructed to lay a two-hour barrage against military and civilian settlements in central Israel. Some shells hit the outskirts of Tel Aviv.
By 10:30 am, Eshkol had sent a message via Odd Bull to King Hussein promising not to initiate any action against Jordan if it stayed out of the war. King Hussein replied that it was too late, “the die was cast“.
At 11:15 am, Jordanian howitzers began a 6,000-shell barrage at Israeli Jerusalem. The Jordanians initially targeted kibbutzRamat Rachel in the south and Mount Scopus in the north, then ranged into the city center and outlying neighborhoods. Military installations, the Prime Minister’s Residence, and the Knesset compound were also targeted. Israeli civilian casualties totalled 20 dead and about 1,000 wounded. Some 900 buildings were damaged, including Hadassah Ein Kerem Hospital.
At 11:50 am, sixteen Jordanian Hawker Hunters attacked Netanya, Kfar Sirkin and Kfar Saba, killing one civilian, wounding seven and destroying a transport plane. Three Iraqi Hawker Hunters strafed civilian settlements in the Jezreel Valley, and an Iraqi Tupolev Tu-16 attacked Afula, and was shot down near the Megiddo airfield. The attack caused minimal material damage, hitting only a senior citizens’ home and several chicken coops, but sixteen Israeli soldiers were killed, most of them when the Tupolev crashed.
When the Israeli cabinet convened to decide what to do, Yigal Allon and Menahem Begin argued that this was an opportunity to take the Old City of Jerusalem, but Eshkol decided to defer any decision until Moshe Dayan and Yitzhak Rabin could be consulted.Uzi Narkiss made a number of proposals for military action, including the capture of Latrun, but the cabinet turned him down. Dayan rejected multiple requests from Narkiss for permission to mount an infantry assault towards Mount Scopus. However, Dayan sanctioned a number of more limited retaliatory actions.
Initial response
Shortly before 12:30 pm, the Israeli Air Force attacked Jordan’s two airbases. The Hawker Hunters were refueling at the time of the attack. The Israeli aircraft attacked in two waves, the first of which cratered the runways and knocked out the control towers, and the second wave destroyed all 21 of Jordan’s Hawker Hunter fighters, along with six transport aircraft and two helicopters. One Israeli jet was shot down by ground fire.
Israeli aircraft also attacked H-3, an Iraqi Air Force base in western Iraq. During the attack, 12 MiG-21s, 2 MiG-17s, 5 Hunter F6s, and 3 Il-28 bombers were destroyed or shot down. A Pakistani pilot stationed at the base shot down an Israeli fighter and a bomber during the raid. The Jordanian radar facility at Ajloun was destroyed in an Israeli airstrike. Israeli Fouga Magister jets attacked the Jordanian 40th Brigade with rockets as it moved south from the Damiya Bridge. Dozens of tanks were knocked out, and a convoy of 26 trucks carrying ammunition was destroyed. In Jerusalem, Israel responded to Jordanian shelling with a missile strike that devastated Jordanian positions. The Israelis used the L missile, a surface-to-surface missile developed jointly with France in secret.
A Jordanian battalion advanced up Government House ridge and dug in at the perimeter of Government House, the headquarters of the United Nations observers, and opened fire on Ramat Rachel, the Allenby Barracks and the Jewish section of Abu Tor with mortars and recoilless rifles. UN observers fiercely protested the incursion into the neutral zone, and several manhandled a Jordanian machine gun out of Government House after the crew had set it up in a second-floor window. After the Jordanians occupied Jabel Mukaber, an advance patrol was sent out and approached Ramat Rachel, where they came under fire from four civilians, including the wife of the director, who were armed with old Czech-made weapons.
Israeli paratroopers flush out Jordanian soldiers from trenches during the Battle of Ammunition Hill.
Silhouette of Israeli paratroops advancing on Ammunition Hill.
The immediate Israeli response was an offensive to retake Government House and its ridge. The Jerusalem Brigade’s Reserve Battalion 161, under Lieutenant-Colonel Asher Dreizin, was given the task. Dreizin had two infantry companies and eight tanks under his command, several of which broke down or became stuck in the mud at Ramat Rachel, leaving three for the assault. The Jordanians mounted fierce resistance, knocking out two tanks.
The Israelis broke through the compound’s western gate and began clearing the building with grenades, before General Odd Bull, commander of the UN observers, compelled the Israelis to hold their fire, telling them that the Jordanians had already fled. The Israelis proceeded to take the Antenna Hill, directly behind Government House, and clear out a series of bunkers to the west and south.
The fighting, often conducted hand-to-hand, continued for nearly four hours before the surviving Jordanians fell back to trenches held by the Hittin Brigade, which were steadily overwhelmed. By 6:30 pm, the Jordanians had retreated to Bethlehem, having suffered about 100 casualties. All but ten of Dreizin’s soldiers were casualties, and Dreizin himself was wounded three times.
Israeli invasion
During the late afternoon of June 5, the Israelis launched an offensive to encircle Jerusalem, which lasted into the following day. During the night, they were supported by intense tank, artillery and mortar fire to soften up Jordanian positions. Searchlights placed atop the Labor Federation building, then the tallest in Israeli Jerusalem, exposed and blinded the Jordanians. The Jerusalem Brigade moved south of Jerusalem, while the mechanized Harel Brigade and 55th Paratroopers Brigade under Mordechai Gur encircled it from the north.
A combined force of tanks and paratroopers crossed no-man’s land near the Mandelbaum Gate. One of Gur’s paratroop battalions approached the fortified Police Academy. The Israelis used bangalore torpedoes to blast their way through barbed wire leading up to the position while exposed and under heavy fire. With the aid of two tanks borrowed from the Jerusalem Brigade, they captured the Police Academy. After receiving reinforcements, they moved up to attack Ammunition Hill.
The Jordanian defenders, who were heavily dug-in, fiercely resisted the attack. All of the Israeli officers except for two company commanders were killed, and the fighting was mostly led by individual soldiers. The fighting was conducted at close quarters in trenches and bunkers, and was often hand-to-hand. The Israelis captured the position after four hours of heavy fighting. During the battle, 36 Israeli and 71 Jordanian soldiers were killed.
The battalion subsequently drove east, and linked up with the Israeli enclave on Mount Scopus and its Hebrew University campus. Gur’s other battalions captured the other Jordanian positions around the American Colony, despite being short on men and equipment and having come under a Jordanian mortar bombardment while waiting for the signal to advance.
At the same time, the mechanized Harel Brigade attacked the fortress at Latrun, which the Jordanians had abandoned due to heavy Israeli tank fire. The brigade attacked Har Adar, but seven tanks were knocked out by mines, forcing the infantry to mount an assault without armoured cover. The Israeli soldiers advanced under heavy fire, jumping between stones to avoid mines. The fighting was conducted at close-quarters, often with knives and bayonets.
The Jordanians fell back after a battle that left two Israeli and eight Jordanian soldiers dead, and Israeli forces advanced through Beit Horon towards Ramallah, taking four fortified villages along the way. By the evening, the brigade arrived in Ramallah. Meanwhile, the 163rd Infantry Battalion secured Abu Tor following a fierce battle, severing the Old City from Bethlehem and Hebron.
Meanwhile, 600 Egyptian commandos stationed in the West Bank moved to attack Israeli airfields. Led by Jordanian intelligence scouts, they crossed the border and began infiltrating through Israeli settlements towards Ramla and Hatzor. They were soon detected and sought shelter in nearby fields, which the Israelis set on fire. Some 450 commandos were killed, and the remainder escaped to Jordan.
From the American Colony, the paratroopers moved towards the Old City. Their plan was to approach it via the lightly defended Salah al-Din Street. However, they made a wrong turn onto the heavily defended Nablus Road. The Israelis ran into fierce resistance. Their tanks fired at point-blank range down the street, while the paratroopers mounted repeated charges. Despite repelling repeated Israeli charges, the Jordanians gradually gave way to Israeli firepower and momentum. The Israelis suffered some 30 casualties – half the original force – while the Jordanians lost 45 dead and 142 wounded.
Meanwhile, the Israeli 71st Battalion breached barbed wire and minefields and emerged near Wadi Joz, near the base of Mount Scopus, from where the Old City could be cut off from Jericho and East Jerusalem from Ramallah. Israeli artillery targeted the one remaining route from Jerusalem to the West Bank, and shellfire deterred the Jordanians from counterattacking from their positions at Augusta-Victoria. An Israeli detachment then captured the Rockefeller Museum after a brief skirmish.
Afterwards, the Israelis broke through to the Jerusalem-Ramallah road. At Tel al-Ful, the Israelis fought a running battle with up to thirty Jordanian tanks. The Jordanians stalled the advance and destroyed a number of half-tracks, but the Israelis launched air attacks and exploited the vulnerability of the external fuel tanks mounted on the Jordanian tanks. The Jordanians lost half their tanks, and retreated towards Jericho. Joining up with the 4th Brigade, the Israelis then descended through Shuafat and the site of what is now French Hill, through Jordanian defenses at Mivtar, emerging at Ammunition Hill.
An Israeli airstrike near the Augusta-Victoria Hospital
With Jordanian defenses in Jerusalem crumbling, elements of the Jordanian 60th Brigade and an infantry battalion were sent from Jericho to reinforce Jerusalem. Its original orders were to repel the Israelis from the Latrun corridor, but due to the worsening situation in Jerusalem, the brigade was ordered to proceed to Jerusalem’s Arab suburbs and attack Mount Scopus. Parallel to the brigade were infantrymen from the Imam Ali Brigade, who were approaching Issawiya. The brigades were spotted by Israeli aircraft and decimated by rocket and cannon fire. Other Jordanian attempts to reinforce Jerusalem were beaten back, either by armoured ambushes or airstrikes.
Fearing damage to holy sites and the prospect of having to fight in built-up areas, Dayan ordered his troops not to enter the Old City. He also feared that Israel would be subjected to a fierce international backlash and the outrage of Christians worldwide if it forced its way into the Old City. Privately, he told David Ben-Gurion that he was also concerned over the prospect of Israel capturing Jerusalem’s holy sites, only to be forced to give them up under the threat of international sanctions.
The Old City (June 7)
On June 7, heavy fighting ensued. Dayan had ordered his troops not to enter the Old City; however, upon hearing that the UN was about to declare a ceasefire, he changed his mind, and without cabinet clearance, decided to capture it. Two paratroop battalions attacked Augusta-Victoria Hill, high ground overlooking the Old City from the east. One battalion attacked from Mount Scopus, and another attacked from the valley between it and the Old City. Another paratroop battalion, personally led by Gur, broke into the Old City, and was joined by the other two battalions after their missions were complete. The paratroopers met little resistance. The fighting was conducted solely by the paratroopers; the Israelis did not use armour during the battle out of fear of severe damage to the Old City.
In the north, one battalion from Peled’s division was sent to check Jordanian defenses in the Jordan Valley. A brigade belonging to Peled’s division captured the western part of the West Bank. One brigade attacked Jordanian artillery positions around Jenin, which were shelling Ramat David Airbase. The Jordanian 12th Armored Battalion, which outnumbered the Israelis, held off repeated attempts to capture Jenin. However, Israeli air attacks took their toll, and the Jordanian M48 Pattons, with their external fuel tanks, proved vulnerable at short distances, even to the Israeli-modified Shermans. Twelve Jordanian tanks were destroyed, and only six remained operational.
David Rubinger‘s famed photograph of IDF paratroopers at Jerusalem‘s Western Wall shortly after its capture. From left to right: Zion Karasenti, Yitzhak Yifat, and Haim Oshri.
Just after dusk, Israeli reinforcements arrived. The Jordanians continued to fiercely resist, and the Israelis were unable to advance without artillery and air support. One Israeli jet attacked the Jordanian commander’s tank, wounding him and killing his radio operator and intelligence officer. The surviving Jordanian forces then withdrew to Jenin, where they were reinforced by the 25th Infantry Brigade. The Jordanians were effectively surrounded in Jenin.
Jordanian infantry and their three remaining tanks managed to hold off the Israelis until 4:00 am, when three battalions arrived to reinforce them in the afternoon. The Jordanian tanks charged, and knocked out multiple Israeli vehicles, and the tide began to shift. After sunrise, Israeli jets and artillery conducted a two-hour bombardment against the Jordanians. The Jordanians lost 10 dead and 250 wounded, and had only seven tanks left, including two without gas, and sixteen APCs. The Israelis then fought their way into Jenin, and captured the city after fierce fighting.
After the Old City fell, the Jerusalem Brigade reinforced the paratroopers, and continued to the south, capturing Judea and Gush Etzion. Hebron was taken without any resistance. Fearful that Israeli soldiers would exact retribution for the 1929 massacre of the city’s Jewish community, Hebron’s residents flew white sheets from their windows and rooftops, and voluntarily gave up their weapons.
The Harel Brigade proceeded eastward, descending to the Jordan River.
On June 7, Israeli forces seized Bethlehem, taking the city after a brief battle that left some 40 Jordanian soldiers dead, with the remainder fleeing. On the same day, one of Peled’s brigades seized Nablus; then it joined one of Central Command’s armoured brigades to fight the Jordanian forces; as the Jordanians held the advantage of superior equipment and were equal in numbers to the Israelis.
Again, the air superiority of the IAF proved paramount as it immobilized the Jordanians, leading to their defeat. One of Peled’s brigades joined with its Central Command counterparts coming from Ramallah, and the remaining two blocked the Jordan river crossings together with the Central Command’s 10th. Engineering Corps sappers blew up the Abdullah and Hussein bridges with captured Jordanian mortar shells, while elements of the Harel Brigade crossed the river and occupied positions along the east bank to cover them, but quickly pulled back due to American pressure. The Jordanians, anticipating an Israeli offensive deep into Jordan, assembled the remnants of their army and Iraqi units in Jordan to protect the western approaches to Amman and the southern slopes of the Golan Heights.
No specific decision had been made to capture any other territories controlled by Jordan. After the Old City was captured, Dayan told his troops to dig in to hold it. When an armoured brigade commander entered the West Bank on his own initiative, and stated that he could see Jericho, Dayan ordered him back. It was only after intelligence reports indicated that Hussein had withdrawn his forces across the Jordan River that Dayan ordered his troops to capture the West Bank.
According to Narkis:
First, the Israeli government had no intention of capturing the West Bank. On the contrary, it was opposed to it. Second, there was not any provocation on the part of the IDF. Third, the rein was only loosened when a real threat to Jerusalem’s security emerged. This is truly how things happened on June 5, although it is difficult to believe. The end result was something that no one had planned.
Golan Heights
The Battle of Golan Heights, June 9–10.
In May–June 1967, the Israeli government did everything in its power to confine the confrontation to the Egyptian front. Eshkol and his colleagues took into account the possibility of some fighting on the Syrian front.
Syria’s attack
False Egyptian reports of a crushing victory against the Israeli army and forecasts that Egyptian forces would soon be attacking Tel Aviv influenced Syria’s decision to enter the war. Syrian artillery began shelling northern Israel, and twelve Syrian jets attacked Israeli settlements in the Galilee. Israeli fighter jets intercepted the Syrian aircraft, shooting down three and driving off the rest.
In addition, two LebaneseHawker Hunter jets, two of the twelve Lebanon had, crossed into Israeli airspace and began strafing Israeli positions in the Galilee. They were intercepted by Israeli fighter jets, and one was shot down.
A minor Syrian force tried to capture the water plants at Tel Dan (the subject of a fierce escalation two years earlier), Dan, and She’ar Yashuv. These attacks were repulsed with the loss of twenty soldiers and seven tanks. An Israeli officer was also killed. But a broader Syrian offensive quickly failed. Syrian reserve units were broken up by Israeli air attacks, and several tanks were reported to have sunk in the Jordan River.
Other problems included tanks being too wide for bridges, lack of radio communications between tanks and infantry, and units ignoring orders to advance. A post-war Syrian army report concluded:
Our forces did not go on the offensive either because they did not arrive or were not wholly prepared or because they could not find shelter from the enemy’s planes. The reserves could not withstand the air attacks; they dispersed after their morale plummeted.
The Syrians abandoned hopes of a ground attack and began a massive bombardment of Israeli communities in the Hula Valley instead.
Israeli Air Force attacks the Syrian airfields
On the evening of June 5, the Israeli Air Force attacked Syrian airfields. The Syrian Air Force lost some 32 MiG 21s, 23 MiG-15 and MiG-17 fighters, and two Ilyushin Il-28 bombers, two-thirds of its fighting strength. The Syrian aircraft that survived the attack retreated to distant bases and played no further role in the war. Following the attack, Syria realised that the news it had received from Egypt of the near-total destruction of the Israeli military could not have been true.
Israelis debate whether the Golan Heights should be attacked
On June 7 and 8, the Israeli leadership debated about whether to attack the Golan Heights as well. Syria had supported pre-war raids that had helped raise tensions and had routinely shelled Israel from the Heights, so some Israeli leaders wanted to see Syria punished. Military opinion was that the attack would be extremely costly, since it would entail an uphill battle against a strongly fortified enemy. The western side of the Golan Heights consists of a rock escarpment that rises 500 meters (1,700 ft) from the Sea of Galilee and the Jordan River, and then flattens to a gently sloping plateau.
Dayan opposed the operation bitterly at first, believing such an undertaking would result in losses of 30,000 and might trigger Soviet intervention. Prime Minister Eshkol, on the other hand, was more open to the possibility, as was the head of the Northern Command, David Elazar, whose unbridled enthusiasm for and confidence in the operation may have eroded Dayan’s reluctance.
Eventually, the situation on the Southern and Central fronts cleared up, intelligence estimated that the likelihood of Soviet intervention had been reduced, reconnaissance showed some Syrian defenses in the Golan region collapsing, and an intercepted cable revealed that Nasser was urging the President of Syria to immediately accept a cease-fire. At 3 am on June 9, Syria announced its acceptance of the cease-fire. Despite this announcement, Dayan became more enthusiastic about the idea and four hours later at 7 am, “gave the order to go into action against Syria” without consultation or government authorisation.
The Syrian army consisted of about 75,000 men grouped in nine brigades, supported by an adequate amount of artillery and armour. Israeli forces used in combat consisted of two brigades (the 8th Armored Brigade and the Golani Brigade) in the northern part of the front at Givat HaEm, and another two (infantry and one of Peled’s brigades summoned from Jenin) in the center. The Golan Heights’ unique terrain (mountainous slopes crossed by parallel streams every several kilometers running east to west), and the general lack of roads in the area channeled both forces along east-west axes of movement and restricted the ability of units to support those on either flank.
Thus the Syrians could move north-south on the plateau itself, and the Israelis could move north-south at the base of the Golan escarpment. An advantage Israel possessed was the excellent intelligence collected by Mossad operative Eli Cohen (who was captured and executed in Syria in 1965) regarding the Syrian battle positions. Syria had built extensive defensive fortifications in depths up to 15 kilometers, comparable to the Maginot Line.
As opposed to all the other campaigns, IAF was only partially effective in the Golan because the fixed fortifications were so effective. However, the Syrian forces proved unable to put up effective defense largely because the officers were poor leaders and treated their soldiers badly; often officers would retreat from danger, leaving their men confused and ineffective. The Israelis also had the upper hand during close combat that took place in the numerous Syrian bunkers along the Golan Heights, as they were armed with the Uzi, a submachine gun designed for close combat, while Syrian soldiers were armed with the heavier AK-47 assault rifle, designed for combat in more open areas.
Israeli attack: first day
On the morning of June 9, Israeli jets began carrying out dozens of sorties against Syrian positions from Mount Hermon to Tawfiq, using rockets salvaged from captured Egyptian stocks. The airstrikes knocked out artillery batteries and storehouses and forced transport columns off the roads. The Syrians suffered heavy casualties and a drop in morale, with a number of senior officers and troops deserting. The attacks also provided time as Israeli forces cleared paths through Syrian minefields. However, the airstrikes did not seriously damage the Syrians’ bunkers and trench systems, and the bulk of Syrian forces on the Golan remained in their positions.
About two hours after the airstrikes began, the 8th Armored Brigade, led by Colonel Albert Mandler, advanced into the Golan Heights from Givat HaEm. Its advance was spearheaded by Engineering Corps sappers and eight bulldozers, which cleared away barbed wire and mines. As they advanced, the force came under fire, and five bulldozers were immediately hit.
The Israeli tanks, with their maneuverability sharply reduced by the terrain, advanced slowly under fire toward the fortified village of Sir al-Dib, with their ultimate objective being the fortress at Qala. Israeli casualties steadily mounted. Part of the attacking force lost its way and emerged opposite Za’ura, a redoubt manned by Syrian reservists.
With the situation critical, Colonel Mandler ordered simultaneous assaults on Za’ura and Qala. Heavy and confused fighting followed, with Israeli and Syrian tanks struggling around obstacles and firing at extremely short ranges. Mandler recalled that “the Syrians fought well and bloodied us. We beat them only by crushing them under our treads and by blasting them with our cannons at very short range, from 100 to 500 meters.” The first three Israeli tanks to enter Qala were stopped by a Syrian bazooka team, and a relief column of seven Syrian tanks arrived to repel the attackers.
The Israelis took heavy fire from the houses, but could not turn back, as other forces were advancing behind them, and they were on a narrow path with mines on either side. The Israelis continued pressing forward, and called for air support.
A pair of Israeli jets destroyed two of the Syrian tanks, and the remainder withdrew. The surviving defenders of Qala retreated after their commander was killed. Meanwhile, Za’ura fell in an Israeli assault, and the Israelis also captured the ‘Ein Fit fortress.
In the central sector, the Israeli 181st Battalion captured the strongholds of Dardara and Tel Hillal after fierce fighting. Desperate fighting also broke out along the operation’s northern axis, where Golani Brigade attacked thirteen Syrian positions, including the formidable Tel Fakhr position. Navigational errors placed the Israelis directly under the Syrians’ guns. In the fighting that followed, both sides took heavy casualties, with the Israelis losing all nineteen of their tanks and half-tracks.
The Israeli battalion commander then ordered his twenty-five remaining men to dismount, divide into two groups, and charge the northern and southern flanks of Tel Fakhr. The first Israelis to reach the perimeter of the southern approach laid bodily down on the barbed wire, allowing their comrades to vault over them. From there, they assaulted the fortified Syrian positions. The fighting was waged at extremely close quarters, often hand-to-hand.
On the northern flank, the Israelis broke through within minutes and cleared out the trenches and bunkers. During the seven-hour battle, the Israelis lost 31 dead and 82 wounded, while the Syrians lost 62 dead and 20 captured. Among the dead was the Israeli battalion commander. The Golani Brigade’s 51st Battalion took Tel ‘Azzaziat, and Darbashiya also fell to Israeli forces.
By the evening of June 9, the four Israeli brigades had all broken through to the plateau, where they could be reinforced and replaced. Thousands of reinforcements began reaching the front, those tanks and half-tracks that had survived the previous day’s fighting were refueled and replenished with ammunition, and the wounded were evacuated. By dawn, the Israelis had eight brigades in the sector.
Syria’s first line of defense had been shattered, but the defenses beyond that remained largely intact. Mount Hermon and the Banias in the north, and the entire sector between Tawfiq and Customs House Road in the south remained in Syrian hands. In a meeting early on the night of June 9, Syrian leaders decided to reinforce those positions as quickly as possible, and to maintain a steady barrage on Israeli civilian settlements.
Israeli attack: the next day
Throughout the night, the Israelis continued their advance. Though it was slowed by fierce resistance, an anticipated Syrian counterattack never materialized. At the fortified village of Jalabina, a garrison of Syrian reservists, leveling their anti-aircraft guns, held off the Israeli 65th Paratroop Battalion for four hours before a small detachment managed to penetrate the village and knock out the heavy guns.
Meanwhile, the 8th Brigade’s tanks moved south from Qala, advancing six miles to Wasit under heavy artillery and tank bombardment. At the Banias in the north, Syrian mortar batteries opened fire on advancing Israeli forces only after Golani Brigade sappers cleared a path through a minefield, killing sixteen Israeli soldiers and wounding four.
On the next day, June 10, the central and northern groups joined in a pincer movement on the plateau, but that fell mainly on empty territory as the Syrian forces retreated. At 8:30 am, the Syrians began blowing up their own bunkers, burning documents and retreating. Several units joined by Elad Peled’s troops climbed to the Golan from the south, only to find the positions mostly empty. When the 8th Brigade reached Mansura, five miles from Wasit, the Israelis met no opposition and found abandoned equipment, including tanks, in perfect working condition. In the fortified Banias village, Golani Brigade troops found only several Syrian soldiers chained to their positions.
During the day, the Israeli units stopped after obtaining manoeuvre room between their positions and a line of volcanic hills to the west. In some locations, Israeli troops advanced after an agreed-upon cease-fire to occupy strategically strong positions. To the east, the ground terrain is an open gently sloping plain. This position later became the cease-fire line known as the “Purple Line“.
“In an effort to pressure the United Nations into enforcing a ceasefire, Damascus Radio undercut its own army by broadcasting the fall of the city of Quneitra three hours before it actually capitulated. That premature report of the surrender of their headquarters destroyed the morale of the Syrian troops left in the Golan area.”
Conclusion
By June 10, Israel had completed its final offensive in the Golan Heights, and a ceasefire was signed the day after. Israel had seized the Gaza Strip, the Sinai Peninsula, the West Bank of the Jordan River (including East Jerusalem), and the Golan Heights. About one million Arabs were placed under Israel’s direct control in the newly captured territories. Israel’s strategic depth grew to at least 300 kilometers in the south, 60 kilometers in the east, and 20 kilometers of extremely rugged terrain in the north, a security asset that would prove useful in the Yom Kippur War six years later.
Speaking three weeks after the war ended, as he accepted an honorary degree from Hebrew University, Yitzhak Rabin gave his reasoning behind the success of Israel:
Our airmen, who struck the enemies’ planes so accurately that no one in the world understands how it was done and people seek technological explanations or secret weapons; our armoured troops who beat the enemy even when their equipment was inferior to his; our soldiers in all other branches … who overcame our enemies everywhere, despite the latter’s superior numbers and fortifications—all these revealed not only coolness and courage in the battle but … an understanding that only their personal stand against the greatest dangers would achieve victory for their country and for their families, and that if victory was not theirs the alternative was annihilation.
In recognition of contributions, Rabin was given the honour of naming the war for the Israelis. From the suggestions proposed, including the “War of Daring”, “War of Salvation”, and “War of the Sons of Light”, he “chose the least ostentatious, the Six-Day War, evoking the days of creation”.
Dayan’s final report on the war to the Israeli general staff listed several shortcomings in Israel’s actions, including misinterpretation of Nasser’s intentions, overdependence on the United States, and reluctance to act when Egypt closed the Straits. He also credited several factors for Israel’s success: Egypt did not appreciate the advantage of striking first and their adversaries did not accurately gauge Israel’s strength and its willingness to use it.
In Egypt, according to Heikal, Nasser had admitted his responsibility for the military defeat in June 1967.According to historian Abd al-Azim Ramadan, Nasser’s mistaken decisions to expel the international peacekeeping force from the Sinai Peninsula and close the Straits of Tiran in 1967 led to a state of war with Israel, despite Egypt’s lack of military preparedness.
After the 1973 Yom Kippur War, Egypt reviewed the causes of its loss of the 1967 war. Issues that were identified included “the individualistic bureaucratic leadership”; “promotions on the basis of loyalty, not expertise, and the army’s fear of telling Nasser the truth”; lack of intelligence; and better Israeli weapons, command, organization, and will to fight.
Casualties
Between 776 and 983 Israelis were killed and 4,517 were wounded. 15 Israeli soldiers were captured. Arab casualties were far greater. Between 9,800 and 15,000 Egyptian soldiers were listed as killed or missing in action. An additional 4,338 Egyptian soldiers were captured.
Jordanian losses are estimated to be 6,000 killed or missing and 533 captured, though Gawrych cites a number of some 700 killed in action with another 2,500 wounded.The Syrians were estimated to have sustained between 1,000 and 2,500 killed in action. Between 367 and 591 Syrians were captured.
Controversies
Preemptive strike v. unjustified attack
At the commencement of hostilities, both Egypt and Israel announced that they had been attacked by the other country. The Israeli government later abandoned its initial position, acknowledging Israel had struck first, claiming that it was a preemptive strike in the face of a planned invasion by Egypt.
On the other hand, the Arab view was that it was unjustified to attack Egypt. Many commentators consider the war as the classic case of anticipatory attack in self-defense.
Allegations of atrocities against Egyptian soldiers
It has been alleged that Nasser did not want Egypt to learn of the true extent of his defeat and so ordered the killing of Egyptian army stragglers making their way back to the Suez canal zone. There have also been allegations from both Israeli and Egyptian sources that Israeli troops killed unarmed Egyptian prisoners.
Allegations of military support from the US, UK and Soviet Union
There have been a number of allegations of direct military support of Israel during the war by the US and the UK, including the supply of equipment (despite an embargo) and the participation of US forces in the conflict. Many of these allegations and conspiracy theorieshave been disputed and it has been claimed that some were given currency in the Arab world to explain the Arab defeat. It has also been claimed that the Soviet Union, in support of its Arab allies, used its naval strength in the Mediterranean to act as a major restraint on the US Navy.
America features prominently in Arab conspiracy theories purporting to explain the June 1967 defeat. Mohamed Hassanein Heikal, a confidant of Nasser, claims that President Lyndon B. Johnson was obsessed with Nasser and that Johnson conspired with Israel to bring him down. The reported Israeli troop movements seemed all the more threatening because they were perceived in the context of a US conspiracy against Egypt. Salah Bassiouny of the Foreign ministry, claims that Foreign Ministry saw the reported Israeli troop movements as credible because Israel had reached the level at which it could find strategic alliance with the United States.
During the war, Cairo announced that American and British planes were participating in the Israeli attack. Nasser broke off diplomatic relations following this allegation. Nasser’s image of the United States was such that he might well have believed the worst. However Anwar Sadat implied that Nasser used this deliberate conspiracy in order to accuse the United States as a political cover-up for domestic consumption.
Lutfi Abd al-Qadir, the director of Radio Cairo during the late 1960s, who accompanied Nasser to his visits in Moscow, had his conspiracy theory that both the Soviets and the Western powers wanted to topple Nasser or to reduce his influence.
USS Liberty incident
On June 8, 1967, USS Liberty, a United States Navyelectronic intelligence vessel sailing 13 nautical miles (24 km) off Arish (just outside Egypt’s territorial waters), was attacked by Israeli jets and torpedo boats, nearly sinking the ship, killing 34 sailors and wounding 171. Israel said the attack was a case of mistaken identity, and that the ship had been misidentified as the Egyptian vessel El Quseir.
Israel apologized for the mistake, and paid compensation to the victims or their families, and to the United States for damage to the ship. After an investigation, the U.S. accepted the explanation that the incident was friendly fire and the issue was closed by the exchange of diplomatic notes in 1987. Others however, including the then United States Secretary of StateDean Rusk, Chief of Naval Operations at the time, Admiral Thomas Moorer, some survivors of the attack and intelligence officials familiar with transcripts of intercepted signals on the day, have rejected these conclusions as unsatisfactory and maintain that the attack was made in the knowledge that the ship was American.
Aftermath
The political importance of the 1967 War was immense; Israel demonstrated that it was able and willing to initiate strategic strikes that could change the regional balance. Egypt and Syria learned tactical lessons and would launch an attack in 1973 in an attempt to reclaim their lost territory.
After following other Arab nations in declaring war, Mauritania remained in a declared state of war with Israel until about 1999.
The United States imposed an embargo on new arms agreements to all Middle East countries, including Israel. The embargo remained in force until the end of the year, despite urgent Israeli requests to lift it.
Israel and Zionism
Following the war, Israel experienced a wave of national euphoria, and the press praised the military’s performance for weeks afterward. New “victory coins” were minted to celebrate. In addition, the world’s interest in Israel grew, and the country’s economy, which had been in crisis before the war, flourished due to an influx of tourists and donations, as well as the extraction of oil from the Sinai’s wells.
The aftermath of the war is also of religious significance. Under Jordanian rule, Jews were expelled from Jerusalem and were effectively barred from visiting the Western Wall (even though Article VIII of the 1949 Armistice Agreement demanded Israeli Jewish access to the Western Wall).
Jewish holy sites were not maintained, and Jewish cemeteries had been desecrated. After the annexation to Israel, each religious group was granted administration over its holy sites. For the first time since 1948, Jews could visit the Old City of Jerusalem and pray at the Western Wall, the holiest site where Jews are permitted to pray.
Despite the Temple Mount being the most important holy site in Jewish tradition, the al-Aqsa Mosque has been under sole administration of the Jordanian Muslim Waqf, and Jews are barred from praying on the Temple Mount, although they are allowed to visit it.[156][157] In Hebron, Jews gained access to the Cave of the Patriarchs (the second most holy site in Judaism, after the Temple Mount) for the first time since the 14th century (previously Jews were allowed to pray only at the entrance).
Other Jewish holy sites, such as Rachel’s Tomb in Bethlehem and Joseph’s Tomb in Nablus, also became accessible.
The war inspired the Jewish diaspora, which was swept up in overwhelming support for Israel. According to Michael Oren, the war enabled American Jews to
“walk with their backs straight and flex their political muscle as never before. American Jewish organizations which had previously kept Israel at arms length suddenly proclaimed their Zionism.”
Record numbers of Jewish immigrants arrived from Western countries after the war, although many of them would later return to their countries of origin
.Most notably, the war stirred Zionist passions among Jews in the Soviet Union, who had by that time been forcibly assimilated. Many Soviet Jews subsequently applied for exit visas and began protesting for their right to immigrate to Israel. Following diplomatic pressure from the West, the Soviet government began granting exit visas to Jews in growing numbers. From 1970 to 1988, some 291,000 Soviet Jews were granted exit visas, of whom 165,000 immigrated to Israel and 126,000 immigrated to the United States.
Jews in Arab countries-Pogroms and expulsion
In the Arab nations, populations of minority Jews faced persecution and expulsion following the Israeli victory. According to historian and ambassador Michael B. Oren:
Mobs attacked Jewish neighborhoods in Egypt, Yemen, Lebanon, Tunisia, and Morocco, burning synagogues and assaulting residents. A pogrom in Tripoli, Libya, left 18 Jews dead and 25 injured; the survivors were herded into detention centers. Of Egypt’s 4,000 Jews, 800 were arrested, including the chief rabbis of both Cairo and Alexandria, and their property sequestered by the government. The ancient communities of Damascus and Baghdad were placed under house arrest, their leaders imprisoned and fined. A total of 7,000 Jews were expelled, many with merely a satchel.
Antisemitism against Jews in Communist countries
Following the war, a series of antisemitic purges began in Communist countries. Some 11,200 Jews from Poland immigrated to Israel during the 1968 Polish political crisis and the following year.
Peace and diplomacy
Following the war, Israel made an offer for peace that included the return of most of the recently captured territories. According to Chaim Herzog:
On June 19, 1967, the National Unity Government [of Israel] voted unanimously to return the Sinai to Egypt and the Golan Heights to Syria in return for peace agreements. The Golans would have to be demilitarized and special arrangement would be negotiated for the Straits of Tiran. The government also resolved to open negotiations with King Hussein of Jordan regarding the Eastern border.
The June 19 Israeli cabinet decision did not include the Gaza Strip, and left open the possibility of Israel permanently acquiring parts of the West Bank. On June 25–27, Israel incorporated East Jerusalem together with areas of the West Bank to the north and south into Jerusalem’s new municipal boundaries.
The Israeli decision was to be conveyed to the Arab nations by the United States. The U.S. was informed of the decision, but not that it was to transmit it. There is no evidence of receipt from Egypt or Syria, and some historians claim that they may never have received the offer.
In September, the Khartoum Arab Summit resolved that there would be “no peace, no recognition and no negotiation with Israel”. However, as Avraham Sela notes, the Khartoum conference effectively marked a shift in the perception of the conflict by the Arab states away from one centered on the question of Israel’s legitimacy, toward one focusing on territories and boundaries. This was shown on November 22 when Egypt and Jordan accepted United Nations Security Council Resolution 242.
Nasser forestalled any movement toward direct negotiations with Israel. In dozens of speeches and statements, Nasser posited the equation that any direct peace talks with Israel were tantamount to surrender.
After the war, the entire Soviet bloc of Eastern Europe (with the exception of Romania) broke off diplomatic relations with Israel.
The 1967 War laid the foundation for future discord in the region, as the Arab states resented Israel’s victory and did not want to give up territory.
On November 22, 1967, the United Nations Security Council adopted Resolution 242, the “land for peace” formula, which called for Israeli withdrawal “from territories occupied” in 1967 and “the termination of all claims or states of belligerency”. Resolution 242 recognized the right of “every state in the area to live in peace within secure and recognized boundaries free from threats or acts of force.” Israel returned the Sinai to Egypt in 1978, after the Camp David Accords, and disengaged from the Gaza Strip in the summer of 2005. Its army frequently re-enters Gaza for military operations and still retains control of the seaports, airports and most of the border crossings.
Captured territories and Arab displaced populations
There was extensive displacement of populations in the captured territories: of about one million Palestinians in the West Bank and Gaza, 300,000 (according to the United States Department of State) either fled, or were displaced from their homes, to Jordan, where they contributed to the growing unrest.
The other 700,000 remained. In the Golan Heights, an estimated 80,000 Syrians fled. Israel allowed only the inhabitants of East Jerusalem and the Golan Heights to receive full Israeli citizenship, applying its law, administration and jurisdiction to these territories in 1967 and 1981, respectively. The vast majority of the populations in both territories declined to take citizenship. See also Israeli–Palestinian conflict and Golan Heights.
In three villages southwest of Jerusalem and at Qalqilya, houses were destroyed “not in battle, but as punishment … and in order to chase away the inhabitants … contrary to government … policy,” Dayan wrote in his memoirs. In Qalqilya, about a third of the homes were razed and about 12,000 inhabitants were evicted, though many then camped out in the environs. The evictees in both areas were allowed to stay and later were given cement and tools by the Israeli authorities to rebuild at least some of their dwellings.
But many thousands of other Palestinians now took to the roads. Perhaps as many as seventy thousand, mostly from the Jericho area, fled during the fighting; tens of thousands more left over the following months. Altogether, about one-quarter of the population of the West Bank, about 200–250,000 people, went into exile. … They simply walked to the Jordan River crossings and made their way on foot to the East Bank. It is unclear how many were intimidated or forced out by the Israeli troops and how many left voluntarily, in panic and fear. There is some evidence of IDF soldiers going around with loudspeakers ordering West Bankers to leave their homes and cross the Jordan. Some left because they had relatives or sources of livelihood on the East Bank and feared being permanently cut off.
Thousands of Arabs were taken by bus from East Jerusalem to the Allenby Bridge, though there is no evidence of coercion. The free Israeli-organized transportation, which began on June 11, 1967, went on for about a month. At the bridge they had to sign a document stating that they were leaving of their own free will. Perhaps as many as 70,000 people emigrated from the Gaza Strip to Egypt and elsewhere in the Arab world.
On July 2, the Israeli government announced that it would allow the return of those 1967 refugees who desired to do so, but no later than August 10, later extended to September 13. The Jordanian authorities probably pressured many of the refugees, who constituted an enormous burden, to sign up to return. In practice only 14,000 of the 120,000 who applied were allowed by Israel back into the West Bank by the beginning of September. After that, only a trickle of “special cases” were allowed back, perhaps 3,000 in all. (328–29)
In addition, between 80,000 and 110,000 Syrians fled the Golan Heights, of which about 20,000 were from the city of Quneitra. According to more recent research by the Israeli daily Haaretz, a total of 130,000 Syrian inhabitants fled or were expelled from the territory, most of them pushed out by the Israeli army.
Long term
Israel made peace with Egypt following the Camp David Accords of 1978 and completed a staged withdrawal from the Sinai in 1982. However, the position of the other occupied territories has been a long-standing and bitter cause of conflict for decades between Israel and the Palestinians, and the Arab world in general.
Jordan and Egypt eventually withdrew their claims to sovereignty over the West Bank and Gaza, respectively. (The Sinai was returned to Egypt on the basis of the Camp David Accords of 1978.) Israel and Jordan signed a peace treaty in 1994.
After the Israeli conquest of these newly acquired ‘territories’, it launched a large settlement effort in these areas to secure a permanent foothold. There are now hundreds of thousands of Israeli settlers in the West Bank. They are a matter of controversy within Israel, both among the general population and within different political administrations, supporting them to varying degrees. Palestinians consider them a provocation.
The Armenian Genocide (Armenian: Հայոց ցեղասպանություն, Hayots tseghaspanutyun), also known as the Armenian Holocaust, was the Muslim Ottoman government‘s systematic extermination of 1.5 million Armenian Christians,mostly Ottoman citizens within the Ottoman Empire and its successor state, the Republic of Turkey. The starting date is conventionally held to be 24 April 1915, the day that Ottoman authorities rounded up, arrested, and deported 235 to 270 Armenian intellectuals and community leaders from Constantinople to the region of Ankara, the majority of whom were eventually murdered.
The genocide was carried out during and after World War I and implemented in two phases: the wholesale killing of the able-bodied male population through massacre and subjection of army conscripts to forced labour, followed by the deportation of women, children, the elderly, and the infirm on death marches leading to the Syrian desert. Driven forward by military escorts, the deportees were deprived of food and water and subjected to periodic robbery, rape, and massacre.
Other indigenous and Christian ethnic groups such as the Assyrians and the Ottoman Greeks were similarly targeted for extermination by the Ottoman government in the Assyrian genocide and the Greek genocide, and their treatment is considered by some historians to be part of the same genocidal policy. Most Armenian diaspora communities around the world came into being as a direct result of the genocide.
Raphael Lemkin was explicitly moved by the Armenian annihilation to define systematic and premeditated exterminations within legal parameters and to coin the word genocide in 1943. The Armenian Genocide is acknowledged to have been one of the first modern genocides, because scholars point to the organized manner in which the killings were carried out in order to eliminate the Armenians, and it is the second most-studied case of genocide after the Holocaust.
Turkey, the successor state of the Ottoman Empire, denies the word genocide as an accurate term for the mass killings of Armenians that began under Ottoman rule in 1915. It has in recent years been faced with repeated calls to recognize them as genocide. To date, 29 countries have officially recognized the mass killings as genocide, as have most genocide scholars and historians.
The dictator was killed along his mistress , Clara Petacci. Their bodies were taken to Milan from the Lecco district near Lake Como where they were arrested and killed.
According to the Times correspondent in Milan, the corpses of Mussolini, Petacci and 12 Fascists are on display in Piazzale Loreto “with ghastly promiscuity in the open square under the same fence against which one year ago 15 partisans had been shot by their own countrymen”.
Clara Petacci
One woman fired five shots into Mussolini’s body, according to Milan Radio, and shouted: “Five shots for my five assassinated sons!”
Other passers-by spat on the bodies
The executions are the first conspicuous demonstration of mob violence carried out by the partisans who until now have been kept under control by their leaders.
The partisan commander-in-chief General Raffaele Cadorna said such incidents were regrettable but desirable in this case as a way for the public to vent their anger against the former dictator and his cohorts.
Among the bodies were former general secretary of the Fascist Party, Roberto Farinacci and Carlo Scorza, former secretary of the party.
Mussolini was spotted heading towards Switzerland by an Italian customs guard at Dongo, near Lake Como. He was driving a car in a column of other German cars wearing a German greatcoat over his uniform.
Other members of his party were found in neighbouring villages.
It was in Milan that Mussolini founded Europe’s first fascist movement – Fasci di Combattimento – in 1919.
He came to power in 1922 after the so-called March on Rome.
By 1928 Mussolini was absolute dictator and took the title of Duce, leader, and embarked on an expansionist foreign policy taking Ethiopia in 1935 and annexing Albania in 1939. That same year Mussolini signed a Tripartite Pact with Adolf Hitler’s Germany and Imperial Japan.
After defeats in Greece, the Balkans, North Africa and Russia, Mussolini lost popularity. Then on 9 July 1943 the Allies landed in Sicily and Italy was faced with an invasion of its mainland.
Mussolini failed to secure assurances from Germany of adequate support against such an invasion and the Fascist Grand Council turned against him and had him arrested on 25 July.
Marshal Pietro Badoglio was appointed prime minister, dissolved fascist organisations and negotiated an armistice with the Allies.
Six weeks later the Germans launched a dramatic rescue of Mussolini. He was made head of the puppet republic of Salo – also known as the Italian Social Republic – once the Germans had occupied northern Italy in September 1943.
On 11 October 1943 the Badoglio government declared war on Germany
The events began with a ceremony attended by Canadian PM Justin Trudeau and French President Francois Hollande.
About 25,000 people, including relatives of those who fought in the battle, are attending the commemorations at the Canadian National Memorial on the battlefield near Arras.
Many historians and writers consider the Canadian victory at Vimy a defining moment for Canada, when the country emerged from under the shadow of Britain and felt capable of greatness. Canadian troops also earned a reputation as formidable, effective troops because of the stunning success. But it was a victory at a terrible cost, with more than 10,000 killed and wounded.
The Canadian Corps was ordered to seize Vimy Ridge in April 1917. [Map] Situated in northern France, the heavily-fortified seven-kilometre ridge held a commanding view over the Allied lines. The Canadians would be assaulting over an open graveyard since previous French attacks had failed with over 100,000 casualties.
Naval 12 inch howitzer in action
To capture this difficult position, the Canadians would carefully plan and rehearse their attack. To provide greater flexibility and firepower in battle, the infantry were given specialist roles as machine-gunners, rifle-men and grenade-throwers. These same soldiers underwent weeks of training behind the lines using models to represent the battlefield, and new maps crafted from aerial photographs to guide their way. To bring men forward safely for the assault, engineers dug deep tunnels from the rear to the front. Despite this training and preparation, the key to victory would be a devastating artillery barrage that would not only isolate enemy trenches, but provide a moving wall of high explosives and shrapnel to force the Germans to stay in their deep dugouts and away from their machine-guns. “Chaps, you shall go over exactly like a railroad train, on time, or you shall be annihilated,” warned Canadian Corps commander Sir Julian Byng.
In the week leading up to the battle, Canadian and British artillery pounded the enemy positions on the ridge, killing and tormenting defenders. New artillery tactics allowed the gunners to first target, then destroy enemy positions. A nearly limitless supply of artillery shells and the new 106 fuse, which allowed shells to explode on contact, as opposed to burying themselves in ground, facilitated the destruction of hardened defences and barbed wire. The Canadian infantry would be well supported when it went into battle with over 1,000 artillery pieces laying down withering, supportive fire.
Taking Vimy Ridge, advancing with tank class=
Attacking together for the first time, the four Canadian divisions stormed the ridge at 5:30am on 9 April 1917. More than 15,000 Canadian infantry overran the Germans all along the front. Incredible bravery and discipline allowed the infantry to continue moving forward under heavy fire, even when their officers were killed.There were countless acts of sacrifice, as Canadians single-handedly charged machine-gun nests or forced the surrender of Germans in protective dugouts. Hill 145, the highest and most important feature of the Ridge, and where the Vimy monument now stands, was captured in a frontal bayonet charge against machine-gun positions. Three more days of costly battle delivered final victory. The Canadian operation was an important success, even if the larger British and French offensive, of which it had been a part, had failed. But it was victory at a heavy cost: 3,598 Canadians were killed and another 7,000 wounded.
The capture of Vimy was more than just an important battlefield victory. For the first time all four Canadian divisions attacked together: men from all regions of Canada were present at the battle. Brigadier-General A.E. Ross declared after the war, “in those few minutes I witnessed the birth of a nation.” Canadians Returning from Vimy Ridge 1917, First World War
The Battle of Vimy Ridge was a military engagement fought primarily as part of the Battle of Arras, in the Nord-Pas-de-Calais region of France, during the First World War. The main combatants were the Canadian Corps, of four divisions, against three divisions of the German Sixth Army. The battle, which took place from 9 to 12 April 1917, was part of the opening phase of the British-led Battle of Arras, a diversionary attack for the French Nivelle Offensive.
The objective of the Canadian Corps was to take control of the German-held high ground along an escarpment at the northernmost end of the Arras Offensive. This would ensure that the southern flank could advance without suffering German enfilade fire. Supported by a creeping barrage, the Canadian Corps captured most of the ridge during the first day of the attack. The town of Thélus fell during the second day of the attack, as did the crest of the ridge once the Canadian Corps overcame a salient against considerable German resistance. The final objective, a fortified knoll located outside the village of Givenchy-en-Gohelle, fell to the Canadian Corps on 12 April. The German forces then retreated to the Oppy–Méricourt line.
Historians attribute the success of the Canadian Corps in capturing the ridge to a mixture of technical and tactical innovation, meticulous planning, powerful artillery support and extensive training, as well as the failure of the German Sixth Army to properly apply the new German defensive doctrine. The battle was the first occasion when all four divisions of the Canadian Expeditionary Force participated in a battle together and it was made a symbol of Canadian national achievement and sacrifice. Recent historical research[5] has called this patriotic narrative into question, showing that it developed in the latter part of the twentieth century. The nation-building story only emerged fully formed after most of those who experienced the Great War directly or indirectly had passed from the scene. A 100-hectare (250-acre) portion of the former battleground serves as a memorial park and site of the Canadian National Vimy Memorial
Footage has emerged of an intriguing network of caves found through a rabbit hole that many believe were built by the Knights Templar order 700 years ago.
The sanctuary in Shropshire is located under an unassuming set of what appear to be large rabbit holes in a farmer’s field near the town of Shifnal.
The caves, some of which have to be accessed on hands and knees, are one metre underground and are carved out of sandstone. They feature several alcoves and a font.
It remains unclear exactly what the caves were used for or when they were built, but Historic England describes them as a “grotto” and states it appears they have recently been used for “black magic rites”
Photographer Michael Scott said: “I traipsed over a field to find it, but if you didn’t know it was there you would just walk right past it. Considering how long it’s been there it’s in amazing condition, it’s like an underground temple.”
“I had to crouch down and once I was in it was completely silent. There were a few spiders in there but that was it. It was raining so the slope down was quite sludgy but inside the cave was bone dry.”
The Poor Fellow-Soldiers of Christ and of the Temple of Solomon (Latin: Pauperes commilitones Christi Templique Salomonici), also known as the Order of Solomon’s Temple (French: Ordre du Temple or Templiers, Arabic: فرسان الهيكل), the Knights Templar, or simply as Templars, was a Christian military order recognised in 1139 by papal bullOmne Datum Optimum of the Holy See.[4] The order was founded in 1119 and active from about 1129 to 1312.
The order, which was among the wealthiest and most powerful, became a favoured charity throughout Christendom and grew rapidly in membership and power. They were prominent in Christian finance. Templar knights, in their distinctive white mantles with a red cross, were among the most skilled fighting units of the Crusades.
Non-combatant members of the order managed a large economic infrastructure throughout Christendom, developing innovative financial techniques that were an early form of banking, and building fortifications across Europe and the Holy Land.
The Templars were closely tied to the Crusades; when the Holy Land was lost, support for the order faded. Rumours about the Templars’ secret initiation ceremony created distrust, and King Philip IV of France – deeply in debt to the order – took advantage of the situation to gain control over them. In 1307, he had many of the order’s members in France arrested, tortured into giving false confessions, and burned at the stake.
Pope Clement V disbanded the order in 1312 under pressure from King Philip.
The abrupt reduction in power of a significant group in European society gave rise to speculation, legend, and legacy through the ages. The re-use of their name for later organizations has kept the name “Templar” alive to the modern day.
Knights Templar Poor Fellow-Soldiers of Christ and of the Temple of Solomon Pauperes commilitones Christi Templique Salomonici Hierosolymitanis
After Europeans in the First Crusade recovered Jerusalem in 1099, many Christians made pilgrimages to various sacred sites in the Holy Land. Although the city of Jerusalem was under relatively secure Christian control, the rest of Outremer was not. Bandits and marauding highwaymen preyed upon pilgrims, who were routinely slaughtered, sometimes by the hundreds, as they attempted to make the journey from the coastline at Jaffa into the interior of the Holy Land.
The Temple Mount had a mystique because it was above what was believed to be the ruins of the Temple of Solomon. The Crusaders therefore referred to the Al-Aqsa Mosque as Solomon’s Temple, and from this location the new order took the name of Poor Knights of Christ and the Temple of Solomon, or “Templar” knights. The order, with about nine knights including Godfrey de Saint-Omer and André de Montbard, had few financial resources and relied on donations to survive.
Their emblem was of two knights riding on a single horse, emphasising the order’s poverty.
The first headquarters of the Knights Templar, on the Temple Mount in Jerusalem. The Crusaders called it the Temple of Solomon and from this location derived their name of Templar.
The impoverished status of the Templars did not last long. They had a powerful advocate in Saint Bernard of Clairvaux, a leading Church figure, the French abbot primarily responsible for the founding of the Cistercian Order of monks and a nephew of André de Montbard, one of the founding knights. Bernard put his weight behind them and wrote persuasively on their behalf in the letter ‘In Praise of the New Knighthood’, and in 1129, at the Council of Troyes, he led a group of leading churchmen to officially approve and endorse the order on behalf of the church. With this formal blessing, the Templars became a favoured charity throughout Christendom, receiving money, land, businesses, and noble-born sons from families who were eager to help with the fight in the Holy Land. Another major benefit came in 1139, when Pope Innocent II‘s papal bullOmne Datum Optimum exempted the order from obedience to local laws.
This ruling meant that the Templars could pass freely through all borders, were not required to pay any taxes, and were exempt from all authority except that of the pope.
With its clear mission and ample resources, the order grew rapidly. Templars were often the advance shock troops in key battles of the Crusades, as the heavily armoured knights on their warhorses would set out to charge at the enemy, ahead of the main army bodies, in an attempt to break opposition lines. One of their most famous victories was in 1177 during the Battle of Montgisard, where some 500 Templar knights helped several thousand infantry to defeat Saladin‘s army of more than 26,000 soldiers.
A Templar Knight is truly a fearless knight, and secure on every side, for his soul is protected by the armour of faith, just as his body is protected by the armour of steel. He is thus doubly armed, and need fear neither demons nor men.”
Bernard de Clairvaux, c. 1135,
De Laude Novae Militae—In Praise of the New Knighthood
Although the primary mission of the order was military, relatively few members were combatants. The others acted in support positions to assist the knights and to manage the financial infrastructure. The Templar Order, though its members were sworn to individual poverty, was given control of wealth beyond direct donations. A nobleman who was interested in participating in the Crusades might place all his assets under Templar management while he was away. Accumulating wealth in this manner throughout Christendom and the Outremer, the order in 1150 began generating letters of credit for pilgrims journeying to the Holy Land: pilgrims deposited their valuables with a local Templar preceptory before embarking, received a document indicating the value of their deposit, then used that document upon arrival in the Holy Land to retrieve their funds in an amount of treasure of equal value.
This innovative arrangement was an early form of banking and may have been the first formal system to support the use of cheques; it improved the safety of pilgrims by making them less attractive targets for thieves, and also contributed to the Templar coffers.
Based on this mix of donations and business dealing, the Templars established financial networks across the whole of Christendom. They acquired large tracts of land, both in Europe and the Middle East; they bought and managed farms and vineyards; they built massive stone cathedrals and castles; they were involved in manufacturing, import and export; they had their own fleet of ships; and at one point they even owned the entire island of Cyprus. The Order of the Knights Templar arguably qualifies as the world’s first multinational corporation.
In the mid-12th century, the tide began to turn in the Crusades. The Muslim world had become more united under effective leaders such as Saladin, and dissension arose amongst Christian factions in, and concerning, the Holy Land. The Knights Templar were occasionally at odds with the two other Christian military orders, the Knights Hospitaller and the Teutonic Knights, and decades of internecine feuds weakened Christian positions, both politically and militarily. After the Templars were involved in several unsuccessful campaigns, including the pivotal Battle of Hattin, Jerusalem was recaptured by Muslim forces under Saladin in 1187.
The Holy Roman Emperor Frederick II reclaimed the city for Christians in the Sixth Crusade of 1229, without Templar aid, but only held it briefly for a little more than a decade. In 1244, the Ayyubids, together with Khwarezmi mercenaries recaptured Jerusalem, and the city did not return to Western control until 1917 when the British captured it from the Ottoman Empire in World War I.
The Templars were forced to relocate their headquarters to other cities in the north, such as the seaport of Acre, which they held for the next century. It was lost in 1291, followed by their last mainland strongholds, Tortosa (Tartus in what is now Syria) and Atlit in present-day Israel. Their headquarters then moved to Limassol on the island of Cyprus, and they also attempted to maintain a garrison on tiny Arwad Island, just off the coast from Tortosa. In 1300, there was some attempt to engage in coordinated military efforts with the Mongols via a new invasion force at Arwad.
In 1302 or 1303, however, the Templars lost the island to the Egyptian Mamluks in the Siege of Arwad. With the island gone, the Crusaders lost their last foothold in the Holy Land.
With the order’s military mission now less important, support for the organization began to dwindle. The situation was complex, however, since during the two hundred years of their existence, the Templars had become a part of daily life throughout Christendom.
The organization’s Templar Houses, hundreds of which were dotted throughout Europe and the Near East, gave them a widespread presence at the local level.[3] The Templars still managed many businesses, and many Europeans had daily contact with the Templar network, such as by working at a Templar farm or vineyard, or using the order as a bank in which to store personal valuables. The order was still not subject to local government, making it everywhere a “state within a state”—its standing army, though it no longer had a well-defined mission, could pass freely through all borders.
This situation heightened tensions with some European nobility, especially as the Templars were indicating an interest in founding their own monastic state, just as the Teutonic Knights had done in Prussia and the Knights Hospitaller were doing in Rhodes.
Arrests, charges and dissolution
In 1305, the new Pope Clement V, based in Avignon, France, sent letters to both the Templar Grand Master Jacques de Molay and the Hospitaller Grand Master Fulk de Villaret to discuss the possibility of merging the two orders. Neither was amenable to the idea, but Pope Clement persisted, and in 1306 he invited both Grand Masters to France to discuss the matter. De Molay arrived first in early 1307, but de Villaret was delayed for several months.
While waiting, De Molay and Clement discussed criminal charges that had been made two years earlier by an ousted Templar and were being discussed by King Philip IV of France and his ministers. It was generally agreed that the charges were false, but Clement sent the king a written request for assistance in the investigation. According to some historians, King Philip, who was already deeply in debt to the Templars from his war with the English, decided to seize upon the rumors for his own purposes. He began pressuring the church to take action against the order, as a way of freeing himself from his debts.
At dawn on Friday, 13 October 1307 (a date sometimes linked with the origin of the Friday the 13th superstition) King Philip IV ordered de Molay and scores of other French Templars to be simultaneously arrested. The arrest warrant started with the phrase: “Dieu n’est pas content, nous avons des ennemis de la foi dans le Royaume”
[“God is not pleased. We have enemies of the faith in the kingdom”].
Claims were made that during Templar admissions ceremonies, recruits were forced to spit on the Cross, deny Christ, and engage in indecent kissing; brethren were also accused of worshiping idols, and the order was said to have encouraged homosexual practices. The Templars were charged with numerous other offences such as financial corruption, fraud, and secrecy.
Many of the accused confessed to these charges under torture, and these confessions, even though obtained under duress, caused a scandal in Paris. The prisoners were coerced to confess that they had spat on the Cross:
“Moi, Raymond de La Fère, 21 ans, reconnais que [j’ai] craché trois fois sur la Croix, mais de bouche et pas de cœur” (free translation: “I, Raymond de La Fère, 21 years old, admit that I have spat three times on the Cross, but only from my mouth and not from my heart”).
The Templars were accused of idolatry and were suspected of worshipping either a figure known as Baphomet or a mummified severed head they recovered, amongst other artifacts, at their original headquarters on the Temple Mount that many scholars theorize might have been that of John the Baptist, among other things.
Relenting to Phillip’s demands, Pope Clement then issued the papal bull Pastoralis Praeeminentiae on 22 November 1307, which instructed all Christian monarchs in Europe to arrest all Templars and seize their assets. Pope Clement called for papal hearings to determine the Templars’ guilt or innocence, and once freed of the Inquisitors‘ torture, many Templars recanted their confessions. Some had sufficient legal experience to defend themselves in the trials, but in 1310, having appointed the archbishop of Sens, Philippe de Marigny, to lead the investigation, Philip blocked this attempt, using the previously forced confessions to have dozens of Templars burned at the stake in Paris.
With Philip threatening military action unless the pope complied with his wishes, Pope Clement finally agreed to disband the order, citing the public scandal that had been generated by the confessions. At the Council of Vienne in 1312, he issued a series of papal bulls, including Vox in excelso, which officially dissolved the order, and Ad providam, which turned over most Templar assets to the Hospitallers.
As for the leaders of the order, the elderly Grand Master Jacques de Molay, who had confessed under torture, retracted his confession. Geoffroi de Charney, Preceptor of Normandy, also retracted his confession and insisted on his innocence. Both men were declared guilty of being relapsed heretics, and they were sentenced to burn alive at the stake in Paris on 18 March 1314. De Molay reportedly remained defiant to the end, asking to be tied in such a way that he could face the Notre Dame Cathedral and hold his hands together in prayer.
According to legend, he called out from the flames that both Pope Clement and King Philip would soon meet him before God. His actual words were recorded on the parchment as follows : “Dieu sait qui a tort et a péché. Il va bientot arriver malheur à ceux qui nous ont condamnés à mort” (free translation :
“God knows who is wrong and has sinned. Soon a calamity will occur to those who have condemned us to death”).
Pope Clement died only a month later, and King Philip died in a hunting accident before the end of the year.
With the last of the order’s leaders gone, the remaining Templars around Europe were either arrested and tried under the Papal investigation (with virtually none convicted), absorbed into other military orders such as the Knights Hospitaller, or pensioned off and allowed to live out their days peacefully. By papal decree, the property of the Templars was transferred to the Knights Hospitaller, which also absorbed many of the Templars’ members.
In effect, the dissolution of the Templars could be seen as the merger of the two rival orders. Templar organizations simply changed their name, from Knights Templar to Order of Christ and also a parallel Supreme Order of Christ of the Holy See in which both are considered the successors.
In September 2001, a document known as the “Chinon Parchment” dated 17–20 August 1308 was discovered in the Vatican Secret Archives by Barbara Frale, apparently after having been filed in the wrong place in 1628. It is a record of the trial of the Templars and shows that Clement absolved the Templars of all heresies in 1308 before formally disbanding the order in 1312, as did another Chinon Parchment dated 20 August 1308 addressed to Philip IV of France, also mentioning that all Templars that had confessed to heresy were “restored to the Sacraments and to the unity of the Church”.
This other Chinon Parchment has been well-known to historians, having been published by Étienne Baluze in 1693 and by Pierre Dupuy in 1751.
The current position of the Roman Catholic Church is that the medieval persecution of the Knights Templar was unjust, that nothing was inherently wrong with the order or its rule, and that Pope Clement was pressed into his actions by the magnitude of the public scandal and by the dominating influence of King Philip IV, who was Clement’s relative.
Organization
Templar chapel from the 12th century in Metz, France.
Once part of the Templar commandery of Metz, the oldest Templar institution of the Holy Roman Empire.
The Templars were organized as a monastic order similar to Bernard’s Cistercian Order, which was considered the first effective international organization in Europe. The organizational structure had a strong chain of authority. Each country with a major Templar presence (France, Poitou, Anjou, Jerusalem, England, Aragon, Portugal, Italy, Tripoli, Antioch, Hungary, and Croatia) had a Master of the Order for the Templars in that region.
All of them were subject to the Grand Master, appointed for life, who oversaw both the order’s military efforts in the East and their financial holdings in the West. The Grand Master exercised his authority via the visitors-general of the order, who were knights specially appointed by the Grand Master and convent of Jerusalem to visit the different provinces, correct malpractices, introduce new regulations, and resolve important disputes. The visitors-general had the power to remove knights from office and to suspend the Master of the province concerned.
No precise numbers exist, but it is estimated that at the order’s peak there were between 15,000 and 20,000 Templars, of whom about a tenth were actual knights.
Ranks within the order
Three main ranks
There was a threefold division of the ranks of the Templars: the noble knights, the non-noble sergeants, and the chaplains. The Templars did not perform knighting ceremonies, so any knight wishing to become a Knight Templar had to be a knight already. They were the most visible branch of the order, and wore the famous white mantles to symbolise their purity and chastity.
They were equipped as heavy cavalry, with three or four horses and one or two squires. Squires were generally not members of the order but were instead outsiders who were hired for a set period of time. Beneath the knights in the order and drawn from non-noble families were the sergeants. They brought vital skills and trades such as blacksmithing and building, and administered many of the order’s European properties. In the Crusader States, they fought alongside the knights as light cavalry with a single horse.
Several of the order’s most senior positions were reserved for sergeants, including the post of Commander of the Vault of Acre, who was the de facto Admiral of the Templar fleet. The sergeants wore black or brown. From 1139, chaplains constituted a third Templar class. They were ordained priests who cared for the Templars’ spiritual needs.
All three classes of brother wore the order’s red cross.
Grand Masters
Templar building at Saint Martin des Champs, France
Starting with founder Hugues de Payens in 1118–1119, the order’s highest office was that of Grand Master, a position which was held for life, though considering the martial nature of the order, this could mean a very short tenure. All but two of the Grand Masters died in office, and several died during military campaigns. For example, during the Siege of Ascalon in 1153, Grand Master Bernard de Tremelay led a group of 40 Templars through a breach in the city walls. When the rest of the Crusader army did not follow, the Templars, including their Grand Master, were surrounded and beheaded.
The Grand Master oversaw all of the operations of the order, including both the military operations in the Holy Land and Eastern Europe and the Templars’ financial and business dealings in Western Europe. Some Grand Masters also served as battlefield commanders, though this was not always wise: several blunders in de Ridefort’s combat leadership contributed to the devastating defeat at the Battle of Hattin. The last Grand Master was Jacques de Molay, burned at the stake in Paris in 1314 by order of King Philip IV.
Behaviour, clothing and beards
Representation of a Knight Templar
Bernard de Clairvaux and founder Hugues de Payens devised the specific code of behaviour for the Templar Order, known to modern historians as the Latin Rule. Its 72 clauses defined the ideal behaviour for the Knights, such as the types of garments they were to wear and how many horses they could have. Knights were to take their meals in silence, eat meat no more than three times per week, and not have physical contact of any kind with women, even members of their own family.
A Master of the Order was assigned:
“4 horses, and one chaplain-brother and one clerk with three horses, and one sergeant brother with two horses, and one gentleman valet to carry his shield and lance, with one horse.”
As the order grew, more guidelines were added, and the original list of 72 clauses was expanded to several hundred in its final form.
The knights wore a white surcoat with a red cross and a white mantle also with a red cross; the sergeants wore a black tunic with a red cross on the front and a black or brown mantle. The white mantle was assigned to the Templars at the Council of Troyes in 1129, and the cross was most probably added to their robes at the launch of the Second Crusade in 1147, when Pope Eugenius III, King Louis VII of France, and many other notables attended a meeting of the French Templars at their headquarters near Paris.
According to their Rule, the knights were to wear the white mantle at all times, even being forbidden to eat or drink unless they were wearing it.
One of the many reported flags of the Knights Templar
The red cross that the Templars wore on their robes was a symbol of martyrdom, and to die in combat was considered a great honour that assured a place in heaven. There was a cardinal rule that the warriors of the order should never surrender unless the Templar flag had fallen, and even then they were first to try to regroup with another of the Christian orders, such as that of the Hospitallers. Only after all flags had fallen were they allowed to leave the battlefield.
This uncompromising principle, along with their reputation for courage, excellent training, and heavy armament, made the Templars one of the most feared combat forces in medieval times.
Although not prescribed by the Templar Rule, it later became customary for members of the order to wear long and prominent beards. In about 1240, Alberic of Trois-Fontaines described the Templars as an “order of bearded brethren”; while during the interrogations by the papal commissioners in Paris in 1310–11, out of nearly 230 knights and brothers questioned, 76 are described as wearing a beard, in some cases specified as being “in the style of the Templars”, and 133 are said to have shaved off their beards, either in renunciation of the order or because they had hoped to escape detection.
Initiation, known as Reception (receptio) into the order, was a profound commitment and involved a solemn ceremony. Outsiders were discouraged from attending the ceremony, which aroused the suspicions of medieval inquisitors during the later trials. New members had to willingly sign over all of their wealth and goods to the order and take vows of poverty, chastity, piety, and obedience.[
Most brothers joined for life, although some were allowed to join for a set period. Sometimes a married man was allowed to join if he had his wife’s permission, but he was not allowed to wear the white mantle.
As the chapel of the New Temple in London, it was the location for Templar initiation ceremonies. In modern times it is the parish church of the Middle and Inner Temples, two of the Inns of Court, and a popular tourist attraction.
With their military mission and extensive financial resources, the Knights Templar funded a large number of building projects around Europe and the Holy Land. Many of these structures are still standing. Many sites also maintain the name “Temple” because of centuries-old association with the Templars.
Distinctive architectural elements of Templar buildings include the use of the image of “two knights on a single horse”, representing the Knights’ poverty, and round buildings designed to resemble the Church of the Holy Sepulchre in Jerusalem.
Modern organizations
The story of the persecution and sudden dissolution of the secretive yet powerful medieval Templars has drawn many other groups to use alleged connections with the Templars as a way of enhancing their own image and mystery. There is no clear historical connection between the Knights Templar, which were dismantled in the Rolls of the Catholic Church in 1309 with the martyrdom of Jacques de Molay, and any of the modern organizations, the earliest emerged publicly in the 18th century.
Beginning in the 1960s, there have been speculative popular publications surrounding the order’s early occupation of the Temple Mount in Jerusalem and speculation about what relics the Templars may have found there, such as the Holy Grail or the Ark of the Covenant, or the historical accusation of idol worship (Baphomet) transformed into a context of “witchcraft”.
The association of the Holy Grail with the Templars has precedents even in 12th century fiction; Wolfram von Eschenbach‘s Parzival calls the knights guarding the Grail Kingdom templeisen, apparently a conscious fictionalisation of the templarii.
Up to 35 people die and 100 others are injured after three trains are involved in a collision during morning rush hour in south London.
On the morning of 12 December 1988, a crowded passenger train crashed into the rear of another train that had stopped at a signal, just south of Clapham Junction railway station in London, and subsequently sideswiped an empty train travelling in the opposite direction. A total of 35 people were killed in the collision, while 484 were injured.
The collision was caused by a signal failure due to a wiring fault. New wiring had been installed, but the old wiring had been left connected at one end, and loose and uninsulated at the other. An independent inquiry, chaired by Anthony Hidden, QC, found that the signalling technician responsible had not been told his working practices were wrong and his work had not been inspected by an independent person. He had also worked a seven-day week for the previous 13 weeks.
Critical of the health and safety culture within British Rail at the time, Hidden’s recommendations included ensuring that work was independently inspected and that a senior project manager be made responsible for all aspects of any major, safety-critical project such as re-signalling work.
British Rail was fined £250,000 for violations of health and safety law in connection with the accident.
On 12 December 1988 the 07:18 from Basingstoke to London Waterloo, a crowded train made up from three four-car 4Vepelectric multiple units, was approaching Clapham Junction when the driver saw the signal ahead of him change from green (“proceed”) to red (“danger”). Unable to stop at the signal, he stopped his train at the next signal and then reported to the signal box by telephone. He was told there was nothing wrong with the signal. At this point the following train, the 06:30 from Bournemouth, made up of a 4-REP and two 4TC multiple units, collided with the Basingstoke train.
A third train, carrying no passengers and made of two four-car 4Vep units, was passing on the adjacent line in the other direction and was hit by the Bournemouth train immediately after the initial impact. The driver of a fourth train, coasting with no traction current, saw the other trains and managed to come to a stop behind the other two and the signal that should have protected them, which was showing a yellow “caution” aspect instead of a red “danger” aspect.
As a result of the collisions, 35 people died, and 69 were seriously injured. Another 415 sustained minor injuries.
Aftermath
The driver of the Basingstoke train was standing by the telephone when his train was pushed forward several feet by the collision. He picked up the receiver and spoke to the signalman, informing him of the collision and asking him to call the emergency services. The signalman immediately switched all the signals he could to ‘danger’, and signalled to the adjacent signal boxes he had an obstruction on the line.
However he had no control over automatic signals, and was not able to stop the fourth train. He then called the Clapham Junction station manager and asked him to call the emergency services. The accident had tripped the high-voltage feed to the traction current. The operator in the near-by Raynes Park electrical control room suspected there had been a derailment and re-configured the supply so that the nearby Wimbledon line trains could still run.
Pupils and teachers from the adjacent Emanuel School were first on the scene of the disaster. They were commended for their service by the then Prime Minister, Margaret Thatcher. As the accident was in central London, the first calls to the police came from members of the public, using public telephones and car phones.
The first of the emergency services to arrive was the fire brigade, which was on scene by 08:17. From a bridge over the railway the station officer was able to see the wreckage, and immediately asked for eight fire appliances. At 08:19 and 08:20 he asked for eight ambulances and a surgical team to be sent and at 08:27 declared that it was a major incident.
Ambulances arrived at 08:21 and by 08:36, 12 ambulances had been sent.
The Metropolitan Police helicopter was used to fly doctors to the site. Rescue was hampered because the railway was in a cutting, with metal fence at the top and a wall at the bottom of a wooded slope, so the local authority cut away the fence, trees and shrubs on the slope into which it cut steps. A mobile canteen was organised by the Salvation Army.
The last casualty was taken to hospital at 13:04 and the last body was removed at 15:45.
Inquiry
An initial internal investigation showed that a wiring fault meant that the signal would not show a red danger aspect when the track circuit immediately in front of the signal was occupied. Work associated with the Waterloo Area Resignalling Scheme meant new wiring had been installed, but the old wiring had been left connected at one end, and loose and uninsulated at the other.
An independent inquiry was chaired by Anthony Hidden, QC for the Department for Transport. A 1978 British Rail Southern Region report had concluded that due to the age of the equipment the re-signalling was needed by 1986, however approval was given in 1984 after a report of three wrong side signal failures.
The re-signalling project had been planned assuming more people were available and employees felt that the programme was inflexible and under pressure to get the work done Installation and testing was carried out at weekend during voluntary overtime, the technician having worked a seven-day week for the previous 13 weeks.
The re-wiring had been done a few weeks previously, but the fault had only developed the previous day when equipment had been moved and the loose and uninsulated wire had created a false feed to a relay.
The signalling technician who had done the work had not cut back, insulated nor tied back the loose wire and his work had not been supervised, nor inspected by an independent person as was required. In particular, a wire count that would have identified that a wire had not been removed was not carried out.
There had been inadequate training, assessment, supervision and testing and, with a lack of understanding of the risks of signalling failure, these were not monitored effectively.
Memorial at the site of the crash
Critical of the health and safety culture within British Rail at the time, Hidden recommended that unused signal wires needed to be cut back and insulated, and that a testing plan be in place, with the inspection and testing being done by an independent person. Signal technicians needed to attend refresher courses every five years, and testers needed to be trained and certified. Management was to ensure that no one was working high levels of overtime, and a senior project manager made responsible for all aspects of the project.
Unprotected wrong side signal failures – where the failure permitted a train to go beyond where it was permitted – had to be reported to the Railway Inspectorate. Cab radios, linking driver and signalman, were recommended and to begin installing public address system on existing trains that were not expected to be withdrawn within five years.
Legacy
Testing was mandated on British Rail signalling work and the hours of work of employees involved in safety critical work was limited. Although British Rail was fined £250,000 for breach of the Health and Safety at Work etc. Act, there was frustration that there was no prosecution for manslaughter. In 1996 the collision was one of the events cited by the Law Commission as reason for new law on manslaughter, resulting in the Corporate Manslaughter and Corporate Homicide Act 2007.
A memorial marking the location of the crash site is atop the cutting above the railway on Spencer Park, Battersea.
The Basingstoke train stopped at the next signal after the faulty signal, in accordance with the rule book. As of 1999, the rule book had not been changed. If the Basingstoke train had carried on to the next signal then the crash would not have happened, because the Basingstoke train would have been protected by a working track circuit
The background to the battle was the death of the childless King Edward the Confessor in January 1066, which set up a succession struggle between several claimants to his throne. Harold was crowned king shortly after Edward’s death, but faced invasions by William, his own brother Tostig and the Norwegian King Harald Hardrada (Harold III of Norway). Hardrada and Tostig defeated a hastily gathered army of Englishmen at the Battle of Fulford on 20 September 1066, and were in turn defeated by Harold at the Battle of Stamford Bridge five days later.
The deaths of Tostig and Hardrada at Stamford Bridge left William as Harold’s only serious opponent. While Harold and his forces were recovering, William landed his invasion forces in the south of England at Pevensey on 28 September 1066 and established a beachhead for his conquest of the kingdom. Harold was forced to march south swiftly, gathering forces as he went.
The exact numbers present at the battle are unknown; modern estimates are around 10,000 for William and about 7,000 for Harold. The composition of the forces is clearer; the English army was composed almost entirely of infantry and had few archers, whereas only about half of the invading force was infantry, the rest split equally between cavalry and archers. Harold appears to have tried to surprise William, but scouts found his army and reported its arrival to William, who marched from Hastings to the battlefield to confront Harold.
The battle lasted from about 9 am to dusk. Early efforts of the invaders to break the English battle lines had little effect; therefore, the Normans adopted the tactic of pretending to flee in panic and then turning on their pursuers. Harold’s death, probably near the end of the battle, led to the retreat and defeat of most of his army. After further marching and some skirmishes, William was crowned as king on Christmas Day 1066.
There continued to be rebellions and resistance to William’s rule, but Hastings effectively marked the culmination of William’s conquest of England. Casualty figures are hard to come by, but some historians estimate that 2,000 invaders died along with about twice that number of Englishmen. William founded a monastery at the site of the battle, the high altar of the abbey church supposedly placed at the spot where Harold died.
In 911, French Carolingian ruler Charles the Simple allowed a group of Vikings to settle in Normandy under their leader Rollo. Their settlement proved successful, and they quickly adapted to the indigenous culture, renouncing paganism, converting to Christianity, and intermarrying with the local population.
Over time, the frontiers of the duchy expanded to the west. In 1002, King Æthelred II of England married Emma, the sister of Richard II, Duke of Normandy. Their son Edward the Confessor spent many years in exile in Normandy, and succeeded to the English throne in 1042. This led to the establishment of a powerful Norman interest in English politics, as Edward drew heavily on his former hosts for support, bringing in Norman courtiers, soldiers, and clerics and appointing them to positions of power, particularly in the Church.
Edward was childless and embroiled in conflict with the formidable Godwin, Earl of Wessex and his sons, and he may also have encouraged Duke William of Normandy’s ambitions for the English throne.
Succession crisis in England
Following King Edward’s death on 5 January 1066, the lack of a clear heir led to a disputed succession in which several contenders laid claim to the throne of England. Edward’s immediate successor was the Earl of Wessex, Harold Godwinson, the richest and most powerful of the English aristocrats and son of Godwin, Edward’s earlier opponent. Harold was elected king by the Witenagemot of England and crowned by Archbishop of YorkEaldred, although Norman propaganda claimed that the ceremony was performed by Stigand, the uncanonically elected Archbishop of Canterbury.
Harold was at once challenged by two powerful neighbouring rulers. Duke William claimed that he had been promised the throne by King Edward and that Harold had sworn agreement to this. Harald III of Norway, commonly known as Harald Hardrada, also contested the succession. His claim to the throne was based on an agreement between his predecessor Magnus I of Norway and the earlier King of England Harthacanute, whereby, if either died without heir, the other would inherit both England and Norway. William and Harald Hardrada immediately set about assembling troops and ships for separate invasions.
Tostig and Hardrada’s invasions
In early 1066, Harold’s exiled brother Tostig Godwinson raided south-eastern England with a fleet he had recruited in Flanders, later joined by other ships from Orkney. Threatened by Harold’s fleet, Tostig moved north and raided in East Anglia and Lincolnshire. He was driven back to his ships by the brothers Edwin, Earl of Mercia, and Morcar, Earl of Northumbria. Deserted by most of his followers, he withdrew to Scotland, where he spent the middle of the year recruiting fresh forces.
Hardrada invaded northern England in early September, leading a fleet of more than 300 ships carrying perhaps 15,000 men. Hardrada’s army was further augmented by the forces of Tostig, who supported the Norwegian king’s bid for the throne. Advancing on York, the Norwegians occupied the city after defeating a northern English army under Edwin and Morcar on 20 September at the Battle of Fulford.
The English army was organised along regional lines, with the fyrd, or local levy, serving under a local magnate – whether an earl, bishop, or sheriff. The fyrd was composed of men who owned their own land, and were equipped by their community to fulfil the king’s demands for military forces. For every five hides, or units of land nominally capable of supporting one household, one man was supposed to serve. It appears that the hundred was the main organising unit for the fyrd. As a whole, England could furnish about 14,000 men for the fyrd, when it was called out. The fyrd usually served for two months, except in emergencies.
It was rare for the whole national fyrd to be called out; between 1046 and 1065 it was only done three times, in 1051, 1052, and 1065. The king also had a group of personal armsmen, known as housecarls, who formed the backbone of the royal forces. Some earls also had their own forces of housecarls. Thegns, the local landowning elites, either fought with the royal housecarls or attached themselves to the forces of an earl or other magnate.[23] The fyrd and the housecarls both fought on foot, with the major difference between them being the housecarl’s superior armour. The English army does not appear to have had a significant number of archers.
Harold had spent mid-1066 on the south coast with a large army and fleet waiting for William to invade. The bulk of his forces were militia who needed to harvest their crops, so on 8 September Harold dismissed the militia and the fleet. Learning of the Norwegian invasion he rushed north, gathering forces as he went, and took the Norwegians by surprise, defeating them at the Battle of Stamford Bridge on 25 September. Harald Hardrada and Tostig were killed, and the Norwegians suffered such great losses that only 24 of the original 300 ships were required to carry away the survivors. The English victory came at great cost, as Harold’s army was left in a battered and weakened state.
William’s preparations and landing
Interior ruins at Pevensey Castle, some of which date to shortly after the Battle of Hastings
William assembled a large invasion fleet and an army gathered from Normandy and the rest of France, including large contingents from Brittany and Flanders. He spent almost nine months on his preparations, as he had to construct a fleet from nothing.[d] According to some Norman chronicles, he also secured diplomatic support, although the accuracy of the reports has been a matter of historical debate. The most famous claim is that Pope Alexander II gave a papal banner as a token of support, which only appears in William of Poitiers’s account, and not in more contemporary narratives.
In April 1066 Halley’s Comet appeared in the sky, and was widely reported throughout Europe. Contemporary accounts connected the comet’s appearance with the succession crisis in England.
William mustered his forces at Saint-Valery-sur-Somme, and was ready to cross the English Channel by about 12 August. But the crossing was delayed, either because of unfavourable weather or to avoid being intercepted by the powerful English fleet. The Normans crossed to England a few days after Harold’s victory over the Norwegians, following the dispersal of Harold’s naval force, and landed at Pevensey in Sussex on 28 September.
A few ships were blown off course and landed at Romney, where the Normans fought the local fyrd. After landing, William’s forces built a wooden castle at Hastings, from which they raided the surrounding area. More fortifications were erected at Pevensey.
Norman forces at Hastings
The exact numbers and composition of William’s force are unknown. A contemporary document claims that William had 776 ships, but this may be an inflated figure. Figures given by contemporary writers are highly exaggerated, varying from 14,000 to 150,000. Modern historians have offered a range of estimates for the size of William’s forces: 7,000–8,000 men, 1,000–2,000 of them cavalry; 10,000–12,000 men; 10,000 men, 3,000 of them cavalry; or 7500 men. The army consisted of cavalry, infantry, and archers or crossbowmen, with about equal numbers of cavalry and archers and the foot soldiers equal in number to the other two types combined.
Later lists of companions of William the Conqueror are extant, but most are padded with extra names; only about 35 named individuals can be reliably identified as having been with William at Hastings.
The main armour used was chainmail hauberks, usually knee-length, with slits to allow riding, some with sleeves to the elbows. Some hauberks may have been made of scales attached to a tunic, with the scales made of metal, horn or hardened leather. Headgear was usually a conical metal helmet with a band of metal extending down to protect the nose.[59] Horsemen and infantry carried shields. The infantryman’s shield was usually round and made of wood, with reinforcement of metal. Horsemen had changed to a kite-shaped shield and were usually armed with a lance.
The couched lance, carried tucked against the body under the right arm, was a relatively new refinement and was probably not used at Hastings; the terrain was unfavourable for long cavalry charges. Both the infantry and cavalry usually fought with a straight sword, long and double-edged. The infantry could also use javelins and long spears. Some of the cavalry may have used a mace instead of a sword. Archers would have used a self bow or a crossbow, and most would not have had armour.
Harold moves south
After defeating his brother Tostig and Harald Hardrada in the north, Harold left much of his forces in the north, including Morcar and Edwin, and marched the rest of his army south to deal with the threatened Norman invasion. It is unclear when Harold learned of William’s landing, but it was probably while he was travelling south. Harold stopped in London, and was there for about a week before Hastings, so it is likely that he spent about a week on his march south, averaging about 27 miles (43 kilometres) per day, for the approximately 200 miles (320 kilometres).
Harold camped at Caldbec Hill on the night of 13 October, near what was described as a “hoar-apple tree”. This location was about 8 miles (13 kilometres) from William’s castle at Hastings. Some of the early contemporary French accounts mention an emissary or emissaries sent by Harold to William, which is likely. Nothing came of these efforts.
Although Harold attempted to surprise the Normans, William’s scouts reported the English arrival to the duke. The exact events preceding the battle are obscure, with contradictory accounts in the sources, but all agree that William led his army from his castle and advanced towards the enemy. Harold had taken a defensive position at the top of Senlac Hill (present-day Battle, East Sussex), about 6 miles (9.7 kilometres) from William’s castle at Hastings.
English forces at Hastings
The exact number of soldiers in Harold’s army is unknown. The contemporary records do not give reliable figures; some Norman sources give 400,000 to 1,200,000 men on Harold’s side.[j] The English sources generally give very low figures for Harold’s army, perhaps to make the English defeat seem less devastating. Recent historians have suggested figures of between 5,000 and 13,000 for Harold’s army at Hastings, and most modern historians argue for a figure of 7,000–8,000 English troops.
These men would have been a mix of the fyrd and housecarls. Few individual Englishmen are known to have been at Hastings; about 20 named individuals can reasonably be assumed to have fought with Harold at Hastings, including Harold’s brothers Gyrth and Leofwine and two other relatives.
The English army consisted entirely of infantry. It is possible that some of the higher class members of the army rode to battle, but when battle was joined they dismounted to fight on foot The core of the army was made up of housecarls, full-time professional soldiers. Their armour consisted of a conical helmet, a mailhauberk, and a shield, which might be either kite-shaped or round. Most housecarls fought with the two-handed Danish battleaxe, but they could also carry a sword.
The rest of the army was made up of levies from the fyrd, also infantry but more lightly armoured and not professionals. Most of the infantry would have formed part of the shield wall, in which all the men in the front ranks locked their shields together. Behind them would have been axemen and men with javelins as well as archers.
Battle
Background and location
The battlefield from the north side
Because many of the primary accounts contradict each other at times, it is impossible to provide a description of the battle that is beyond dispute. The only undisputed facts are that the fighting began at 9 am on Saturday 14 October 1066 and that the battle lasted until dusk. Sunset on the day of the battle was at 4:54 pm, with the battlefield mostly dark by 5:54 pm and in full darkness by 6:24 pm. Moonrise that night was not until 11:12 pm, so once the sun set, there was little light on the battlefield.
William of Jumieges reports that Duke William kept his army armed and ready against a surprise night attack for the entire night before. The battle took place 7 miles (11 km) north of Hastings at the present-day town of Battle, between two hills – Caldbec Hill to the north and Telham Hill to the south. The area was heavily wooded, with a marsh nearby. The name traditionally given to the battle is unusual – there were several settlements much closer to the battlefield than Hastings.
The Anglo-Saxon Chronicle called it the battle “at the hoary apple tree”. Within 40 years, the battle was described by the Anglo-Norman chronicler Orderic Vitalis as “Senlac”,[m] a Norman-French adaptation of the Old English word “Sandlacu”, which means “sandy water”.[n] This may have been the name of the stream that crosses the battlefield.[o] The battle was already being referred to as “bellum Hasestingas” or “Battle of Hastings” by 1087, in the Domesday Book.
Sunrise was at 6:48 am that morning, and reports of the day record that it was unusually bright. The weather conditions are not recorded. The route that the English army took to the battlefield is not known precisely. Several roads are possible: one, an old Roman road that ran from Rochester to Hastings has long been favoured because of a large coin hoard found nearby in 1876. Another possibility is a Roman road between London and Lewes and then over local tracks to the battlefield.
Some accounts of the battle indicate that the Normans advanced from Hastings to the battlefield, but the contemporary account of William of Jumieges places the Normans at the site of the battle the night before. Most historians incline towards the former view, but M. K. Lawson argues that William of Jumieges’s account is correct.
Dispositions of forces and tactics
Battle dispositions
Harold’s forces deployed in a small, dense formation at the top of steep slope, with their flanks protected by woods and marshy ground in front of them. The line may have extended far enough to be anchored on a nearby stream. The English formed a shield wall, with the front ranks holding their shields close together or even overlapping to provide protection from attack. Sources differ on the exact site that the English fought on: some sources state the site of the abbey, but some newer sources suggest it was Caldbec Hill.
More is known about the Norman deployment. Duke William appears to have arranged his forces in three groups, or “battles”, which roughly corresponded to their origins. The left units were the Bretons, along with those from Anjou, Poitou and Maine. This division was led by Alan the Red, a relative of the Breton count. The centre was held by the Normans, under the direct command of the duke and with many of his relatives and kinsmen grouped around the ducal party.
The final division on the right consisted of the Frenchmen, along with some men from Picardy, Boulogne, and Flanders. The right was commanded by William fitzOsbern and Count Eustace II of Boulogne. The front lines were archers with a line of foot soldiers armed with spears behind. There were probably a few crossbowmen and slingers in with the archers. The cavalry was held in reserve, and a small group of clergymen and servants situated at the base of Telham Hill was not expected to take part in the fighting.
William’s disposition of his forces implies that he planned to open the battle with archers in the front rank weakening the enemy with arrows, followed by infantry who would engage in close combat. The infantry would create openings in the English lines that could be exploited by a cavalry charge to break through the English forces and pursue the fleeing soldiers.
Beginning of the battle
View of the battlefield looking towards Senlac Hill
The battle opened with the Norman archers shooting uphill at the English shield wall, to little effect. The uphill angle meant that the arrows either bounced off the shields of the English or overshot their targets and flew over the top of the hill.
The lack of English archers hampered the Norman archers, as there were few English arrows to be gathered up and reused. After the attack from the archers, William sent the spearmen forward to attack the English. They were met with a barrage of missiles, not arrows but spears, axes and stones. The infantry was unable to force openings in the shield wall, and the cavalry advanced in support. The cavalry also failed to make headway, and a general retreat began, blamed on the Breton division on William’s left.
A rumour started that the duke had been killed, which added to the confusion. The English forces began to pursue the fleeing invaders, but William rode through his forces, showing his face and yelling that he was still alive. The duke then led a counter-attack against the pursuing English forces; some of the English rallied on a hillock before being overwhelmed.
It is not known whether the English pursuit was ordered by Harold or if it was spontaneous. Wace relates that Harold ordered his men to stay in their formations but no other account gives this detail. The Bayeux Tapestry depicts the death of Harold’s brothers Gyrth and Leofwine occurring just before the fight around the hillock. This may mean that the two brothers led the pursuit. The Carmen de Hastingae Proelio relates a different story for the death of Gyrth, stating that the duke slew Harold’s brother in combat, perhaps thinking that Gyrth was Harold. William of Poitiers states that the bodies of Gyrth and Leofwine were found near Harold’s, implying that they died late in the battle.
It is possible that if the two brothers died early in the fighting their bodies were taken to Harold, thus accounting for their being found near his body after the battle. The military historian Peter Marren speculates that if Gyrth and Leofwine died early in the battle, that may have influenced Harold to stand and fight to the end.
Fact or Fiction E03 King Harold
Feigned flights
Scene from the Bayeux Tapestry showing mounted Norman cavalrymen fighting Anglo-Saxon infantry
A lull probably occurred early in the afternoon, and a break for rest and food would probably have been needed. William may have also needed time to implement a new strategy, which may have been inspired by the English pursuit and subsequent rout by the Normans. If the Normans could send their cavalry against the shield wall and then draw the English into more pursuits, breaks in the English line might form.
William of Poitiers says the tactic was used twice. Although arguments have been made that the chroniclers’ accounts of this tactic were meant to excuse the flight of the Norman troops from battle, this is unlikely as the earlier flight was not glossed over. It was a tactic used by other Norman armies during the period.
Some historians have argued that the story of the use of feigned flight as a deliberate tactic was invented after the battle; most historians agree that it was used by the Normans at Hastings.
“Harold Rex Interfectus Est” (“King Harold was killed”). Scene from the Bayeux Tapestry depicting the Battle of Hastings and the death of Harold
Although the feigned flights did not break the lines, they probably thinned out the housecarls in the English shield wall. The housecarls were replaced with members of the fyrd, and the shield wall held. Archers appear to have been used again before and during an assault by the cavalry and infantry led by the duke. Although 12th-century sources state that the archers were ordered to shoot at a high angle to shoot over the front of the shield wall, there is no trace of such an action in the more contemporary accounts.
It is not known how many assaults were launched against the English lines, but some sources record various actions by both Normans and Englishmen that took place during the afternoon’s fighting.The Carmen claims that Duke William had two horses killed under him during the fighting, but William of Poitiers’s account states that it was three.
Death of Harold
Stone marking the spot of the high altar at Battle Abbey, where Harold died
Harold appears to have died late in the battle, although accounts in the various sources are contradictory. William of Poitiers only mentions his death, without giving any details on how it occurred. The Tapestry is not helpful, as it shows a figure holding an arrow sticking out of his eye next to a falling fighter being hit with a sword. Over both figures is a statement “Here King Harold has been killed”.
It is not clear which figure is meant to be Harold, or if both are meant. The earliest written mention of the traditional account of Harold dying from an arrow to the eye dates to the 1080s from a history of the Normans written by an Italian monk, Amatus of Montecassino.
William of Malmesbury stated that Harold died from an arrow to the eye that went into the brain, and that a knight wounded Harold at the same time. Wace repeats the arrow-to-the-eye account. The Carmen states that Duke William killed Harold, but this is unlikely, as such a feat would have been recorded elsewhere.
The account of William of Jumièges is even more unlikely, as it has Harold dying in the morning, during the first fighting. The Chronicle of Battle Abbey states that no one knew who killed Harold, as it happened in the press of battle.
A modern biographer of Harold, Ian Walker, states that Harold probably died from an arrow in the eye, although he also says it is possible that Harold was struck down by a Norman knight while mortally wounded in the eye. Another biographer of Harold, Peter Rex, after discussing the various accounts, concludes that it is not possible to declare how Harold died.
Harold’s death left the English forces leaderless, and they began to collapse.Many of them fled, but the soldiers of the royal household gathered around Harold’s body and fought to the end. The Normans began to pursue the fleeing troops, and except for a rearguard action at a site known as the “Malfosse”, the battle was over.
Exactly what happened at the Malfosse, or “Evil Ditch”, and where it took place, is unclear. It occurred at a small fortification or set of trenches where some Englishmen rallied and seriously wounded Eustace of Boulogne before being destroyed by Duke William.
Line Of Fire Battle Of Hastings 1066
Reasons for the outcome
Harold’s defeat was probably due to several circumstances. One was the need to defend against two almost simultaneous invasions. The fact that Harold had dismissed his forces in southern England on 8 September also contributed to the defeat. Many historians fault Harold for hurrying south and not gathering more forces before confronting William at Hastings, although it is not clear that the English forces were insufficient to deal with William’s forces.
Against these arguments for an exhausted English army, the length of the battle, which lasted an entire day, show that the English forces were not tired by their long march. Tied in with the speed of Harold’s advance to Hastings is the possibility Harold may not have trusted Earls Edwin of Mercia and Morcar of Northumbria once their enemy Tostig had been defeated, and declined to bring them and their forces south. Modern historians have pointed out that one reason for Harold’s rush to battle was to contain William’s depredations and keep him from breaking free of his beachhead.
Most of the blame for the defeat probably lies in the events of the battle. William was the more experienced military leader, and in addition the lack of cavalry on the English side allowed Harold fewer tactical options. Some writers have criticised Harold for not exploiting the opportunity offered by the rumoured death of William early in the battle. The English appear to have erred in not staying strictly on the defence, for when they pursued the retreating Normans they exposed their flanks to attack. Whether this was due to the inexperience of the English commanders or the indiscipline of the English soldiers is unclear.
In the end, Harold’s death appears to have been decisive, as it signalled the break-up of the English forces in disarray. The historian David Nicolle said of the battle that William’s army “demonstrated – not without difficulty – the superiority of Norman-French mixed cavalry and infantry tactics over the Germanic-Scandinavian infantry traditions of the Anglo-Saxons.”
The day after the battle, Harold’s body was identified, either by his armour or marks on his body. His personal standard was presented to William, and later sent to the papacy. The bodies of the English dead, including some of Harold’s brothers and his housecarls, were left on the battlefield,[121] although some were removed by relatives later.
The Norman dead were buried in a large communal grave, which has not been found. Exact casualty figures are unknown. Of the Englishmen known to be at the battle, the number of dead implies that the death rate was about 50 per cent of those engaged, although this may be too high. Of the named Normans who fought at Hastings, one in seven is stated to have died, but these were all noblemen, and it is probable that the death rate among the common soldiers was higher.
Although Orderic Vitalis’s figures are highly exaggerated,[w] his ratio of one in four casualties may be accurate. Marren speculates that perhaps 2,000 Normans and 4,000 Englishmen were killed at Hastings. The Normans buried their dead in mass graves. Reports stated that some of the English dead were still being found on the hillside years later. Although scholars thought for a long time that remains would not be recoverable, due to the acidic soil, recent finds have changed this view.
One skeleton that was found in a medieval cemetery, and originally was thought to be associated with the 13th century Battle of Lewes now is thought to be associated with Hastings instead.
Ruins of the monks’ dormitory at Battle Abbey
One story relates that Gytha, Harold’s mother, offered the victorious duke the weight of her son’s body in gold for its custody, but was refused. William ordered that Harold’s body be thrown into the sea, but whether that took place is unclear.
Another story relates that Harold was buried at the top of a cliff. Waltham Abbey, which had been founded by Harold, later claimed that his body had been secretly buried there. Other legends claimed that Harold did not die at Hastings, but escaped and became a hermit at Chester.
William expected to receive the submission of the surviving English leaders after his victory, but instead Edgar the Ætheling[y] was proclaimed king by the Witenagemot, with the support of Earls Edwin and Morcar, Stigand, the Archbishop of Canterbury, and Ealdred, the Archbishop of York. William therefore advanced on London, marching around the coast of Kent. He defeated an English force that attacked him at Southwark but was unable to storm London Bridge, forcing him to reach the capital by a more circuitous route.
William moved up the Thames valley to cross the river at Wallingford, where he received the submission of Stigand. He then travelled north-east along the Chilterns, before advancing towards London from the north-west,[z] fighting further engagements against forces from the city. The English leaders surrendered to William at Berkhamsted, Hertfordshire. William was acclaimed King of England and crowned by Ealdred on 25 December 1066, in Westminster Abbey.
Despite the submission of the English nobles, resistance continued to erupt for several years. There were rebellions in Exeter in late 1067, an invasion by Harold’s sons in mid-1068, and an uprising in Northumbria in 1068.[In 1069 William faced more troubles from Northumbrian rebels, an invading Danish fleet, and rebellions in the south and west of England. He ruthlessly put down the various risings, culminating in the Harrying of the North in late 1069 and early 1070 that devastated parts of northern England.
A further rebellion in 1070 by Hereward the Wake was also defeated by the king, at Ely.
Battle Abbey was founded by William at the site of the battle. According to 12th-century sources, William made a vow to found the abbey, and the high altar of the church was placed at the site where Harold had died. More likely, the foundation was imposed on William by papal legates in 1070.
The topography of the battlefield has been altered by subsequent construction work for the abbey, and the slope defended by the English is now much less steep than it was at the time of the battle; the top of the ridge has also been built up and levelled.After the Dissolution of the Monasteries, the abbey’s lands passed to secular landowners, who used it as a residence or country house. In 1976 the estate was put up for sale and purchased by the government with the aid of some American donors who wished to honour the 200th anniversary of American independence.
The battlefield and abbey grounds are currently owned and administered by English Heritage and are open to the public.
The Bayeux Tapestry is an embroidered narrative of the events leading up to Hastings probably commissioned by Odo of Bayeux soon after the battle, perhaps to hang at the bishop’s palace at Bayeux.In modern times annual reenactments of the Battle of Hastings have drawn thousands of participants and spectators to the site of the original battle.
The Vikings in the region became known as the “Northmen,” from which “Normandy” and “Normans” are derived.
There is some slight confusion in the original sources about the exact date; it was most likely 5 January, but a few contemporaneous sources give 4 January.
Other contenders later came to the fore. The first was Edgar Ætheling, Edward the Confessor’s great nephew who was a patrilineal descendant of King Edmund Ironside. He was the son of Edward the Exile, son of Edmund Ironside, and was born in Hungary where his father had fled after the conquest of England by Cnut. After his family’s eventual return to England and his father’s death in 1057, Edgar had by far the strongest hereditary claim to the throne, but he was only about thirteen or fourteen at the time of Edward the Confessor’s death, and with little family to support him, his claim was passed over by the Witan. Another contender was Sweyn II of Denmark, who had a claim to the throne as the grandson of Sweyn Forkbeard and nephew of Cnut, but he did not make his bid for the throne until 1069.Tostig Godwinson‘s attacks in early 1066 may have been the beginning of a bid for the throne, but threw in his lot with Harald Hardrada after defeat at the hands of Edwin and Morcar and the desertion of most of his followers he.
The surviving ship list gives 776 ships, contributed by 14 different Norman nobles. This list does not include William’s flagship, the Mora, given to him by his wife, Matilda of Flanders. The Mora is depicted on the Bayeux Tapestry with a lion figurehead.
The comet’s appearance was depicted on the Bayeux Tapestry, where it is connected with Harold’s coronation, although the appearance of the comet was later, from 24 April to 1 May 1066. The image on the tapestry is the earliest pictorial depiction of Halley’s Comet to survive.
Most modern historians agree on this date, although a few contemporary sources have William landing on 29 September.
Most contemporary accounts have William landing at Pevensey, with only the E version of the Anglo-Saxon Chronicle giving the landing as taking place at Hastings. Most modern accounts also state that William’s forces landed at Pevensey.
Of those 35, 5 are known to have died in the battle: Robert of Vitot, Engenulf of Laigle, Robert fitzErneis, Roger son of Turold, and Taillefer.
“Hoar” means grey, and probably refers to a crab-apple tree covered with lichen that was likely a local landmark.
Of these named persons, eight died in the battle – Harold, Gyrth, Leofwine, Godric the sheriff, Thurkill of Berkshire, Breme, and someone known only as “son of Helloc”.
Some historians have argued, based on comments by Snorri Sturlson made in the 13th century, that the English army did occasionally fight as cavalry. Contemporary accounts, such as in the Anglo-Saxon Chronicle record that when English soldiers were forced to fight on horseback, they were usually routed, as in 1055 near Hereford.
This was the name popularised by Edward Freeman,a Victorian historian who wrote one of the definitive accounts of the battle.
“Sandlacu” can be rendered into Modern English as “sandlake”.
Freeman suggested that “Senlac” meant “sand lake” in Old English with the Norman conquerors calling it (in French) “sanguelac”. Freeman regarded this use as a pun because the English translation of “sanguelac” is “blood lake”.
There is a story that the first fighting at Hastings was between a jongleur named Taillefer and some of the English fighters which comes from three sources: the Carmen de Hastingae Proelio, Wace’s Romance de Rou, and the 12th-century account of Henry of Huntingdon.The story has two versions, in one of which Taillefer entertained the Norman army prior to the battle by juggling a sword but then killed an English soldier sent to kill him. Another version has the jongleur charging the English and killing two before dying himself.
The issue is furthered confused by the fact that there is evidence that the 19th century restoration of the Tapestry changed the scene by inserting or changing the placement of the arrow through the eye.
Amatus’ account is less than trustworthy because it also states that Duke William commanded 100,000 soldiers at Hastings.
Modern wargaming has demonstrated the correctness of not pursuing the fleeing Normans,with the historian Christopher Gravett stating that if in a wargame he allowed Harold to pursue the Normans, his opponent “promptly, and rightly, punished such rashness with a brisk counter-attack with proved to be the turning point of the battle — just as in 1066”.
A 12th-century tradition stated that Harold’s face could not be recognised and Edith the Fair, Harold’s common-law wife, was brought to the battlefield to identify his body from marks that only she knew.
It is possible the grave site was located where the abbey now stands.
He states that there were 15,000 casualties out of 60,000 who fought on William’s side at the battle.
This skeleton, numbered 180, sustained six fatal sword cuts to the back of the skull and was one of five skeletons that had suffered violent trauma. Analysis continues on the other remains to try and build up a more accurate picture of who the individuals are.
Ætheling is the Anglo-Saxon term for a royal prince with some claim to the throne.
William appears to have taken this route to meet up with reinforcements that had landed by Portsmouth and met him between London and Winchester. By swinging around to the north, William cut off London from reinforcements.
The first recorded mention of the tapestry is from 1476, but it is similar in style to late Anglo-Saxon manuscript illustrations and may have been composed and executed in England. The Tapestry now is displayed at the former Bishop’s Palace at Bayeux in France
Like millions of others the world over the 9/11 attacks were a pivotal event in my life and I remember the details as though they happened yesterday and yes my life did change a little on that day.
Suddenly there were no boundaries and the horror of international terrorism announced itself to a disbelieving world .
At the time I was working for a publishing company based in Russell Square , central London and I had a meeting with a client in Soho. I had arranged to have an early business lunch and met the client in an Italian restaurant in Brewer Street. After the meal I went outside to have a fag and I noticed a lot of people gathered around the windows of a pub , watching the news.
Naturally I was curious and I walked over to see what was happening and was amazed to see the footage of the first plane hitting the Tower. At this point it was still thought that it been a tragic accident , although no one could explain what the plane was doing flying so low and within that airspace.
As I watched with the ever increasing crowd the second plane hit and the reality of the situation changed from a plane crash to New York being under attack from terrorists. As new reports came in about the other attacks – panic seem to set in and people began to drift off and make their way home. I went and explained what was happening to my client and we rightly called it a day. When I got back to the office everyone was standing about outside the building , amid rumours that London was under attack also and all planes had been grounded etc. People seemed to be in a state of shock and there was real panic that London would be next and we were all sent home for the remainder of the day.
At home I watched with horror as the truth and scale of the attacks became clear and Osama bin Laden became the instigator of a new kind of terror and the most wanted man on planet earth. Thankfully he is now burning in the pits of hell with the legions of other Islamic extremists whom have shamed the human race with their bloodlust and brutal, twisted ideology.
Current events although brutal and unimaginable horrific , shock and sicken us, but 9/11 was the Day the World changed forever and life would never be the same again.
London Bombs 7/7
I was meant to be inthe office on the day of the London Bombs and would have been travelling on the route & time of those trains that were bombed, but for once fate dealt me a fair hand and I was out of the office that day. The irony of my leaving Belfast to escape the slaughter of the IRA was not lost on me and here I was on the front line again!!
—————————————————————————————————
9/11~September 11th 2001-Attack on the World || Trade Center
The destruction of the World Trade Center and nearby infrastructure caused serious damage to the economy of Lower Manhattan and had a significant effect on global markets, closing Wall Street until September 17 and the civilian airspace in the U.S. and Canada until September 13. Many closings, evacuations, and cancellations followed, out of respect or fear of further attacks. Cleanup of the World Trade Center site was completed in May 2002, and the Pentagon was repaired within a year. On November 18, 2006, construction of One World Trade Center began at the World Trade Center site. The building was officially opened on November 3, 2014.
The origins of al-Qaeda can be traced to 1979 when the Soviet Union invaded Afghanistan. Osama bin Laden traveled to Afghanistan and helped organize Arab mujahideen to resist the Soviets. Under the guidance of Ayman al-Zawahiri, bin Laden became more radical. In 1996, bin Laden issued his first fatwā, calling for American soldiers to leave Saudi Arabia.
In a second fatwā in 1998, bin Laden outlined his objections to American foreign policy with respect to Israel, as well as the continued presence of American troops in Saudi Arabia after the Gulf War. Bin Laden used Islamic texts to exhort Muslims to attack Americans until the stated grievances are reversed. Muslim legal scholars “have throughout Islamic history unanimously agreed that the jihad is an individual duty if the enemy destroys the Muslim countries.”, according to bin Laden
Bin Laden, who orchestrated the attacks, initially denied but later admitted involvement.Al Jazeera broadcast a statement by bin Laden on September 16, 2001, stating, “I stress that I have not carried out this act, which appears to have been carried out by individuals with their own motivation.”
In November 2001, U.S. forces recovered a videotape from a destroyed house in Jalalabad, Afghanistan. In the video, bin Laden is seen talking to Khaled al-Harbi and admits foreknowledge of the attacks. On December 27, 2001, a second bin Laden video was released. In the video, he said,
“It has become clear that the West in general and America in particular have an unspeakable hatred for Islam….It is the hatred of crusaders. Terrorism against America deserves to be praised because it was a response to injustice, aimed at forcing America to stop its support for Israel, which kills our people…We say that the end of the United States is imminent, whether Bin Laden or his followers are alive or dead, for the awakening of the Muslim umma (nation) has occurred”,
but he stopped short of admitting responsibility for the attacks.
The transcript references several times to the United States specifically targeting Muslims.
Shortly before the U.S. presidential election in 2004, in a taped statement, bin Laden publicly acknowledged al-Qaeda’s involvement in the attacks on the U.S. and admitted his direct link to the attacks. He said that the attacks were carried out because, “we are free … and want to regain freedom for our nation. As you undermine our security we undermine yours.”
Bin Laden said he had personally directed his followers to attack the World Trade Center.[11][16] Another video obtained by Al Jazeera in September 2006 shows bin Laden with Ramzi bin al-Shibh, as well as two hijackers, Hamza al-Ghamdi and Wail al-Shehri, as they make preparations for the attacks.The U.S. never formally indicted bin Laden for the 9/11 attacks but he was on the FBI’s Most Wanted List for the bombings of the U.S. Embassies in Dar es Salaam, Tanzania, and Nairobi, Kenya.
The journalist Yosri Fouda of the Arabic television channel Al Jazeera reported that, in April 2002, Khalid Sheikh Mohammed admitted his involvement, along with Ramzi bin al-Shibh. The 9/11 Commission Report determined that the animosity towards the United States felt by Mohammed, the principal architect of the 9/11 attacks, stemmed from his “violent disagreement with U.S. foreign policy favoring Israel”. Mohammed was also an adviser and financier of the 1993 World Trade Center bombing and the uncle of Ramzi Yousef, the lead bomber in that attack.
Mohammed was arrested on March 1, 2003, in Rawalpindi, Pakistan, by Pakistani security officials working with the CIA, then transported to Guantanamo Bay and interrogated using methods including waterboarding.[28][29] During U.S. hearings at Guantanamo Bay in March 2007, Mohammed again confessed his responsibility for the attacks, stating he “was responsible for the 9/11 operation from A to Z” and that his statement was not made under duress.[24][30]
In “Substitution for Testimony of Khalid Sheikh Mohammed” from the trial of Zacarias Moussaoui, five people are identified as having been completely aware of the operation’s details. They are bin Laden, Khalid Sheikh Mohammed, Ramzi bin al-Shibh, Abu Turab al-Urduni, and Mohammed Atef.To date, only peripheral figures have been tried or convicted for the attacks.
On September 26, 2005, the Spanish high court sentenced Abu Dahdah to 27 years in prison for conspiracy on the 9/11 attacks and being a member of the terrorist organization al-Qaeda. At the same time, another 17 al-Qaeda members were sentenced to penalties of between six and eleven years. On February 16, 2006, the Spanish Supreme Court reduced the Abu Dahdah penalty to 12 years because it considered that his participation in the conspiracy was not proven.
Also, in 2006, Moussaoui, who some originally suspected might have been the assigned 20th hijacker, was convicted for the lesser role of conspiracy to commit acts of terrorism and air piracy. He is serving a life sentence without parole in the United States.Mounir el-Motassadeq, an associate of the Hamburg-based hijackers, is serving 15 years in Germany for his role in helping the hijackers prepare for the attacks.
Osama bin Laden’s declaration of a holy war against the United States, and a 1998 fatwā signed by bin Laden and others, calling for the killing of Americans, are seen by investigators as evidence of his motivation. In bin Laden’s November 2002 “Letter to America”, he explicitly stated that al-Qaeda’s motives for their attacks include
After the attacks, bin Laden and al-Zawahiri released additional video tapes and audio tapes, some of which repeated those reasons for the attacks. Two particularly important publications were bin Laden’s 2002 “Letter to America”,[45] and a 2004 video tape by bin Laden.[46]
Bin Laden interpreted Muhammad as having banned the “permanent presence of infidels in Arabia”.[47] In 1996, bin Laden issued a fatwā calling for American troops to leave Saudi Arabia. In 1998, al-Qaeda wrote, “for over seven years the United States has been occupying the lands of Islam in the holiest of places, the Arabian Peninsula, plundering its riches, dictating to its rulers, humiliating its people, terrorizing its neighbors, and turning its bases in the Peninsula into a spearhead through which to fight the neighboring Muslim peoples.”[48]
In a December 1999 interview, bin Laden said he felt that Americans were “too near to Mecca“, and considered this a provocation to the entire Muslim world.[49] One analysis of suicide terrorism suggested that without U.S. troops in Saudi Arabia, al-Qaeda likely would not have been able to get people to commit to suicide missions.[50]
In the 1998 fatwā, al-Qaeda identified the Iraq sanctions as a reason to kill Americans, condemning the “protracted blockade”[48] among other actions that constitute a declaration of war against “Allah, his messenger, and Muslims.”[48] The fatwā declared that “the ruling to kill the Americans and their allies – civilians and military – is an individual duty for every Muslim who can do it in any country in which it is possible to do it, in order to liberate the al-Aqsa Mosque and the holy mosque of Mecca from their grip, and in order for their [the Americans’] armies to move out of all the lands of Islam, defeated and unable to threaten any Muslim.”[9][51]
Bin Laden claimed, in 2004, that the idea of destroying the towers had first occurred to him in 1982, when he witnessed Israel’s bombardment of high-rise apartment buildings during the 1982 Lebanon War.[52][53] Some analysts, including Mearsheimer and Walt, also claim that one motivation for the attacks was U.S. support of Israel.[41][49] In 2004 and 2010, bin Laden again connected the September 11 attacks with U.S. support of Israel, although most of the letter expressed bin Laden’s disdain for President Bush and bin Laden’s hope to “destroy and bankrupt” the U.S.[54][55]
Other motives have been suggested in addition to those stated by bin Laden and al-Qaeda, including western support of Islamic and non-Islamic authoritarian regimes in Saudi Arabia, Iran, Egypt, Iraq, Pakistan and northern Africa, and the presence of western troops in some of these countries.[56] Some authors suggest the “humiliation” resulting from the Islamic world falling behind the Western world – this discrepancy rendered especially visible by the globalization trend[57][58] and a desire to provoke the U.S. into a broader war against the Islamic world in the hope of motivating more allies to support al-Qaeda. Similarly, others have argued that 9/11 was a strategic move with the objective of provoking America into a war that would incite a pan-Islamic revolution.[59][60]
Map showing the attacks on the World Trade Center (the planes are not drawn to scale)
The idea for the attacks came from Khalid Sheikh Mohammed, who first presented it to Osama bin Laden in 1996.[61] At that time, bin Laden and al-Qaeda were in a period of transition, having just relocated back to Afghanistan from Sudan.[62] The 1998 African Embassy bombings and bin Laden’s 1998 fatwā marked a turning point, as bin Laden became intent on attacking the United States.[62]
In late 1998 or early 1999, bin Laden gave approval for Mohammed to go forward with organizing the plot. A series of meetings occurred in early 1999, involving Mohammed, bin Laden, and his deputy Mohammed Atef.[62] Atef provided operational support for the plot, including target selections and helping arrange travel for the hijackers.[62] Bin Laden overruled Mohammed, rejecting some potential targets such as the U.S. Bank Tower in Los Angeles because, “there was not enough time to prepare for such an operation”.[63][64]
Diagram showing the attacks on the World Trade Center
Bin Laden provided leadership and financial support for the plot, and was involved in selecting participants.[65] Bin Laden initially selected Nawaf al-Hazmi and Khalid al-Mihdhar, both experienced jihadists who had fought in Bosnia. Hazmi and Mihdhar arrived in the United States in mid-January 2000. In spring 2000, Hazmi and Mihdhar took flying lessons in San Diego, California, but both spoke little English, performed poorly with flying lessons, and eventually served as secondary – or “muscle” – hijackers.[66][67]
In late 1999, a group of men from Hamburg, Germany arrived in Afghanistan, including Mohamed Atta, Marwan al-Shehhi, Ziad Jarrah, and Ramzi bin al-Shibh.[68] Bin Laden selected these men because they were educated, could speak English, and had experience living in the West.[69] New recruits were routinely screened for special skills and al-Qaeda leaders consequently discovered that Hani Hanjour already had a commercial pilot’s license.[70]
Hanjour arrived in San Diego on December 8, 2000, joining Hazmi.[71]:6–7 They soon left for Arizona, where Hanjour took refresher training.[71]:7 Marwan al-Shehhi arrived at the end of May 2000, while Atta arrived on June 3, 2000, and Jarrah arrived on June 27, 2000.[71]:6 Bin al-Shibh applied several times for a visa to the United States, but as a Yemeni, he was rejected out of concerns he would overstay his visa and remain as an illegal immigrant.[71]:4, 14 Bin al-Shibh stayed in Hamburg, providing coordination between Atta and Mohammed.[71]:16 The three Hamburg cell members all took pilot training in South Florida.[71]:6
In spring 2001, the secondary hijackers began arriving in the United States.[72] In July 2001, Atta met with bin al-Shibh in Spain, where they coordinated details of the plot, including final target selection. Bin al-Shibh also passed along bin Laden’s wish for the attacks to be carried out as soon as possible.[73]
Flight paths of the four planes used on September 11
Early on the morning of September 11, 2001, 19 hijackers took control of four commercial airliners (two Boeing 757 and two Boeing 767) en route to California (three headed to LAX in Los Angeles, and one to San Francisco) after takeoffs from Boston, Massachusetts; Newark, New Jersey; and Washington, D.C.[74] Large planes with long flights were selected for hijacking because they would be heavily fueled.[75]
The four flights were:
American Airlines Flight 11: a Boeing 767 aircraft, departed Boston’s Logan Airport at 7:59 a.m. en route to Los Angeles with a crew of 11 and 76 passengers, not including five hijackers. The hijackers flew the plane into the North Tower of the World Trade Center at 8:46 a.m.
United Airlines Flight 175: a Boeing 767 aircraft, departed Logan Airport at 8:14 a.m. en route to Los Angeles with a crew of nine and 51 passengers, not including five hijackers. The hijackers flew the plane into the South Tower of the World Trade Center at 9:03 a.m.
American Airlines Flight 77: a Boeing 757 aircraft, departed Washington Dulles International Airport in Virginia at 8:20 a.m. en route to Los Angeles with a crew of six and 53 passengers, not including five hijackers. The hijackers flew the plane into the Pentagon at 9:37 a.m.
United Airlines Flight 93: a Boeing 757 aircraft, departed Newark International Airport at 8:42 a.m. en route to San Francisco, with a crew of seven and 33 passengers, not including four hijackers. As passengers attempted to subdue the hijackers, the aircraft crashed into the ground near Shanksville, Pennsylvania, at 10:03 a.m.
Media coverage was extensive during the attacks and aftermath, beginning moments after the first crash into the World Trade Center.[76]
Events
Plume of September 11 attack seen from space by NASA.[77]
A fourth flight, United Airlines Flight 93, under the control of four hijackers, crashed near Shanksville, Pennsylvania, southeast of Pittsburgh, at 10:03 a.m. after the passengers fought the hijackers. Flight 93’s target is believed to have been either the Capitol or the White House.[75] Flight 93’s cockpit voice recorder revealed crew and passengers tried to seize control of the plane from the hijackers after learning through phone calls that Flights 11, 77, and 175 had been crashed into buildings that morning.[81] Once it became evident to the hijackers that the passengers might regain control of the plane, the hijackers rolled the plane and intentionally crashed it.[82][83]
The north face of Two World Trade Center (south tower) immediately after being struck by United Airlines Flight 175
Some passengers and crew members who called from the aircraft using the cabin airphone service and mobile phones provided details: several hijackers were aboard each plane; they used mace, tear gas, or pepper spray to overcome attendants; and some people aboard had been stabbed.[84][85][86][87][88][89][90] Reports indicated hijackers stabbed and killed pilots, flight attendants, and one or more passengers.[74][91] In their final report, the 9/11 Commission found the hijackers had recently purchased multi-function hand tools and assorted knives and blades.[92][93] A flight attendant on Flight 11, a passenger on Flight 175, and passengers on Flight 93 said the hijackers had bombs, but one of the passengers said he thought the bombs were fake. The FBI found no traces of explosives at the crash sites, and the 9/11 Commission concluded that the bombs were probably fake.[74]
Three buildings in the World Trade Center complex collapsed due to fire-induced structural failure.[94] The South Tower collapsed at 9:59 a.m. after burning for 56 minutes in a fire caused by the impact of United Airlines Flight 175 and the explosion of its fuel.[94] The North Tower collapsed at 10:28 a.m. after burning for 102 minutes.[94] When the North Tower collapsed, debris fell on the nearby 7 World Trade Center building (7 WTC), damaging it and starting fires. These fires burned for hours, compromising the building’s structural integrity, and 7 WTC collapsed at 5:21 p.m.[95][96] The west side of the Pentagon sustained significant damage.
Security camera footage of Flight 77 hitting the Pentagon.[97] The plane hits the Pentagon approximately 86 seconds after the beginning of this recording.
At 9:42 a.m., the Federal Aviation Administration (FAA) grounded all aircraft within the continental U.S., and aircraft already in flight were told to land immediately.[98] All international civilian aircraft were either turned back or redirected to airports in Canada or Mexico, and all international flights were banned from landing on United States territory for three days.[99] The attacks created widespread confusion among news organizations and air traffic controllers. Among the unconfirmed and often contradictory news reports aired throughout the day, one of the most prevalent said a car bomb had been detonated at the U.S. State Department’s headquarters in Washington, D.C.[100] Another jet—Delta Air Lines Flight 1989—was suspected of having been hijacked, but the aircraft responded to controllers and landed safely in Cleveland, Ohio.[101]
In a April 2002 interview, Khalid Sheikh Mohammed and Ramzi bin al-Shibh, who are believed to have organized the attacks, said Flight 93’s intended target was the United States Capitol, not the White House.[102] During the planning stage of the attacks, Mohamed Atta, the hijacker and pilot of Flight 11, thought the White House might be too tough a target and sought an assessment from Hani Hanjour, who would later hijack and pilot Flight 77.[103] Mohammed said al-Qaeda initially planned to target nuclear installations rather than the World Trade Center and the Pentagon, but decided against it, fearing things could “get out of control”.[104] Final decisions on targets, according to Mohammed, were left in the hands of the pilots.[103]
The attacks resulted in the deaths of 2,996 people, including the 19 hijackers.[105] The 2,977 victims included 246 on the four planes (from which there were no survivors), 2,606 in the World Trade Center and in the surrounding area, and 125 at the Pentagon.[106][107] Nearly all of those who perished were civilians with the exceptions of 72 law enforcement officers, 343 firefighters, and 55 military personnel who died in the attacks.[108][109] After New York, New Jersey lost the most state citizens, with the city of Hoboken having the most citizens that died in the attacks.[110] More than 90 countries lost citizens in the September 11 attacks.[111] The attacks of September 11, 2001, marked it the worst terrorist attack in world history and the deadliest foreign act of destruction to life and property on American soil since the Japanese surprise attack on Pearl Harbor on December 7, 1941.[3][not in citation given]
In Arlington County, 125 Pentagon workers lost their lives when Flight 77 crashed into the western side of the building. Of these, 70 were civilians and 55 were military personnel, many of them who worked for the United States Army or the United States Navy. The Army lost 47 civilian employees, six civilian contractors, and 22 soldiers, while the Navy lost six civilian employees, three civilian contractors, and 33 sailors. Seven Defense Intelligence Agency (DIA) civilian employees were also among the dead in the attack, as well as an Office of the Secretary of Defense (OSD) contractor.[112][113][114]Lieutenant GeneralTimothy Maude, an Army Deputy Chief of Staff, was the highest-ranking military official killed at the Pentagon.[115]
Burning towers with view from Statue of Liberty
In New York City, more than 90% of the workers and visitors who died in the towers had been at or above the points of impact.[116] In the North Tower, 1,355 people at or above the point of impact were trapped and died of smoke inhalation, fell or jumped from the tower to escape the smoke and flames, or were killed in the building’s eventual collapse. The destruction of all three staircases in the tower when Flight 11 hit made it impossible for anyone above the impact zone to escape. 107 people below the point of impact died as well.
———————————————————————
9/11: The Falling Man – Real Stories
———————————————————————
In the South Tower, one stairwell, Stairwell A, was left intact after Flight 175 hit, allowing 14 people located on the floors of impact (including one man who saw the plane coming at him) and four more from the floors above to escape. 911 operators who received calls from individuals inside the tower were not well informed of the situation as it rapidly unfolded and as a result, told callers not to descend the tower on their own.[117] 630 people died in that tower, fewer than half the number killed in the North Tower.[116] Casualties in the South Tower were significantly reduced by some occupants deciding to start evacuating as soon as the North Tower was struck.[118]
Urban Search and Rescue Task Force German Shepherd dog works to uncover survivors at the site of the collapsed World Trade Center after the September 11, 2001 attacks.
At least 200 people fell or jumped to their deaths from the burning towers (as exemplified in the photograph The Falling Man), landing on the streets and rooftops of adjacent buildings hundreds of feet below.[119] Some occupants of each tower above the point of impact made their way toward the roof in hope of helicopter rescue, but the roof access doors were locked. No plan existed for helicopter rescues, and the combination of roof equipment and thick smoke and intense heat prevented helicopters from approaching.[120] A total of 411 emergency workers died as they tried to rescue people and fight fires. The New York City Fire Department (FDNY) lost 343 firefighters, including a chaplain, two paramedics, and a fire marshal.[121] The New York City Police Department (NYPD) lost 23 officers.[122] The Port Authority Police Department (PAPD) lost 37 officers.[123] Eight emergency medical technicians (EMTs) and paramedics from private emergency medical services units were killed.[124]
Cantor Fitzgerald L.P., an investment bank on the 101st–105th floors of the North Tower, lost 658 employees, considerably more than any other employer.[125]Marsh Inc., located immediately below Cantor Fitzgerald on floors 93–100, lost 358 employees,[126][127] and 175 employees of Aon Corporation were also killed.[128] The National Institute of Standards and Technology (NIST) estimated that about 17,400 civilians were in the World Trade Center complex at the time of the attacks. Turnstile counts from the Port Authority suggest 14,154 people were typically in the Twin Towers by 8:45 a.m.[129][130] The vast majority of people below the impact zone safely evacuated the buildings.[131]
Weeks after the attack, the death toll was estimated to be over 6,000, more than twice the number of deaths eventually confirmed.[138] The city was only able to identify remains for about 1,600 of the World Trade Center victims. The medical examiner’s office collected “about 10,000 unidentified bone and tissue fragments that cannot be matched to the list of the dead”.[139] Bone fragments were still being found in 2006 by workers who were preparing to demolish the damaged Deutsche Bank Building. In 2010, a team of anthropologists and archaeologists searched for human remains and personal items at the Fresh Kills Landfill, where seventy-two more human remains were recovered, bringing the total found to 1,845. DNA profiling continues in an attempt to identify additional victims.[140][141][142] The remains are being held in storage in Memorial Park, outside the New York City Medical Examiner’s facilities. It was expected that the remains would be moved in 2013 to a repository behind a wall at the 9/11 museum. In July 2011, a team of scientists at the Office of Chief Medical Examiner was still trying to identify remains, in the hope that improved technology will allow them to identify other victims.[142] On March 20, 2015, the 1,640th victim was identified. There are still 1,113 victims who have not been identified.[143]
The Deutsche Bank Building across Liberty Street from the World Trade Center complex was later condemned as uninhabitable because of toxic conditions inside the office tower, and was deconstructed.[147][148] The Borough of Manhattan Community College‘s Fiterman Hall at 30 West Broadway was condemned due to extensive damage in the attacks, and is being rebuilt.[149] Other neighboring buildings (including 90 West Street and the Verizon Building) suffered major damage but have been restored.[150]World Financial Center buildings, One Liberty Plaza, the Millenium Hilton, and 90 Church Street had moderate damage and have since been restored.[151] Communications equipment on top of the North Tower was also destroyed, but media stations were quickly able to reroute the signals and resume their broadcasts.[144][152]
The Pentagon was severely damaged by the impact of American Airlines Flight 77 and ensuing fires, causing one section of the building to collapse.[153] As the airplane approached the Pentagon, its wings knocked down light poles and its right engine hit a power generator before crashing into the western side of the building.[154][155] The plane hit the Pentagon at the first-floor level. The front part of the fuselage disintegrated on impact, while the mid and tail sections kept moving for another fraction of a second.[156] Debris from the tail section penetrated furthest into the building, breaking through 310 feet (94 m) of the three outermost of the building’s five rings.[156][157]
An injured victim of the Pentagon attack is evacuated.
The New York City Fire Department deployed 200 units (half of the department) to the World Trade Center. Their efforts were supplemented by numerous off-duty firefighters and emergency medical technicians.[158][159][160] The New York City Police Department sent Emergency Service Units and other police personnel, and deployed its aviation unit. Once on the scene, the FDNY, NYPD, and PAPD did not coordinate efforts and performed redundant searches for civilians.[158][161] As conditions deteriorated, the NYPD aviation unit relayed information to police commanders, who issued orders for its personnel to evacuate the towers; most NYPD officers were able to safely evacuate before the buildings collapsed.[161][162] With separate command posts set up and incompatible radio communications between the agencies, warnings were not passed along to FDNY commanders.
After the first tower collapsed, FDNY commanders issued evacuation warnings; however, due to technical difficulties with malfunctioning radio repeater systems, many firefighters never heard the evacuation orders. 9-1-1 dispatchers also received information from callers that was not passed along to commanders on the scene.[159] Within hours of the attack, a substantial search and rescue operation was launched. After months of around-the-clock operations, the World Trade Center site was cleared by the end of May 2002.[163]
Eight hours after the attacks, Donald Rumsfeld, then U.S. Secretary of Defense, declares “The Pentagon is functioning.”
At 8:32 a.m., FAA officials were notified Flight 11 had been hijacked and they in turn notified the North American Aerospace Defense Command (NORAD). NORAD scrambled two F-15s from Otis Air National Guard Base in Massachusetts and they were airborne by 8:53 a.m.[164] Because of slow and confused communication from FAA officials, NORAD had 9 minutes’ notice that Flight 11 had been hijacked, and no notice about any of the other flights before they crashed.[164] After both of the Twin Towers had already been hit, more fighters were scrambled from Langley Air Force Base in Virginia at 9:30 a.m.[164] At 10:20 a.m. Vice President Dick Cheney issued orders to shoot down any commercial aircraft that could be positively identified as being hijacked. However, these instructions were not relayed in time for the fighters to take action.[164][165][166][167] Some fighters took to the air without live ammunition, knowing that to prevent the hijackers from striking their intended targets, the pilots might have to intercept and crash their fighters into the hijacked planes, possibly ejecting at the last moment.[168]
For the first time in U.S. history, SCATANA was invoked,[169] thus stranding tens of thousands of passengers across the world.[170] The FAA closed American airspace to all international flights, causing about five hundred flights to be turned back or redirected to other countries. Canada received 226 of the diverted flights and launched Operation Yellow Ribbon to deal with the large numbers of grounded planes and stranded passengers.[171]
The 9/11 attacks had immediate effects upon the American people.[172] Police and rescue workers from around the country took leaves of absence, traveling to New York City to help recover bodies from the twisted remnants of the Twin Towers.[173] Blood donations across the U.S. surged in the weeks after 9/11.[174][175]
The deaths of adults in the attacks resulted in over 3,000 children losing a parent.[176] Subsequent studies documented children’s reactions to these actual losses and to feared losses of life, the protective environment in the aftermath of the attacks, and effects on surviving caregivers.[177][178][179]
Domestic reactions
Menu
0:00
At a joint session of Congress, President Bush pledges to defend America’s freedom against the fear of terrorism, September 20, 2001 (audio only).
Following the attacks, President Bush’s approval rating soared to 90%.[180] On September 20, 2001, he addressed the nation and a joint session of the United States Congress regarding the events of September 11 and the subsequent nine days of rescue and recovery efforts, and described his intended response to the attacks. New York City mayor Rudy Giuliani‘s highly visible role won him high praise in New York and nationally.[181]
Many relief funds were immediately set up to assist victims of the attacks, with the task of providing financial assistance to the survivors of the attacks and to the families of victims. By the deadline for victim’s compensation on September 11, 2003, 2,833 applications had been received from the families of those who were killed.[182]
Contingency plans for the continuity of government and the evacuation of leaders were implemented soon after the attacks.[170] However, Congress was not told that the United States had been under a continuity of government status until February 2002.[183]
In the largest restructuring of the U.S. government in contemporary history, the United States enacted the Homeland Security Act of 2002, creating the Department of Homeland Security. Congress also passed the USA PATRIOT Act, saying it would help detect and prosecute terrorism and other crimes.[184] Civil liberties groups have criticized the PATRIOT Act, saying it allows law enforcement to invade the privacy of citizens and that it eliminates judicial oversight of law enforcement and domestic intelligence.[185][186][187] In an effort to effectively combat future acts of terrorism, the National Security Agency (NSA) was given broad powers. NSA commenced warrantless surveillance of telecommunications, which was sometimes criticized since it permitted the agency “to eavesdrop on telephone and e-mail communications between the United States and people overseas without a warrant”.[188] In response to requests by various intelligence agencies, the United States Foreign Intelligence Surveillance Court permitted an expansion of powers by the U.S. government in seeking, obtaining, and sharing information on U.S. citizens as well as non-U.S. people from around the world.[189]
Hate crimes
A fireman looks up at the remains of the South Tower
A fireman stands behind rubble
Shortly after the attacks, President Bush made a public appearance at Washington’s largest Islamic Center and acknowledged the “incredibly valuable contribution” that millions of American Muslims made to their country and called for them “to be treated with respect.”[190] However, numerous incidents of harassment and hate crimes against Muslims and South Asians were reported in the days following the attacks.[191][192][193]Sikhs were also targeted because Sikh males usually wear turbans, which are stereotypically associated with Muslims. There were reports of attacks on mosques and other religious buildings (including the firebombing of a Hindu temple), and assaults on people, including one murder: Balbir Singh Sodhi, a Sikh mistaken for a Muslim, was fatally shot on September 15, 2001, in Mesa, Arizona.[193]
According to an academic study, people perceived to be Middle Eastern were as likely to be victims of hate crimes as followers of Islam during this time. The study also found a similar increase in hate crimes against people who may have been perceived as Muslims, Arabs, and others thought to be of Middle Eastern origin.[194] A report by the South Asian American advocacy group known as South Asian Americans Leading Together, documented media coverage of 645 bias incidents against Americans of South Asian or Middle Eastern descent between September 11 and 17. Various crimes such as vandalism, arson, assault, shootings, harassment, and threats in numerous places were documented.[195][196]
Muslim American response
Muslim organizations in the United States were swift to condemn the attacks and called “upon Muslim Americans to come forward with their skills and resources to help alleviate the sufferings of the affected people and their families”.[197] These organizations included the Islamic Society of North America, American Muslim Alliance, American Muslim Council, Council on American-Islamic Relations, Islamic Circle of North America, and the Shari’a Scholars Association of North America. Along with monetary donations, many Islamic organizations launched blood drives and provided medical assistance, food, and shelter for victims.[198][199][200]
The attacks were denounced by mass media and governments worldwide. Across the globe, nations offered pro-American support and solidarity.[201] Leaders in most Middle Eastern countries, and Afghanistan, condemned the attacks. Iraq was a notable exception, with an immediate official statement that, “the American cowboys are reaping the fruit of their crimes against humanity”.[202] While the government of Saudi Arabia officially condemned the attacks, privately many Saudis favored bin Laden’s cause.[203][204] As in the United States, the aftermath of the attacks saw tensions increase in other countries between Muslims and non-Muslims.[205]
United Nations Security Council Resolution 1368 condemned the attacks, and expressed readiness to take all necessary steps to respond and combat all forms of terrorism in accordance with their Charter.[206] Numerous countries introduced anti-terrorism legislation and froze bank accounts they suspected of al-Qaeda ties.[207][208] Law enforcement and intelligence agencies in a number of countries arrested alleged terrorists.[209][210]
British Prime Minister Tony Blair said Britain stood “shoulder to shoulder” with the United States.[211] A few days later, Blair flew to Washington to affirm British solidarity with the United States. In a speech to Congress, nine days after the attacks, which Blair attended as a guest, President Bush declared “America has no truer friend than Great Britain.”[212] Subsequently, Prime Minister Blair embarked on two months of diplomacy to rally international support for military action; he held 54 meetings with world leaders and travelled more than 40,000 miles (60,000 km).[213]
Vladimir Putin and his wife attending a commemoration service for the victims of the September 11 attacks on November 16, 2001
Tens of thousands of people attempted to flee Afghanistan following the attacks, fearing a response by the United States. Pakistan, already home to many Afghan refugees from previous conflicts, closed its border with Afghanistan on September 17, 2001. Approximately one month after the attacks, the United States led a broad coalition of international forces to overthrow the Taliban regime from Afghanistan for their harboring of al-Qaeda.[214] Though Pakistani authorities were initially reluctant to align themselves with the United States against the Taliban, they permitted the coalition access to their military bases, and arrested and handed over to the U.S. over 600 suspected al-Qaeda members.[215][216]
At 2:40 p.m. in the afternoon of September 11, Secretary of DefenseDonald Rumsfeld was issuing rapid orders to his aides to look for evidence of Iraqi involvement. According to notes taken by senior policy official Stephen Cambone, Rumsfeld asked for, “Best info fast. Judge whether good enough hit S.H.” (Saddam Hussein) “at same time. Not only UBL” (Osama bin Laden).[220] Cambone’s notes quoted Rumsfeld as saying, “Need to move swiftly – Near term target needs – go massive – sweep it all up. Things related and not.”[221][222] In a meeting at Camp David on September 15 the Bush administration rejected the idea of attacking Iraq in response to 9/11.[223]
The NATO council declared the attacks on the United States were an attack on all NATO nations which satisfied Article 5 of the NATO charter. This marked the first invocation of Article 5, which had been written during the Cold War with an attack by the Soviet Union in mind.[224]Australian Prime MinisterJohn Howard who was in Washington D.C. during the attacks invoked Article IV of the ANZUS treaty.[225] The Bush administration announced a War on Terror, with the stated goals of bringing bin Laden and al-Qaeda to justice and preventing the emergence of other terrorist networks.[226] These goals would be accomplished by imposing economic and military sanctions against states harboring terrorists, and increasing global surveillance and intelligence sharing.[227]
On September 14, 2001, the U.S. Congress passed the Authorization for Use of Military Force Against Terrorists. Still in effect, it grants the President the authority to use all “necessary and appropriate force” against those whom he determined “planned, authorized, committed or aided” the September 11th attacks, or who harbored said persons or groups.[228]
On October 7, 2001, the War in Afghanistan began when U.S. and British forces initiated aerial bombing campaigns targeting Taliban and al-Qaeda camps, then later invaded Afghanistan with ground troops of the Special Forces.[229] This eventually led to the overthrow of the Taliban rule of Afghanistan on December 9, 2001 by U.S. led coalition forces.[230] Conflict in Afghanistan between the Taliban insurgency and the Afghan forces backed by NATO Resolute Support Mission is ongoing. The Philippines and Indonesia, among other nations with their own internal conflicts with Islamic terrorism, also increased their military readiness.[231][232]
Survivors were covered in dust after the collapse of the towers.
Hundreds of thousands of tons of toxic debris containing more than 2,500 contaminants, including known carcinogens, were spread across Lower Manhattan due to the collapse of the Twin Towers.[233][234] Exposure to the toxins in the debris is alleged to have contributed to fatal or debilitating illnesses among people who were at ground zero.[235][236] The Bush administration ordered the Environmental Protection Agency (EPA) to issue reassuring statements regarding air quality in the aftermath of the attacks, citing national security, but the EPA did not determine that air quality had returned to pre-September 11 levels until June 2002.[237]
Health effects extended to residents, students, and office workers of Lower Manhattan and nearby Chinatown.[238] Several deaths have been linked to the toxic dust, and the victims’ names were included in the World Trade Center memorial.[239] Approximately 18,000 people have been estimated to have developed illnesses as a result of the toxic dust.[240] There is also scientific speculation that exposure to various toxic products in the air may have negative effects on fetal development. A notable children’s environmental health center is currently analyzing the children whose mothers were pregnant during the WTC collapse, and were living or working nearby.[241] A study of rescue workers released in April 2010 found that all those studied had impaired lung functions, and that 30–40% were reporting little or no improvement in persistent symptoms that started within the first year of the attack.[242]
Years after the attacks, legal disputes over the costs of illnesses related to the attacks were still in the court system. On October 17, 2006, a federal judge rejected New York City’s refusal to pay for health costs for rescue workers, allowing for the possibility of numerous suits against the city.[243] Government officials have been faulted for urging the public to return to lower Manhattan in the weeks shortly after the attacks. Christine Todd Whitman, administrator of the EPA in the aftermath of the attacks, was heavily criticized by a U.S. District Judge for incorrectly saying that the area was environmentally safe.[244] Mayor Giuliani was criticized for urging financial industry personnel to return quickly to the greater Wall Street area.[245]
The United States Congress passed the James L. Zadroga 9/11 Health and Compensation Act on December 22, 2010, and President Barack Obama signed the act into law on January 2, 2011. It allocated $4.2 billion to create the World Trade Center Health Program, which provides testing and treatment for people suffering from long-term health problems related to the 9/11 attacks.[246][247] The WTC Health Program replaced preexisting 9/11-related health programs such as the Medical Monitoring and Treatment Program and the WTC Environmental Health Center program.[247]
According to a new study, pregnant women living near the World Trade Center during the 9/11 terror attacks experienced higher-than-normal negative birth outcomes. The study by Princeton University’s Woodrow Wilson School of Public and International Affairs found that these mothers were more likely to give birth prematurely and deliver babies with low birth weights. Their babies were also more likely to be admitted to neonatal intensive care units after birth (especially baby boys), according to the study led by the Wilson School’s Janet Currie and Hannes Schwandt.[248]
As shown in this table, the 9/11 attacks had a major effect on the economy of New York City (in red), compared to the United States’ economy overall (in blue).
The attacks had a significant economic impact on United States and world markets.[249] The stock exchanges did not open on September 11 and remained closed until September 17. Reopening, the Dow Jones Industrial Average (DJIA) fell 684 points, or 7.1%, to 8921, a record-setting one-day point decline.[250] By the end of the week, the DJIA had fallen 1,369.7 points (14.3%), at the time its largest one-week point drop in history.[251] In 2001 dollars, U.S. stocks lost $1.4 trillion in valuation for the week.[251]
In New York City, about 430,000 job-months and $2.8 billion dollars in wages were lost in the three months after the attacks. The economic effects were mainly on the economy’s export sectors.[252] The city’s GDP was estimated to have declined by $27.3 billion for the last three months of 2001 and all of 2002. The U.S. government provided $11.2 billion in immediate assistance to the Government of New York City in September 2001, and $10.5 billion in early 2002 for economic development and infrastructure needs.[253] Also hurt were small businesses in Lower Manhattan near the World Trade Center, 18,000 of which were destroyed or displaced, resulting in lost jobs and their consequent wages. Assistance was provided by Small Business Administration loans, federal government Community Development Block Grants, and Economic Injury Disaster Loans.[253] Some 31,900,000 square feet (2,960,000 m2) of Lower Manhattan office space was damaged or destroyed.[254] Many wondered whether these jobs would return, and if the damaged tax base would recover.[255] Studies of the economic effects of 9/11 show the Manhattan office real-estate market and office employment were less affected than first feared, because of the financial services industry’s need for face-to-face interaction.[256][257]
North American air space was closed for several days after the attacks and air travel decreased upon its reopening, leading to a nearly 20% cutback in air travel capacity, and exacerbating financial problems in the struggling U.S. airline industry.[258]
The impact of 9/11 extends beyond geopolitics into society and culture in general. Immediate responses to 9/11 included greater focus on home life and time spent with family, higher church attendance, and increased expressions of patriotism such as the flying of flags.[261] The radio industry responded by removing certain songs from playlists, and the attacks have subsequently been used as background, narrative or thematic elements in film, television, music and literature. Already-running television shows as well as programs developed after 9/11 have reflected post-9/11 cultural concerns.[262]9/11 conspiracy theories have become social phenomena, despite negligible support for such views from expert scientists, engineers, and historians.[263] 9/11 has also had a major impact on the religious faith of many individuals; for some it strengthened, to find consolation to cope with the loss of loved ones and overcome their grief; others started to question their faith or lost it entirely, because they couldn’t reconcile it with their view of religion.[264][265]
The culture of America succeeding the attacks is noted for heightened security and an increased demand thereof, as well as paranoia and anxiety regarding future terrorist attacks that includes most of the nation. Psychologists have also confirmed that there has been an increased amount of national anxiety in commercial air travel.[266]
In the United States, the Department of Homeland Security was created by the Homeland Security Act to coordinate domestic anti-terrorism efforts. The USA Patriot Act gave the federal government greater powers, including the authority to detain foreign terror suspects for a week without charge, to monitor telephone communications, e-mail, and Internet use by terror suspects, and to prosecute suspected terrorists without time restrictions. The FAA ordered that airplane cockpits be reinforced to prevent terrorists gaining control of planes, and assigned sky marshals to flights. Further, the Aviation and Transportation Security Act made the federal government, rather than airports, responsible for airport security. The law created the Transportation Security Administration to inspect passengers and luggage, causing long delays and concern over passenger privacy.[273]
Investigations
FBI
Mohamed Atta, an Egyptian national, was the ringleader of the hijackers.
Immediately after the attacks, the Federal Bureau of Investigation started PENTTBOM, the largest criminal inquiry in the history of the United States. At its height, more than half of the FBI’s agents worked on the investigation and followed a half-million leads.[274] The FBI concluded that there was “clear and irrefutable” evidence linking al-Qaeda and bin Laden to the attacks.[275]
The FBI was quickly able to identify the hijackers, including leader Mohamed Atta, when his luggage was discovered at Boston’s Logan Airport. Atta had been forced to check two of his three bags due to space limitations on the 19-seat commuter flight he took to Boston.[276] Due to a new policy instituted to prevent flight delays, the luggage failed to make it aboard American Airlines Flight 11 as planned. The luggage contained the hijackers’ names, assignments and al-Qaeda connections. “It had all these Arab-language (sic) papers that amounted to the Rosetta stone of the investigation”, said one FBI agent.[277] Within hours of the attacks, the FBI released the names and in many cases the personal details of the suspected pilots and hijackers.[278][279] On September 27, 2001, they released photos of all 19 hijackers, along with information about possible nationalities and aliases.[280] Fifteen of the men were from Saudi Arabia, two from the United Arab Emirates, one from Egypt, and one from Lebanon.[281]
By midday, the U.S. National Security Agency and German intelligence agencies had intercepted communications pointing to Osama bin Laden.[282] Two of the hijackers were known to have travelled with a bin Laden associate to Malaysia in 2000[283] and hijacker Mohammed Atta had previously gone to Afghanistan.[284] He and others were part of a terrorist cell in Hamburg.[285] One of the members of the Hamburg cell was discovered to have been in communication with Khalid Sheik Mohammed who was identified as a member of al-Qaeda.[286]
Authorities in the United States and Britain also obtained electronic intercepts, including telephone conversations and electronic bank transfers, which indicate that Mohammed Atef, a bin Laden deputy, was a key figure in the planning of the 9/11 attacks. Intercepts were also obtained that revealed conversations that took place days before September 11 between bin Laden and an associate in Pakistan. In those conversations, the two referred to “an incident that would take place in America on, or around, September 11” and they discussed potential repercussions. In another conversation with an associate in Afghanistan, bin Laden discussed the “scale and effects of a forthcoming operation.” These conversations did not specifically mention the World Trade Center or Pentagon, or other specifics.[287]
Origins of the 19 hijackers
Nationality
Number
Saudi Arabia
15
United Arab Emirates
2
Egypt
1
Lebanon
1
CIA
The Inspector General of the Central Intelligence Agency (CIA) conducted an internal review of the agency’s pre-9/11 performance and was harshly critical of senior CIA officials for not doing everything possible to confront terrorism. He criticized their failure to stop two of the 9/11 hijackers, Nawaf al-Hazmi and Khalid al-Mihdhar, as they entered the United States and their failure to share information on the two men with the FBI.[288] In May 2007, senators from both major U.S. political parties drafted legislation to make the review public. One of the backers, Senator Ron Wyden said, “The American people have a right to know what the Central Intelligence Agency was doing in those critical months before 9/11.”[289]
In February 2002 the Senate Select Committee on Intelligence and the House Permanent Select Committee on Intelligence formed a joint inquiry into the performance of the U.S. Intelligence Community.[290] Their 832 page report released in December 2002[291] detailed failings of the FBI and CIA to use available information, including about terrorists the CIA knew were in the United States, in order to disrupt the plots.[292] The joint inquiry developed its information about possible involvement of Saudi Arabian government officials from non-classified sources.[293] Nevertheless, the Bush administration demanded 28 related pages remain classified.[292] In December 2002 the inquiry’s chair Bob Graham (D-FL) revealed in an interview that there was “evidence that there were foreign governments involved in facilitating the activities of at least some of the terrorists in the United States.”[294] September 11th victim families were frustrated by the unanswered questions and redacted material from the Congressional inquiry and demanded an independent commission.[292] September 11th victim families,[295] members of congress[296][297] and the Saudi Arabian government are still seeking release of the documents.[298][299]
The National Commission on Terrorist Attacks Upon the United States (9/11 Commission), chaired by Thomas Kean and Lee H. Hamilton, was formed in late 2002 to prepare a thorough account of the circumstances surrounding the attacks, including preparedness for and the immediate response to the attacks.[300] On July 22, 2004, the Commission issued the 9/11 Commission Report. The report detailed the events of 9/11, found the attacks were carried out by members of al-Qaeda, and examined how security and intelligence agencies were inadequately coordinated to prevent the attacks. Formed from an independent bipartisan group of mostly former Senators, Representatives, and Governors, the commissioners explained, “We believe the 9/11 attacks revealed four kinds of failures: in imagination, policy, capabilities, and management”.[301] The Commission made numerous recommendations on how to prevent future attacks, and in 2011 was dismayed that several of its recommendations had yet to be implemented.[302]
The exterior support columns from the lower level of the south tower remained standing after the building collapsed.
The U.S. National Institute of Standards and Technology (NIST) investigated the collapses of the Twin Towers and 7 WTC. The investigations examined why the buildings collapsed and what fire protection measures were in place, and evaluated how fire protection systems might be improved in future construction.[303] The investigation into the collapse of 1 WTC and 2 WTC was concluded in October 2005 and that of 7 WTC was completed in August 2008.[304]
NIST found that the fireproofing on the Twin Towers’ steel infrastructures was blown off by the initial impact of the planes and that, had this not occurred, the towers likely would have remained standing.[305] A 2007 study of the north tower’s collapse published by researchers of Purdue University determined that, since the plane’s impact had stripped off much of the structure’s thermal insulation, the heat from a typical office fire would have softened and weakened the exposed girders and columns enough to initiate the collapse regardless of the number of columns cut or damaged by the impact.[306][307]
The director of the original investigation stated that, “the towers really did amazingly well. The terrorist aircraft didn’t bring the buildings down; it was the fire which followed. It was proven that you could take out two thirds of the columns in a tower and the building would still stand.”[308] The fires weakened the trusses supporting the floors, making the floors sag. The sagging floors pulled on the exterior steel columns causing the exterior columns to bow inward. With the damage to the core columns, the buckling exterior columns could no longer support the buildings, causing them to collapse. Additionally, the report found the towers’ stairwells were not adequately reinforced to provide adequate emergency escape for people above the impact zones.[309] NIST concluded that uncontrolled fires in 7 WTC caused floor beams and girders to heat and subsequently “caused a critical support column to fail, initiating a fire-induced progressive collapse that brought the building down”.[304]
Rebuilding
Rebuilt One World Trade Center nearing completion in July 2013
On the day of the attacks, New York City mayor Rudy Giuliani stated: “We will rebuild. We’re going to come out of this stronger than before, politically stronger, economically stronger. The skyline will be made whole again.”[310]
The damaged section of the Pentagon was rebuilt and occupied within a year of the attacks.[311] The temporary World Trade Center PATH station opened in late 2003 and construction of the new 7 World Trade Center was completed in 2006. Work on rebuilding the main World Trade Center site was delayed until late 2006 when leaseholder Larry Silverstein and the Port Authority of New York and New Jersey agreed on financing.[312] The construction of One World Trade Center began on April 27, 2006, and reached its full height on May 20, 2013. The spire was installed atop the building at that date, putting 1 WTC’s height at 1,776 feet (541 m) and thus claiming the title of the tallest building in the Western Hemisphere.[313] 1 WTC finished construction and opened on November 3, 2014.[314]
On the World Trade Center site, three more office towers are expected to be built one block east of where the original towers stood. Construction has begun on all three of these towers.[315]
The Tribute in Light on September 11, 2014, on the thirteenth anniversary of the attacks, seen from Bayonne, New Jersey. The tallest building in the picture is the new One World Trade Center.
In the days immediately following the attacks, many memorials and vigils were held around the world, and photographs of the dead and missing were posted around Ground Zero. A witness described being unable to “get away from faces of innocent victims who were killed. Their pictures are everywhere, on phone booths, street lights, walls of subway stations. Everything reminded me of a huge funeral, people quiet and sad, but also very nice. Before, New York gave me a cold feeling; now people were reaching out to help each other.”[316]
One of the first memorials was the Tribute in Light, an installation of 88 searchlights at the footprints of the World Trade Center towers.[317] In New York, the World Trade Center Site Memorial Competition was held to design an appropriate memorial on the site.[318] The winning design, Reflecting Absence, was selected in August 2006, and consists of a pair of reflecting pools in the footprints of the towers, surrounded by a list of the victims’ names in an underground memorial space.[319]
The Pentagon Memorial was completed and opened to the public on the seventh anniversary of the attacks in 2008.[320][321] It consists of a landscaped park with 184 benches facing the Pentagon.[322] When the Pentagon was repaired in 2001–2002, a private chapel and indoor memorial were included, located at the spot where Flight 77 crashed into the building.[323]
In Shanksville, a permanent Flight 93 National Memorial is planned to include a sculpted grove of trees forming a circle around the crash site, bisected by the plane’s path, while wind chimes will bear the names of the victims.[324] A temporary memorial is located 500 yards (457 m) from the crash site.[325] New York City firefighters donated a cross made of steel from the World Trade Center and mounted on top of a platform shaped like the Pentagon.[326] It was installed outside the firehouse on August 25, 2008.[327] Many other permanent memorials are elsewhere. Scholarships and charities have been established by the victims’ families, and by many other organizations and private figures.[328]
On every anniversary, in New York City, the names of the victims who died there are read out against a background of somber music. The President of the United States attends a memorial service at the Pentagon,[329] and asks Americans to observe Patriot Day with a moment of silence. Smaller services are held in Shanksville, Pennsylvania, which are usually attended by the President’s spouse.
Tomorrow marks the five hundred and thirty first anniversary of the Battle of Bosworth and the end of the War of The Rose’s and for me and many a fascinating period of British/French history. At the end of day King Richard III lay dead , Plantagenet rule came to a bloody, brutal end and the rise of the “sexy” Tudors has began.
As a lover of all things history , especially British/Irish/Roman I have always been fascinated by the key players in the ruthless War of the Rose’s and the sheer brutality of the murder’s they perpetuated and casual deceit they used to forward their quest for the crown of England/Wales. Going against the grain of popular opinion I have always had a soft spot for Richard, regardless of the various murders he has been associated with , not least of all the Prince’s in the Tower. He only ruled for a short term and yet he will go down in history as a giant of British Royalty and the last Battle King of England
The Battle of Bosworth Field (or Battle of Bosworth) was the last significant battle of the Wars of the Roses, the civil war between the Houses of Lancaster and York that raged across England in the latter half of the 15th century. Fought on 22 August 1485, the battle was won by the Lancastrians.
Their leader Henry Tudor, Earl of Richmond, by his victory became the first English monarch of the Tudor dynasty. His opponent, Richard III, the last king of the House of York, was killed in the battle. Historians consider Bosworth Field to mark the end of the Plantagenet dynasty, making it a defining moment of English and Welsh history.
Richard’s reign began in 1483. At the request of his brother Edward IV, Richard was acting as Lord Protector for his son Edward V. Richard had Parliament declare Edward V illegitimate and ineligible for the throne, and Richard took it for himself. Richard lost popularity when the boy and his younger brother disappeared after Richard incarcerated them in the Tower of London, and Richard’s support was further eroded by the popular belief that he was implicated in the death of his wife. Across the English Channel in Brittany, Henry Tudor, a descendant of the greatly diminished House of Lancaster, seized on Richard’s difficulties so that he could challenge Richard’s claim to the throne.
Henry’s first attempt to invade England was frustrated by a storm in 1483, but at his second attempt he arrived unopposed on 7 August 1485 on the southwest coast of Wales. Marching inland, Henry gathered support as he made for London. Richard mustered his troops and intercepted Henry’s army south of Market Bosworth in Leicestershire. Thomas, Lord Stanley, and Sir William Stanley brought a force to the battlefield, but held back while they decided which side it would be more advantageous to support.
Richard divided his army, which outnumbered Henry’s, into three groups (or “battles”). One was assigned to the Duke of Norfolk and another to the Earl of Northumberland. Henry kept most of his force together and placed it under the command of the experienced Earl of Oxford. Richard’s vanguard, commanded by Norfolk, attacked but struggled against Oxford’s men, and some of Norfolk’s troops fled the field. Northumberland took no action when signalled to assist his king, so Richard gambled everything on a charge across the battlefield to kill Henry and end the fight. Seeing the king’s knights separated from his army, the Stanleys intervened; Sir William led his men to Henry’s aid, surrounding and killing Richard. After the battle, Henry was crowned king below an oak tree in nearby Stoke Golding, now a residential garden.
Henry hired chroniclers to portray his reign favourably; the Battle of Bosworth was popularised to represent the Tudor dynasty as the start of a new age. From the 15th to 18th centuries the battle was glamorised as a victory of good over evil. The climax of William Shakespeare‘s play Richard III provides a focal point for critics in later film adaptations. The exact site of the battle is disputed because of the lack of conclusive data, and memorials have been erected at different locations.
In 1974, the Bosworth Battlefield Heritage Centre was built on a site that has since been challenged by several scholars and historians. In October 2009, a team of researchers, who had performed geological surveys and archaeological digs in the area from 2003, suggested a location two miles (3.2 km) southwest of Ambion Hill.
During the 15th century, civil war raged across England as the Houses of York and Lancaster fought each other for the English throne. In 1471, the Yorkists defeated their rivals in the battles of Barnet and Tewkesbury. The Lancastrian King Henry VI and his only son, Edward of Lancaster, died in the aftermath of the Battle of Tewkesbury. Their deaths left the House of Lancaster with no direct claimants to the throne. The Yorkist king, Edward IV, was in complete control of England.
He attainted those who refused to submit to his rule, such as Jasper Tudor and his nephew Henry, naming them traitors and confiscating their lands. The Tudors tried to flee to France but strong winds forced them to land in Brittany, then a semi-independent duchy, where they were taken into the custody of Duke Francis II.
Henry’s mother, Lady Margaret Beaufort, was a great-granddaughter of John of Gaunt, uncle of King Richard II and father of King Henry IV. The Beauforts were originally bastards, but Henry IV legitimised them on the condition that their descendants were not eligible to inherit the throne. Henry Tudor, the only remaining Lancastrian noble with a trace of the royal bloodline, had a weak claim to the throne, and Edward regarded him as “a nobody”.
The Duke of Brittany, however, viewed Henry as a valuable tool to bargain for England’s aid in conflicts with France and kept the Tudors under his protection.
Edward IV died twelve years after Tewkesbury on 9 April 1483.
His twelve-year-old elder son succeeded him as King Edward V; the younger son, nine-year-old Richard of Shrewsbury, was next in line to the throne. Edward V was too young to rule and a Royal Council was established to rule the country until the king’s coming of age. The royal court was worried when they learned that the Woodvilles, relatives of Edward IV’s widow Elizabeth, were plotting to seize control of the council.
Having offended many in their quest for wealth and power, the Woodville family was not popular. To frustrate the Woodvilles’ ambitions, Lord Hastings and other members of the council turned to the new king’s uncle—Richard, Duke of Gloucester, brother of Edward IV. The courtiers urged Gloucester to assume the role of Protector quickly, as had been previously requested by his now dead brother.
Arms of Earl Rivers
On 29 April, Gloucester, accompanied by a contingent of guards and Henry Stafford, 2nd Duke of Buckingham, took Edward V into custody and arrested several prominent members of the Woodville family. After bringing the young king to London, Gloucester had two of the Woodvilles (Anthony Woodville, 2nd Earl Rivers and Richard Grey) executed, without trial, on charges of treason.
On 13 June, Gloucester accused Hastings of plotting with the Woodvilles and had him beheaded. Nine days later, Gloucester convinced Parliament to declare the marriage between Edward IV and Elizabeth illegal, rendering their children illegitimate and disqualifying them from the throne. With his brother’s children out of the way, he was next in the line of succession and was proclaimed King Richard III on 26 June.
The timing and extrajudicial nature of the deeds done to obtain the throne for Richard won him no popularity, and rumours that spoke ill of the new king spread throughout England. After they were declared bastards, the two princes were confined in the Tower of London and never seen in public again.
Discontent with Richard’s actions manifested itself in the summer after he took control of the country, as a conspiracy emerged to displace him from the throne. The rebels were mostly loyalists to Edward IV, who saw Richard as a usurper. Their plans were co-ordinated by a Lancastrian, Henry’s mother Lady Margaret, who was promoting her son as a candidate for the throne. The highest-ranking conspirator was Buckingham. No chronicles tell of the duke’s motive in joining the plot, although historian Charles Ross proposes that Buckingham was trying to distance himself from a king who was becoming increasingly unpopular with the people.
Michael Jones and Malcolm Underwood suggest that Margaret deceived Buckingham into thinking the rebels supported him to be king.
Elizabeth of York: rumours of her marriage launched Henry’s invasion.
The plan was to stage uprisings within a short time in southern and western England, overwhelming Richard’s forces. Buckingham would support the rebels by invading from Wales, while Henry came in by sea. Bad timing and weather wrecked the plot. An uprising in Kent started 10 days prematurely, alerting Richard to muster the royal army and take steps to put down the insurrections. Richard’s spies informed him of Buckingham’s activities, and the king’s men captured and destroyed the bridges across the River Severn. When Buckingham and his army reached the river, they found it swollen and impossible to cross because of a violent storm that broke on 15 October.
Buckingham was trapped and had no safe place to retreat; his Welsh enemies seized his home castle after he had set forth with his army. The duke abandoned his plans and fled to Wem, where he was betrayed by his servant and arrested by Richard’s men. On 2 November 1483, he was executed.
Henry had attempted a landing on 10 October (or 19 October), but his fleet was scattered by a storm. He reached the coast of England (at either Plymouth or Poole), and a group of soldiers hailed him to come ashore. They were, in truth, Richard’s men, prepared to capture Henry once he set foot on English soil. Henry was not deceived and returned to Brittany, abandoning the invasion. Without Buckingham or Henry, the rebellion was easily crushed by Richard.
The survivors of the failed uprisings fled to Brittany, where they openly supported Henry’s claim to the throne. At Christmas, Henry Tudor swore an oath to marry Edward IV’s daughter, Elizabeth of York, to unite the warring houses of York and Lancaster.
Henry’s rising prominence made him a great threat to Richard, and the Yorkist king made several overtures to the Duke of Brittany to surrender the young Lancastrian. Francis refused, holding out for the possibility of better terms from Richard. In mid-1484, Francis was incapacitated by illness and while recuperating, his treasurer, Pierre Landais, took over the reins of government. Landais reached an agreement with Richard to send back Henry and his uncle in exchange for military and financial aid. John Morton, a bishop of Flanders, learned of the scheme and warned the Tudors, who fled to France.
The French court allowed them to stay; the Tudors were useful pawns to ensure that Richard’s England did not interfere with French plans to annexe Brittany.
Anne Neville
On 16 March 1485, Richard’s queen, Anne Neville, died and rumours spread across the country that she was murdered to pave the way for Richard to marry his niece, Elizabeth. The gossip alienated Richard from some of his northern supporters, and upset Henry across the English Channel. The loss of Elizabeth’s hand in marriage could unravel the alliance between Henry’s supporters who were Lancastrians and those who were loyalists to Edward IV.
Anxious to secure his bride, Henry assembled approximately 2,000 men and set sail from France on 1 August.
Factions
A stained-glass window in St. James Church, Sutton Cheney, commemorates the Battle of Bosworth and the leaders of the combatants, Richard III (left) and Henry VII (right).
By the 15th century, English chivalric ideas of selfless service to the king had been corrupted.
Armed forces were mostly raised through musters in individual estates; every able-bodied man had to respond to his lord’s call to arms, and each noble had exclusive authority over his militia. Although a king could raise personal militia from his lands, he could only muster a significantly large army through the support of his nobles. Richard, like his predecessors, had to win over these men by granting gifts and maintaining cordial relationships. Powerful nobles could demand greater incentives to remain on the liege’s side or else they might turn against him.
Three groups, each with its own agenda, stood on Bosworth Field: Richard III and his Yorkist army; his challenger, Henry Tudor, who championed the Lancastrian cause; and the fence-sitting Stanleys.
Yorkis
Small and slender, Richard III did not have the robust physique associated with many of his Plantagenet predecessors. However, he enjoyed very rough sports and activities that were considered manly. His performances on the battlefield impressed his brother greatly, and he became Edward’s right-hand man.
During the 1480s, Richard defended the northern borders of England. In 1482, Edward charged him to lead an army into Scotland with the aim of replacing King James III with the Duke of Albany. Richard’s army broke through the Scottish defences and occupied the capital, Edinburgh, but Albany decided to give up his claim to the throne in return for the post of Lieutenant General of Scotland. As well as obtaining a guarantee that the Scottish government would concede territories and diplomatic benefits to the English crown, Richard’s campaign retook the town of Berwick-upon-Tweed, which the Scots had conquered in 1460.
Edward was not satisfied by these gains, which, according to Ross, could have been greater if Richard had been resolute enough to capitalise on the situation while in control of Edinburgh. In her analysis of Richard’s character, Christine Carpenter sees him as a soldier who was more used to taking orders than giving them. However, he was not averse to displaying his militaristic streak; on ascending the throne he made known his desire to lead a crusade against “not only the Turks, but all [his] foes”.
Duke of Norfolk
Richard’s most loyal subject was John Howard, 1st Duke of Norfolk. The duke had served Richard’s brother for many years and had been one of Edward IV’s closer confidants. He was a military veteran, having fought in the Battle of Towton in 1461 and served as Hastings’ deputy at Calais in 1471.
Ross speculates that he may have borne a grudge against Edward for depriving him of a fortune. Norfolk was due to inherit a share of the wealthy Mowbray estate on the death of eight-year-old Anne de Mowbray, the last of her family. However, Edward convinced Parliament to circumvent the law of inheritance and transfer the estate to his younger son, who was married to Anne. Consequently, Howard supported Richard III in deposing Edward’s sons, for which he received the dukedom of Norfolk and his original share of the Mowbray estate.
Henry Percy, 4th Earl of Northumberland, also supported Richard’s seizure of the throne of England. The Percys were loyal Lancastrians, but Edward IV eventually won the earl’s allegiance. Northumberland had been captured and imprisoned by the Yorkists in 1461, losing his titles and estates; however, Edward released him eight years later and restored his earldom.
From that time, Northumberland served the Yorkist crown, helping to defend northern England and maintain its peace. Initially the earl had issues with Richard III as Edward groomed his brother to be the leading power of the north. Northumberland was mollified when he was promised he would be the Warden of the East March, a position that was formerly hereditary for the Percys.
He served under Richard during the 1482 invasion of Scotland, and the allure of being in a position to dominate the north of England if Richard went south to assume the crown was his likely motivation for supporting Richard’s bid for kingship. However, after becoming king, Richard began moulding his nephew, John de la Pole, 1st Earl of Lincoln, to manage the north, passing over Northumberland for the position. According to Carpenter, although the earl was amply compensated, he despaired of any possibility of advancement under Richard.
Lancastrian
Henry Tudor was unfamiliar with the arts of war and a stranger to the land he was trying to conquer. He spent the first fourteen years of his life in Wales and the next fourteen in Brittany and France. Slender but strong and decisive, Henry lacked a penchant for battle and was not much of a warrior; chroniclers such as Polydore Vergil and ambassadors like Pedro de Ayala found him more interested in commerce and finance. Having not fought in any battles ] Henry recruited several experienced veterans on whom he could rely for military advice and the command of his armies.
John de Vere, 13th Earl of Oxford, was Henry’s principal military commander. He was adept in the arts of war. At the Battle of Barnet, he commanded the Lancastrian right wing and routed the division opposing him. However, as a result of confusion over identities, Oxford’s group came under friendly fire from the Lancastrian main force and retreated from the field. The earl fled abroad and continued his fight against the Yorkists, raiding shipping and eventually capturing the island fort of St Michael’s Mount in 1473. He surrendered after receiving no aid or reinforcement, but in 1484 escaped from prison and joined Henry’s court in France, bringing along his erstwhile gaoler Sir James Blount. Oxford’s presence raised morale in Henry’s camp and troubled Richard III.
Stanleys
In the early stages of the Wars of the Roses, the Stanleys of Cheshire had been predominantly Lancastrians. Sir William Stanley, however, was a staunch Yorkist supporter, fighting in the Battle of Blore Heath in 1459 and helping Hastings to put down uprisings against Edward IV in 1471. When Richard took the crown, Sir William showed no inclination to turn against the new king, refraining from joining Buckingham’s rebellion, for which he was amply rewarded. Sir William’s elder brother, Thomas Stanley, 2nd Baron Stanley, was not as steadfast. By 1485, he had served three kings, namely Henry VI, Edward IV, and Richard III. Lord Stanley’s skilled political manoeuvrings—vacillating between opposing sides until it was clear who would be the winner—gained him high positions; he was Henry’s chamberlain and Edward’s steward.
His non-committal stance, until the crucial point of a battle, earned him the loyalty of his men, who felt he would not needlessly send them to their deaths.
Even though Lord Stanley had served as Edward IV’s steward, his relations with the king’s brother, the eventual Richard III, were not cordial. The two had conflicts that erupted into violence around March 1470. Furthermore, having taken Lady Margaret as his second wife in June 1472, Stanley was Henry Tudor’s stepfather, a relationship which did nothing to win him Richard’s favour. Despite these differences, Stanley did not join Buckingham’s revolt in 1483. When Richard executed those conspirators who had been unable to flee England, he spared Lady Margaret. However, he declared her titles forfeit and transferred her estates to Stanley’s name, to be held in trust for the Yorkist crown.
Richard’s act of mercy was calculated to reconcile him with Stanley, but it may have been to no avail—Carpenter has identified a further cause of friction in Richard’s intention to reopen an old land dispute that involved Thomas Stanley and the Harrington family. Edward IV had ruled the case in favour of Stanley in 1473, but Richard planned to overturn his brother’s ruling and give the wealthy estate to the Harringtons. Immediately before the Battle of Bosworth, being wary of Stanley, Richard took his son, Lord Strange, as hostage to discourage him from joining Henry.
Crossing the Channel and through Wales
The attacking force consisted of around 500 exiled Welsh and Englishmen. The history of one “John Major” (published in 1521) said Charles VIII of France had granted Henry 5,000 men of whom 1,000 were Scots, headed by Sir Alexander Bruce. No mention of Scottish soldiers was made by subsequent English historians. After the battle, Bruce was given an annuity of £20 by Henry for his “faithful services”.
How many Frenchmen actually sailed is unknown, but the historian Chris Skidmore estimates over half of Henry’s armed fleet. The Crowland Chronicler also recorded that Henry’s troops were “as much French as English”. Many of these French mercenaries were from the garrison of Phillipe de Crevecoeur, Lord of Esquerdes. Commynes recorded that these included:
“some 3,000 of the most unruly men in Normandy”.
This is partly the reason why they were taken up the coast of Wales, under Henry’s stern command, keeping them well apart from the Welsh soldiers under Rhys’ command.
Henry’s crossing of the English Channel in 1485 was without incident. Thirty ships sailed from Harfleur on 1 August and, with fair winds behind them, landed in his native Wales, at Mill Bay (near Dale) on the north side of Milford Haven on 7 August, easily capturing nearby Dale Castle. His long awaited arrival had been hailed by contemporary Welsh bards such as Dafydd Ddu and Gruffydd ap Dafydd as the true prince and “the youth of Brittany defeating the Saxons” in order to bring their country back to glory.
Mill Bay had been chosen as it was completely hidden from view and there was no resistance by the cohort of Richard’s men stationed at Dale where Henry and his men spent the first night.
In the morning they marched to Haverfordwest, the county town of Pembrokeshire, 12 miles away and were received “with the utmost goodwill of all”. Here, the Welshman Arnold Butler (who had met Henry in Brittany) announced that “the whole of Pembrokeshire was prepared to serve him”. Butler’s closest friend was Rhys ap Thomas. That afternoon, Henry and his troops headed north towards Cardigan and pitched camp “at the fifth milestone towards Cardigan” where they were joined by Gruffydd Rede with a band of soldiers and John Morgan of Tredegar. The following day, 9 August, they passed through Bwlch-y-gwynt and over the Preseli mountains and to Fagwyr Llwyd south of Cilgwyn.
Richard’s lieutenant in South Wales, Sir Walter Herbert, failed to move against Henry, and two of his officers, Richard Griffith and Evan Morgan, deserted to Henry with their men.
However, the most important defector to Henry in this early stage of the campaign was probably Rhys ap Thomas, who was the leading figure in West Wales. Richard had appointed Rhys Lieutenant in West Wales for his refusal to join Buckingham’s rebellion, asking that he surrender his son Gruffydd ap Rhys ap Thomas as surety, although by some accounts Rhys had managed to evade this condition. However, Henry successfully courted Rhys, offering the lieutenancy of all Wales in exchange for his fealty.
Henry marched via Aberystwyth while Rhys followed a more southerly route, recruiting 2,000 Welshmen en route to swell Henry’s army when they reunited at Cefn Digoll, Welshpool, thus ensuring that the majority of Henry’s army in the ensuing battle would be Welsh. By 15 or 16 August, Henry and his men had crossed the English border, making for the town of Shrewsbury.
Shrewsbury: the gateway to England
March through Wales, to Bosworth Field.
Since 22 June 1485 Richard had been aware of Henry’s impending invasion, and had ordered his lords to maintain a high level of readiness. News of Henry’s landing reached Richard on 11 August, but it took three to four days for his messengers to notify his lords of their king’s mobilisation. On 16 August, the Yorkist army started to gather; Norfolk set off for Leicester, the assembly point, that night. The city of York, a traditional stronghold of Richard’s family, asked the king for instructions, and receiving a reply three days later sent 80 men to join the king. Simultaneously Northumberland, whose northern territory was the most distant from the capital, had gathered his men and ridden to Leicester.
Although London was his goal, Henry did not move directly towards the city. After resting in Shrewsbury, his forces went eastwards and picked up Sir Gilbert Talbot and other English allies, including deserters from Richard’s forces. Although its size had increased substantially since the landing, Henry’s army was not yet large enough to contend with the numbers Richard could muster.
Henry’s pace through Staffordshire was slow, delaying the confrontation with Richard so that he could gather more recruits to his cause. Henry had been communicating on friendly terms with the Stanleys for some time before setting foot in England, and the Stanleys had mobilised their forces on hearing of Henry’s landing. They ranged themselves ahead of Henry’s march through the English countryside, meeting twice in secret with Henry as he moved through Staffordshire.
At the second of these, at Atherstone in Warwickshire, they conferred “in what sort to arraign battle with King Richard, whom they heard to be not far off”. On 21 August, the Stanleys were making camp on the slopes of a hill north of Dadlington, while Henry encamped his army at White Moors to the northwest of their camp.
Early battle (a scenario based on historical interpretations): elements of Richard’s army charged down Ambion Hill to engage Henry’s forces on the plain. The Stanleys stood at the south, observing the situation.
On 20 August, Richard reached Leicester, joining Norfolk. Northumberland arrived the following day. The royal army proceeded westwards to intercept Henry’s march on London. Passing Sutton Cheney, Richard moved his army towards Ambion Hill—which he thought would be of tactical value—and made camp on it. Richard’s sleep was not peaceful and, according to the Croyland Chronicle, in the morning his face was “more livid and ghastly than usual”.
Engagement
Late battle (a scenario based on historical interpretations): Richard led a small group of men around the main battle and charged Henry, who was moving towards the Stanleys. William Stanley rode to Henry’s rescue.
The Yorkist army, numbering about 10,000 men, deployed on the hilltop along the ridgeline from west to east. Norfolk’s group (or “battle” in the parlance of the time) of spearmen stood on the right flank, protecting the cannon and about 1,200 archers. Richard’s group, comprising 3,000 infantry, formed the centre. Northumberland’s men guarded the left flank; he had approximately 4,000 men, many of them mounted. Standing on the hilltop, Richard had a wide, unobstructed view of the area. He could see the Stanleys and their 6,000 men holding positions on and around Dadlington Hill, while to the southwest was Henry’s army.
Henry had very few Englishmen—fewer than a thousand—in his army. Between three and five hundred of them were exiles who had fled from Richard’s rule, and the remainder were Talbot’s men and recent deserters from Richard’s army. Historian John Mackie believes that 1,800 French mercenaries, led by Philibert de Chandée, formed the core of Henry’s army . John Mair, writing thirty-five years after the battle, claimed that this force contained a significant Scottish component, and this claim is accepted by some modern writers, but Mackie reasons that the French would not have released their elite Scottish knights and archers, and concludes that there were probably few Scottish troops in the army, although he accepts the presence of captains like Bernard Stewart, Lord of Aubigny.
In total, Henry’s army was around 5,000 strong, a substantial portion of which was made up by the recruits picked up in Wales. Rhys ap Thomas’s Welsh force was described as being large enough to have “annihilated” the rest of Henry’s force.
In their interpretations of the vague mentions of the battle in the old text, historians placed areas near the foot of Ambion Hill as likely regions where the two armies clashed, and thought up possible scenarios of the engagement. In their recreations of the battle, Henry started by moving his army towards Ambion Hill where Richard and his men stood. As Henry’s army advanced past the marsh at the southwestern foot of the hill, Richard sent a message to Stanley, threatening to execute his son, Lord Strange, if Stanley did not join the attack on Henry immediately. Stanley replied that he had other sons. Incensed, Richard gave the order to behead Strange but his officers temporised, saying that battle was imminent, and it would be more convenient to carry out the execution afterwards.
Henry had also sent messengers to Stanley asking him to declare his allegiance. The reply was evasive—the Stanleys would “naturally” come, after Henry had given orders to his army and arranged them for battle. Henry had no choice but to confront Richard’s forces alone.
Well aware of his own military inexperience, Henry handed command of his army to Oxford and retired to the rear with his bodyguards. Oxford, seeing the vast line of Richard’s army strung along the ridgeline, decided to keep his men together instead of splitting them into the traditional three battles: vanguard, centre, and rearguard. He ordered the troops to stray no further than 10 feet (3.0 m) from their banners, fearing that they would become enveloped. Individual groups clumped together, forming a single large mass flanked by horsemen on the wings.]
The Lancastrians were harassed by Richard’s cannon as they manoeuvred around the marsh, seeking firmer ground. Once Oxford and his men were clear of the marsh, Norfolk’s battle and several contingents of Richard’s group, under the command of Sir Robert Brackenbury, started to advance. Hails of arrows showered both sides as they closed. Oxford’s men proved the steadier in the ensuing hand-to-hand combat; they held their ground and several of Norfolk’s men fled the field.
Recognising that his force was at a disadvantage, Richard signalled for Northumberland to assist but Northumberland’s group showed no signs of movement. Historians, such as Horrox and Pugh, believe Northumberland chose not to aid his king for personal reasons. Ross doubts the aspersions cast on Northumberland’s loyalty, suggesting instead that Ambion Hill’s narrow ridge hindered him from joining the battle. The earl would have had to either go through his allies or execute a wide flanking move—near impossible to perform given the standard of drill at the time—to engage Oxford’s men.
At this juncture Richard saw Henry at some distance behind his main force. Seeing this, Richard decided to end the fight quickly by killing the enemy commander. He led a charge of mounted men around the melee and tore into Henry’s group; several accounts state that Richard’s force numbered 800–1000 knights, but Ross says it was more likely that Richard was accompanied only by his household men and closest friends.
Richard killed Henry’s standard-bearer Sir William Brandon in the initial charge and unhorsed burly John Cheyne, Edward IV’s former standard-bearer, with a blow to the head from his broken lance. French mercenaries in Henry’s retinue related how the attack had caught them off guard and that Henry sought protection by dismounting and concealing himself among them to present less of a target. Henry made no attempt to engage in combat himself.
Oxford had left a small reserve of Pike-equipped men with Henry. They slowed the pace of Richard’s mounted charge and bought Tudor some critical time. The remainder of Henry’s bodyguards surrounded their master and succeeded in keeping him away from the Yorkist king. On seeing Richard embroiled with Henry’s men and separated from his main force, William Stanley made his move. He led his men into the fight at Henry’s side. Outnumbered, Richard’s group was surrounded and gradually pressed back.
Richard’s force was driven several hundred yards away from Tudor, near to the edge of a marsh. The king’s horse lost its footing and toppled into it. Richard gathered himself and rallied his dwindling followers, supposedly refusing to retreat:
“God forbid that I retreat one step. I will either win the battle as a king, or die as one.”
In the fighting Richard’s banner man—Sir Percival Thirlwall—lost his legs but held the Yorkist banner aloft until he was killed.
Polydore Vergil, Henry Tudor’s official historian, recorded that
“King Richard, alone, was killed fighting manfully in the thickest press of his enemies”.
Richard had come within a sword’s length of Henry Tudor before being surrounded by Sir William Stanley’s men and killed. The Burgundian chronicler Jean Molinet says that a Welshman struck the death-blow with a halberd while Richard’s horse was stuck in the marshy ground.
It was said that the blows were so violent that the king’s helmet was driven into his skull. The contemporary Welsh poet Guto’r Glyn implies the leading Welsh Lancastrian Rhys ap Thomas, or one of his men, killed the king, writing that he “killed the boar, shaved his head”.
The identification in 2013 of King Richard’s body shows that the skeleton had 10 wounds, eight of them to the head, clearly inflicted in battle and suggesting he had lost his helmet. The skull showed that a blade had hacked away part of the rear of the skull.
Richard’s forces disintegrated as news of his death spread. Northumberland and his men fled north on seeing the king’s fate, and Norfolk was killed.
Post-battle
Finding Richard’s circlet after the battle, Lord Stanley hands it to Henry.
After the battle, Richard’s circlet was found and brought to Henry, who was crowned king at the top of Crown Hill, near the village of Stoke Golding. According to Vergil, Henry’s official historian, Lord Stanley found the circlet. Historian Stanley Chrimes and Professor Sydney Anglo dismiss the legend of the crown’s finding in a hawthorn bush; none of the contemporary sources reported such an event.
Ross, however, does not ignore the legend. He argues that the hawthorn bush would not be part of Henry’s coat of arms if it did not have a strong relationship to his ascendance.[120] In Vergil’s chronicle, 100 of Henry’s men, compared to 1,000 of Richard’s, died in this battle—a ratio Chrimes believes to be an exaggeration.
The bodies of the fallen were brought to St James Church at Dadlington for burial. However, Henry denied any immediate rest for Richard; instead the last Yorkist king’s corpse was stripped naked and strapped across a horse. His body was brought to Leicester and openly exhibited to prove that he was dead. Early accounts suggest that this was in the major Lancastrian collegiate foundation, the Church of the Annunciation of Our Lady of the Newarke.
After two days, the corpse was interred in a plain unmarked tomb, within the church of the Greyfriars. The location of Richard’s tomb was long uncertain, as the church was demolished following its dissolution in 1538.
On 12 September 2012 archaeologists announced the discovery of a battle-damaged skeleton suspected to be Richard’s in the remains of his burial church in Leicester. On 4 February 2013, it was announced that DNA testing had conclusively identified (“beyond reasonable doubt”) the remains as those of Richard. On Thursday 26 March 2015, these remains were ceremonially buried in Leicester Cathedral. On the following day the new royal tomb of Richard III was unveiled.
Henry dismissed the mercenaries in his force, retaining only a small core of local soldiers to form the “Yeomen of his Garde“, and proceeded to establish his rule of England. Parliament reversed his attainder and recorded Richard’s kingship as illegal, although the Yorkist king’s reign remained officially in the annals of England history. The proclamation of Edward IV’s children as illegitimate was also reversed, restoring Elizabeth’s status to a royal princess.
The marriage of Elizabeth, the heiress to the House of York, to Henry, the master of the House of Lancaster, marked the end of the feud between the two houses and the start of the Tudor dynasty. The royal matrimony, however, was delayed until Henry was crowned king and had established his claim on the throne firmly enough to preclude that of Elizabeth and her kin.
Henry further convinced Parliament to backdate his reign to the day before the battle, retrospectively enabling those who fought against him at Bosworth Field to be declared traitors. Northumberland, who had remained inactive during the battle, was imprisoned but later released and reinstated to pacify the north in Henry’s name. The purge of those who fought for Richard occupied Henry’s first two years of rule, although later he proved prepared to accept those who submitted to him regardless of their former allegiances.
Of his supporters, Henry rewarded the Stanleys the most generously. Aside from making William his chamberlain, he bestowed the earldom of Derby upon Lord Stanley along with grants and offices in other estates. Henry rewarded Oxford by restoring to him the lands and titles confiscated by the Yorkists and appointing him as Constable of the Tower and admiral of England, Ireland, and Aquitaine.
For his kin, Henry created Jasper Tudor the Duke of Bedford. He returned to his mother the lands and grants stripped from her by Richard, and proved to be a filial son, granting her a place of honour in the palace and faithfully attending to her throughout his reign. Parliament’s declaration of Margaret as femme sole effectively empowered her; she no longer needed to manage her estates through Stanley.
Elton points out that despite his initial largesse, Henry’s supporters at Bosworth would only enjoy his special favour for the short term; in later years, he would instead promote those who best served his interests.
Like the kings before him, Henry faced dissenters. The first open revolt occurred two years after Bosworth Field; Lambert Simnel claimed to be Edward Plantagenet, 17th Earl of Warwick, who was Edward IV’s nephew. The Earl of Lincoln backed him for the throne and led rebel forces in the name of the House of York.
The rebel army fended off several attacks by Northumberland’s forces, before engaging Henry’s army at the Battle of Stoke Field on 16 June 1487. Oxford and Bedford led Henry’s men,[137] including several former supporters of Richard III. Henry won this battle easily, but other malcontents and conspiracies would follow.
A rebellion in 1489 started with Northumberland’s murder; military historian Michael C. C. Adams says that the author of a note, which was left next to Northumberland’s body, blamed the earl for Richard’s death.
Legacy and historical significance
Contemporary accounts of the Battle of Bosworth can be found in four main sources, one of which is the English Croyland Chronicle, written by a senior Yorkist chronicler who relied on second-hand information from nobles and soldiers.
The other accounts were written by foreigners—Vergil, Jean Molinet, and Diego de Valera. Whereas Molinet was sympathetic to Richard , Vergil was in Henry’s service and drew information from the king and his subjects to portray them in a good light. Diego de Valera, whose information Ross regards as unreliable, compiled his work from letters of Spanish merchants. However, other historians have used Valera’s work to deduce possibly valuable insights not readily evident in other sources
Ross finds the poem, The Ballad of Bosworth Field, a useful source to ascertain certain details of the battle. The multitude of different accounts, mostly based on second- or third-hand information, has proved an obstacle to historians as they try to reconstruct the battle. Their common complaint is that, except for its outcome, very few details of the battle are found in the chronicles. According to historian Michael Hicks, the Battle of Bosworth is one of the worst-recorded clashes of the Wars of the Roses.
Historical depictions and interpretations
Newport History Society re-enacts Henry’s march through Wales to Bosworth Field during the battle’s quincentenary celebration.
Henry tried to present his victory as a new beginning for the country; he hired chroniclers to portray his reign as a “modern age” with its dawn in 1485. Hicks states that the works of Vergil and the blind historian Bernard André, promoted by subsequent Tudor administrations, became the authoritative sources for writers for the next four hundred years.
As such, Tudor literature paints a flattering picture of Henry’s reign, depicting the Battle of Bosworth as the final clash of the civil war and downplaying the subsequent uprisings. For England the Middle Ages ended in 1485, and English Heritage claims that other than William the Conqueror‘s successful invasion of 1066, no other year holds more significance in English history. By portraying Richard as a hunchbacked tyrant who usurped the throne by killing his nephews, the Tudor historians attached a sense of myth to the battle: it became an epic clash between good and evil with a satisfying moral outcome.
According to Reader Colin Burrow, André was so overwhelmed by the historic significance of the battle that he represented it with a blank page in his Henry VII (1502). For Professor Peter Saccio, the battle was indeed a unique clash in the annals of English history, because
“the victory was determined, not by those who fought, but by those who delayed fighting until they were sure of being on the winning side.”
Historians such as Adams and Horrox believe that Richard lost the battle not for any mythic reasons, but because of morale and loyalty problems in his army. Most of the common soldiers found it difficult to fight for a liege whom they distrusted, and some lords believed that their situation might improve if Richard was dethroned.
According to Adams, against such duplicities Richard’s desperate charge was the only knightly behaviour on the field. As fellow historian Michael Bennet puts it, the attack was “the swan-song of [mediaeval] English chivalry”. Adams believes this view was shared at the time by the printer William Caxton, who enjoyed sponsorship from Edward IV and Richard III. Nine days after the battle, Caxton published Thomas Malory‘s story about chivalry and death by betrayal—Le Morte d’Arthur—seemingly as a response to the circumstances of Richard’s death.
Elton does not believe Bosworth Field has any true significance, pointing out that the 20th-century English public largely ignored the battle until its quincentennial celebration. In his view, the dearth of specific information about the battle—no-one even knows exactly where it took place—demonstrates its insignificance to English society. Elton considers the battle as just one part of Henry’s struggles to establish his reign, underscoring his point by noting that the young king had to spend ten more years pacifying factions and rebellions to secure his throne.
Mackie asserts that, in hindsight, Bosworth Field is notable as the decisive battle that established a dynasty which would rule unchallenged over England for more than a hundred years.
Mackie notes that contemporary historians of that time, wary of the three royal successions during the long Wars of the Roses, considered Bosworth Field just another in a lengthy series of such battles. It was through the works and efforts of Francis Bacon and his successors that the public started to believe the battle had decided their futures by bringing about “the fall of a tyrant”.
Shakespearian dramatisation
William Shakespeare gives prominence to the Battle of Bosworth in his play, Richard III. It is the “one big battle”; no other fighting scene distracts the audience from this action, represented by a one-on-one sword fight between Henry Tudor and Richard III. Shakespeare uses their duel to bring a climactic end to the play and the Wars of the Roses; he also uses it to champion morality, portraying the “unequivocal triumph of good over evil”.
Richard, the villainous lead character, has been built up in the battles of Shakespeare’s earlier play, Henry VI, Part 3, as a “formidable swordsman and a courageous military leader”—in contrast to the dastardly means by which he becomes king in Richard III. Although the Battle of Bosworth has only five sentences to direct it, three scenes and more than four hundred lines precede the action, developing the background and motivations for the characters in anticipation of the battle.
Richard III, Act 5, scene 3: Richard, played by David Garrick, awakens after a nightmare visit by the ghosts of his victims.
Shakespeare’s account of the battle was mostly based on chroniclers Edward Hall‘s and Raphael Holinshed‘s dramatic versions of history, which were sourced from Vergil’s chronicle. However, Shakespeare’s attitude towards Richard was shaped by scholar Thomas More, whose writings displayed extreme bias against the Yorkist king.
The result of these influences is a script that vilifies the king, and Shakespeare had few qualms about departing from history to incite drama.Margaret of Anjou died in 1482, but Shakespeare had her speak to Richard’s mother before the battle to foreshadow Richard’s fate and fulfill the prophecy she had given in Henry VI.
Shakespeare exaggerated the cause of Richard’s restless night before the battle, imagining it as a haunting by the ghosts of those whom the king had murdered, including Buckingham. Richard is portrayed as suffering a pang of conscience, but as he speaks he regains his confidence and asserts that he will be evil, if such needed to retain his crown.
The fight between the two armies is simulated by rowdy noises made off-stage (alarums or alarms) while actors walk on-stage, deliver their lines, and exit. To build anticipation for the duel, Shakespeare requests more alarums after Richard’s councillor, William Catesby, announces that the king is “[enacting] more wonders than a man”. Richard punctuates his entrance with the classic line, “A horse, a horse! My kingdom for a horse!”
He refuses to withdraw, continuing to seek to slay Henry’s doubles until he has killed his nemesis. There is no documentary evidence that Henry had five decoys at Bosworth Field; the idea was Shakespeare’s invention. He drew inspiration from Henry IV‘s use of them at the Battle of Shrewsbury (1403) to amplify the perception of Richard’s courage on the battlefield.
Similarly, the single combat between Henry and Richard is Shakespeare’s creation. The True Tragedy of Richard III, a play earlier than Shakespeare’s, has no signs of staging such an encounter: its stage directions give not a hint of visible combat.
The Battle of Bosworth Field, a Scene in the Great Drama of History, illustrating Beckett’s mocking of Victorian attitude towards history
Despite the dramatic licences taken, Shakespeare’s version of the Battle of Bosworth was the model of the event for English textbooks for many years during the 18th and 19th centuries. This glamorised version of history, promulgated in books and paintings and played out on stages across the country, perturbed humorist Gilbert Abbott à Beckett. He voiced his criticism in the form of a poem, equating the romantic view of the battle to watching a “fifth-rate production of Richard III“: shabbily costumed actors fight the Battle of Bosworth on-stage while those with lesser roles lounge at the back, showing no interest in the proceedings.
In Laurence Olivier‘s 1955 film adaptation of Richard III, the Battle of Bosworth is represented not by a single duel but a general melee that became the film’s most recognised scene and a regular screening at Bosworth Battlefield Heritage Centre. The film depicts the clash between the Yorkist and Lancastrian armies on an open field, focusing on individual characters amidst the savagery of hand-to-hand fighting, and received accolades for the realism portrayed.
One reviewer for The Manchester Guardian newspaper, however, was not impressed, finding the number of combatants too sparse for the wide plains and a lack of subtlety in Richard’s death scene. The means by which Richard is shown to prepare his army for the battle also earned acclaim. As Richard speaks to his men and draws his plans in the sand using his sword, his units appear on-screen, arraying themselves according to the lines that Richard had drawn. Intimately woven together, the combination of pictorial and narrative elements effectively turns Richard into a storyteller, who acts out the plot he has constructed.
Shakespearian critic Herbert Coursen extends that imagery: Richard sets himself up as a creator of men, but dies amongst the savagery of his creations. Coursen finds the depiction a contrast to that of Henry V and his “band of brothers”.
The adaptation of the setting for Richard III to a 1930s fascist England in Ian McKellen‘s 1995 film, however, did not sit well with historians. Adams posits that the original Shakespearian setting for Richard’s fate at Bosworth teaches the moral of facing one’s fate, no matter how unjust it is, “nobly and with dignity”. By overshadowing the dramatic teaching with special effects, McKellen’s film reduces its version of the battle to a pyrotechnic spectacle about the death of a one-dimensional villain. Coursen agrees that, in this version, the battle and Richard’s end are trite and underwhelming.
Battlefield location
Richard’s Field
The memorial and its plaque
Officially the site of the battle is deemed by Leicestershire County Council to be in the vicinity of the town of Market Bosworth. The council engaged historian Daniel Williams to research the battle, and in 1974 his findings were used to build the Bosworth Battlefield Heritage Centre and the presentation it houses. Williams’s interpretation, however, has since been questioned. Sparked by the battle’s quincentenary celebration in 1985, a dispute among historians has led many to suspect the accuracy of Williams’s theory. In particular, geological surveys conducted from 2003 to 2009 by the Battlefields Trust, a charitable organisation that protects and studies old English battlefields, show that the southern and eastern flanks of Ambion Hill were solid ground in the 15th century, contrary to Williams’s claim that it was a large area of marshland.
Landscape archaeologistGlenn Foard, leader of the survey, said the collected soil samples and finds of medieval military equipment suggest that the battle took place two miles (3 km) southwest of Ambion Hill (52°34′41″N 1°26′02″W), contrary to the popular belief that it was fought near the foot of the hill.
Bosworth Battlefield true location
Historians’ theories
The Historic Buildings and Monuments Commission for England (popularly referred to as “English Heritage”) argues that the battle was named after Market Bosworth because the town was the nearest significant settlement to the battlefield in the 15th century.
As explored by Professor Philip Morgan, a battle might initially not be named specifically at all. As time passes, writers of administrative and historical records find it necessary to identify a notable battle, ascribing it a name that is usually toponymical in nature and sourced from combatants or observers. This official name becomes accepted by society and future generations without question.
Early records associated the Battle of Bosworth with “Brownehethe”, “bellum Miravallenses“, “Sandeford” and “Dadlyngton field”. The earliest record, a municipal memorandum of 23 August 1485 from York, locates the battle “on the field of Redemore”. This is corroborated by a 1485–86 letter that mentions “Redesmore” as its site.
According to historian Peter Foss, records did not associate the battle with “Bosworth” until 151
Foss is named by English Heritage as the principal advocate for “Redemore” as the battle site. He suggests the name is derived from “Hreod Mor“, an Anglo-Saxon phrase that means “reedy marshland”. Basing his opinion on 13th- and 16th-century church records, he believes “Redemore” was an area of wetland that lay between Ambion Hill and the village of Dadlington, and was close to the Fenn Lanes, a Roman road running east to west across the region.
Foard believes this road to be the most probable route that both armies took to reach the battlefield. Williams dismisses the notion of “Redmore” as a specific location, saying that the term refers to a large area of reddish soil; Foss argues that Williams’s sources are local stories and flawed interpretations of recor
Moreover, he proposes that Williams was influenced by William Hutton‘s 1788 The Battle of Bosworth-Field, which Foss blames for introducing the notion that the battle was fought west of Ambion Hill on the north side of the River Sence. Hutton, as Foss suggests, misinterpreted a passage from his source, Raphael Holinshed‘s 1577 Chronicle. Holinshed wrote, “King Richard pitched his field on a hill called Anne Beame, refreshed his soldiers and took his rest.” Foss believes that Hutton mistook “field” to mean “field of battle”, thus creating the idea that the fight took place on Anne Beame (Ambion) Hill. To “[pitch] his field”, as Foss clarifies, was a period expression for setting up a camp
St James the Greater, Dadlington: the dead of Bosworth Field were buried here.
Foss brings further evidence for his “Redemore” theory by quoting Edward Hall‘s 1550 Chronicle. Hall stated that Richard’s army stepped onto a plain after breaking camp the next day. Furthermore, historian William Burton, author of Description of Leicestershire (1622), wrote that the battle was:
“fought in a large, flat, plaine, and spacious ground, three miles [5 km] distant from [Bosworth], between the Towne of Shenton, Sutton [Cheney], Dadlington and Stoke [Golding]”.
In Foss’s opinion both sources are describing an area of flat ground north of Dadlington.
Physical site
English Heritage, responsible for managing England’s historic sites, used both theories to designate the site for Bosworth Field. Without preference for either theory, they constructed a single continuous battlefield boundary that encompasses the locations proposed by both Williams and Foss.
The region has experienced extensive changes over the years, starting after the battle. Holinshed stated in his chronicle that he found firm ground where he expected the marsh to be, and Burton confirmed that by the end of the 16th century, areas of the battlefield were enclosed and had been improved to make them agriculturally productive. Trees were planted on the south side of Ambion Hill, forming Ambion Wood. In the 18th and 19th centuries, the Ashby Canal carved through the land west and south-west of Ambion Hill. Winding alongside the canal at a distance, the Ashby and Nuneaton Joint Railway crossed the area on an embankment.
The changes to the landscape were so extensive that when Hutton revisited the region in 1807 after an earlier 1788 visit, he could not readily find his way around
Richard’s Well, where the last Yorkist king supposedly took a drink of water on the day of the battle.
Bosworth Battlefield Heritage Centre was built on Ambion Hill, near Richard’s Well. According to legend, Richard III drank from one of the several springs in the region on the day of the battle. In 1788, a local pointed out one of the springs to Hutton as the one mentioned in the legend. A stone structure was later built over the location. The inscription on the well reads:
“Near this spot, on August 22nd 1485, at the age of 32, King Richard III fell fighting gallantly in defence of his realm & his crown against the usurper Henry Tudor.
The Cairn was erected by Dr. Samuel Parr in 1813 to mark the well from which the king is said to have drunk during the battle.
It is maintained by the Fellowship of the White Boar.”
Northwest of Ambion Hill, just across the northern tributary of the Sence, a flag and memorial stone mark Richard’s Field. Erected in 1973, the site was selected on the basis of Williams’s theory. St James’s Church at Dadlington is the only structure in the area that is reliably associated with the Battle of Bosworth; the bodies of those killed in the battle were buried there.
The rediscovered battlefield and possible battle scenario
The very extensive survey carried out (2005-2009) by the Battlefields Trust headed by Glenn Foard led eventually to the discovery of the real location of the core battlefield. This lies about a kilometer further west than the location suggested by Peter Foss. It is in what was at the time of the battle an area of marginal land at the meeting of several township boundaries. There was a cluster of field names suggesting the presence of marshland and heath. Thirty four lead round shot were discovered as a result of systematic metal detecting (more than the total found previously on all other C15th European battlefields), as well as other significant finds, including a small silver gilt badge depicting a boar. Experts believe that the boar badge could indicate the actual site of Richard III’s death, since this high-status badge depicting his personal emblem, was probably worn by a member of his close retinue.
A new interpretation of the battle now integrates the historic accounts with the battlefield finds and landscape history. The new site lies either side of the Fenn Lanes Roman road, close to Fenn Lane Farm and is some three kilometers to the southwest of Ambion Hill.
Bosworth Battlefield (Fenn Lane Farm)
Based on the round shot scatter, the likely size of Richard III’s army, and the topography, Glenn Foard and Anne Curry think that Richard may have lined up his forces on a slight ridge which lies just east of Fox Covert Lane and behind a postulated medieval marsh. Richard’s vanguard commanded by the Duke of Norfolk was on the right (north) side of Richard’s battle line, with the Earl of Northumberland on Richard’s left (south) side.
Tudor’s forces approached along the line of the Roman road and lined up to the west of the present day Fenn Lane Farm, having marched from the vicinity of Merevale in Warwickshire. The Stanleys were positioned on the south side of the battlefield, on rising ground towards Stoke Golding and Dadlington. The Earl of Oxford turned north to avoid the marsh (and possibly Richard’s guns). This manoeuvre put the marsh on Oxford’s right. He moved to attack Norfolk’s vanguard. Norfolk was subsequently killed.
Northumberland failed to engage, possibly due to the presence of the Stanleys, whose intentions were unclear, or due to the position of the marsh (or for both reasons). With Richard’s situation deteriorating, he decided to launch an attack against Henry Tudor, which almost succeeded, but the king’s horse became stuck in the marsh, and he was killed. Fen Hole (where the boar badge was found) is believed to be a residue of the marsh. When Richard began his charge, Sir William Stanley intervened from the vicinity of Stoke Golding. It was here, on what came to be known as Crown Hill (the closest elevated ground to the fighting), that Lord Stanley crowned Henry Tudor after Richard was killed.
Bosworth Battlefield actual site
The windmill close to which the Duke of Norfolk is said to have died (according to the ballad “Lady Bessy”) was Dadlington windmill. This has disappeared but is known to have stood at the time of the battle, in the vicinity of Apple Orchard Farm and North Farm, Dadlington. A small cluster of significant finds was made in this area, including a gold livery badge depicting an eagle. The windmill lay between the core battlefield and Richard’s camp on Ambion Hill and the rout of Norfolk’s vanguard was in this direction. This also accounts for the large number of dead in Dadlington parish, leading to the setting up of the battle chantry there.
Historic England have re-defined the boundaries of the registered Bosworth Battlefield to incorporate the newly identified site. There are hopes that public access to the site may be possible in the future.


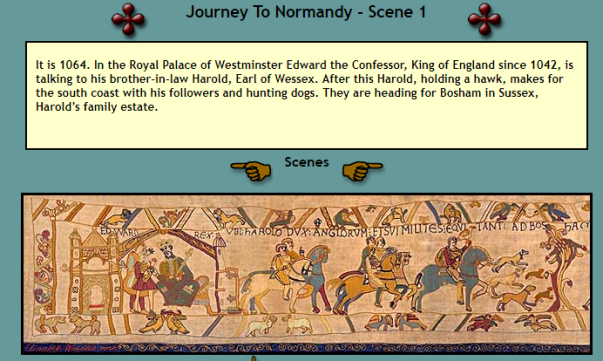
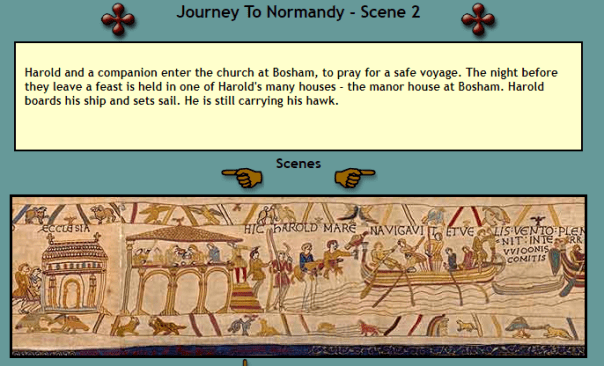
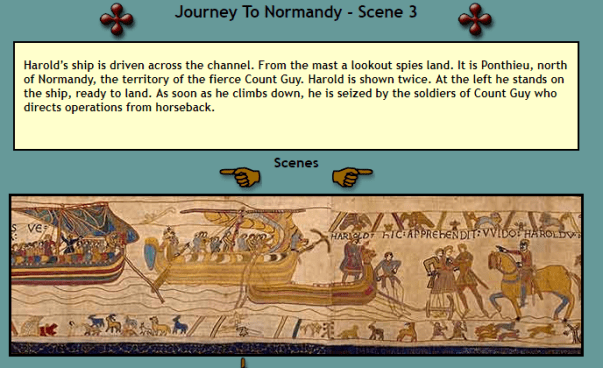
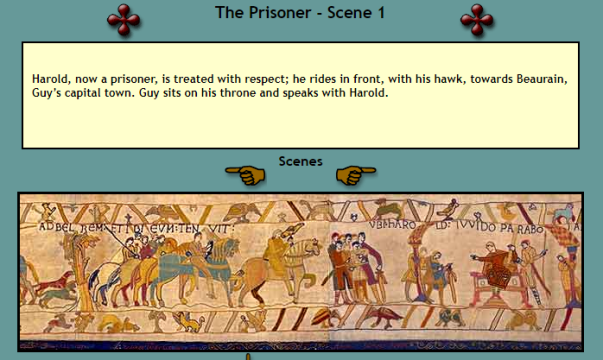
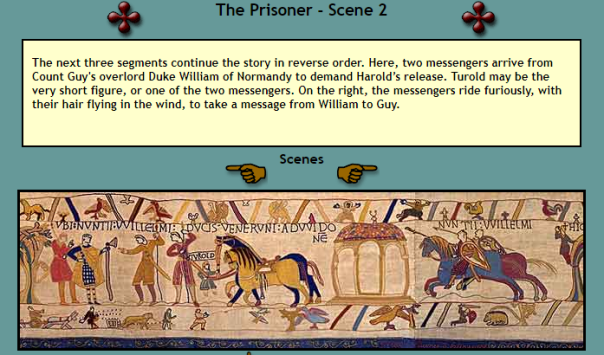
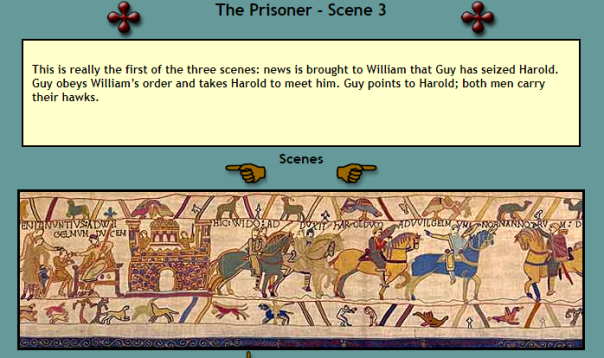
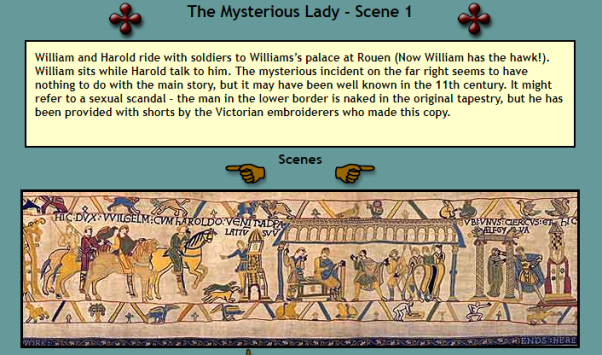


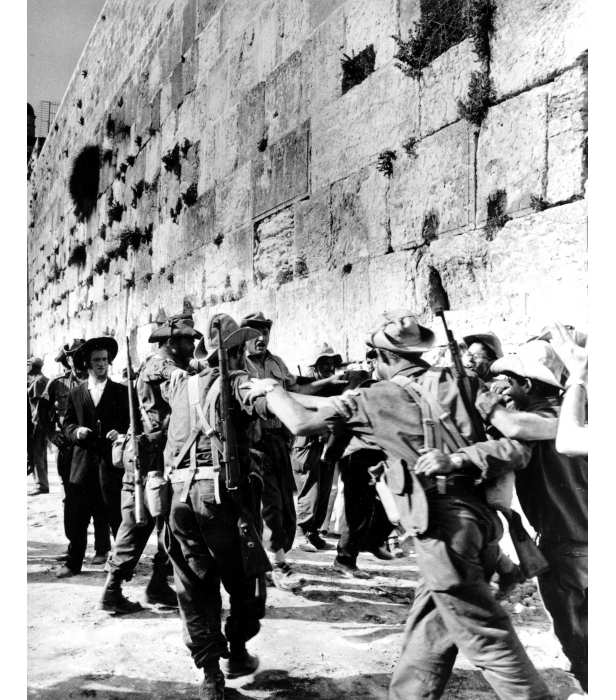

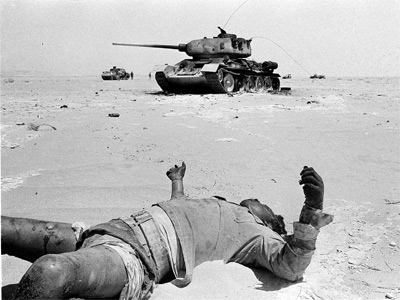


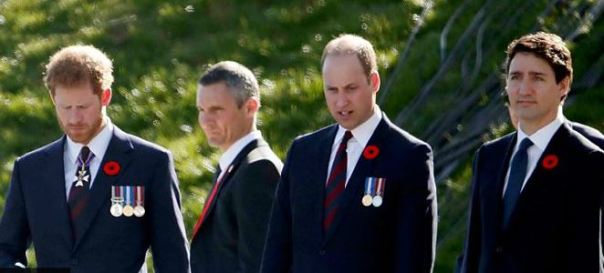 Vimy Ridge: Royals commemorate defining WW1 battle


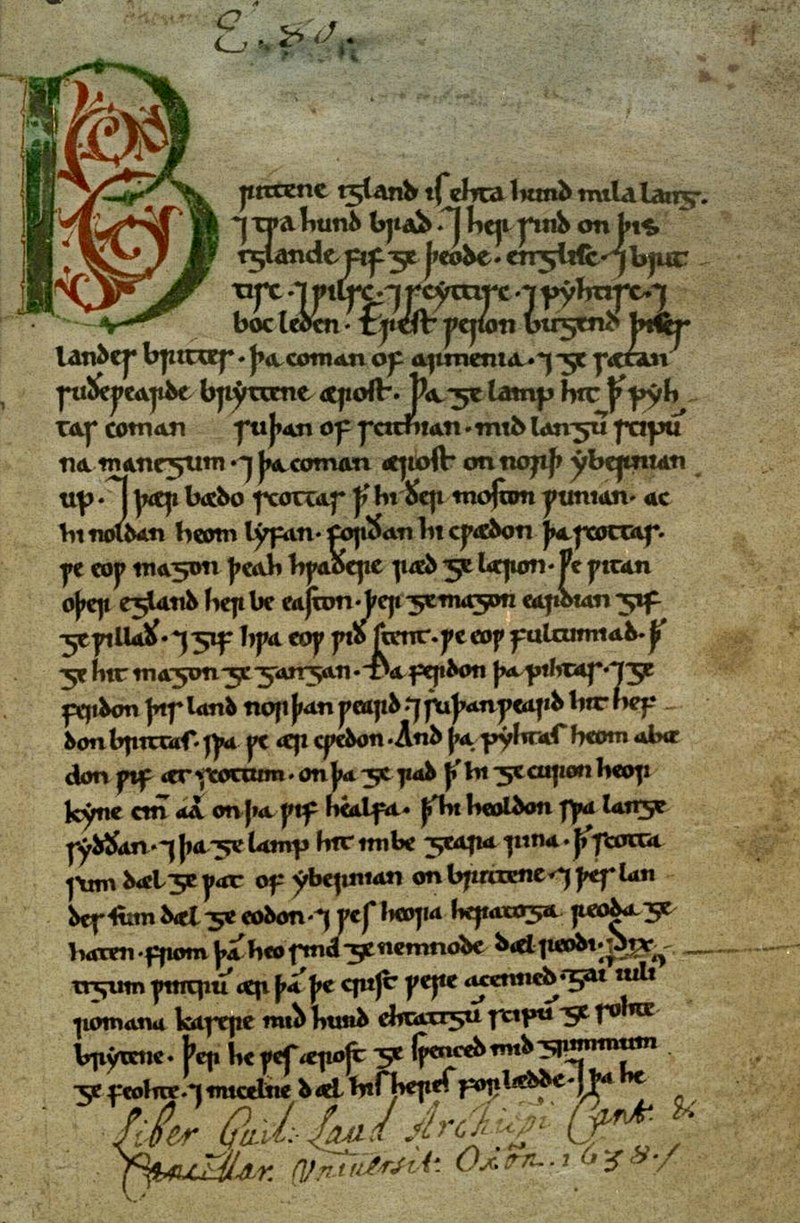


.svg)


.jpg)


.jpg)


.jpg)


