It commemorates the 306 British Army and Commonwealth soldiers executed after courts-martial for desertion and other capital offences during World War I.
Desertion is the abandonment of a military duty or post without permission (a pass, liberty or leave) and is done with the intention of not returning. This contrasts with unauthorized absence (UA) or absence without leave (AWOL , which are temporary forms of absence.
,
Background
The memorial is to servicemen executed by firing squad during the First World War. It is alleged that soldiers accused of cowardice were often not given fair trials; they were often not properly defended, and some were minors.
Shot at Dawn, National Memorial Arboretum, Alrewas, by Roy Kevin Holloway
Other sources contend that military law, being based on Roman rather than Common law, appears unfamiliar to civilian eyes but is no less fair.
“it was the first duty of the court to ensure the prisoner had every advantage to what he was legally entitled”.
If men seemed unrepresented it was because they generally chose to speak in their own defence. The usual cause for their offences has been re-attributed in modern times to post-traumatic stress syndrome and combat stress reaction. Another perspective is that the decisions to execute were taken in the heat of war when the commander’s job was to keep the army together and fighting.
Of the 200,000 or so men court-martialed during the First World War, 20,000 were found guilty of offences carrying the death penalty. Of those, 3000 actually received it, and of those sentences, 346 were carried out.
The others were given lesser sentences, or had death sentences commuted to a lesser punishment, e.g. hard labour, field punishment or a suspended sentence (91 of the men executed were under a suspended sentence: 41 of those executed were previously subject to commuted death sentences, and one had a death sentence commuted twice before). Of the 346 men executed, 309 were pardoned, while the remaining 37 were those executed for murder, who would have been executed under civilian law.
The families of these victims often carried the stigma of the label of :
“coward”.
Another side to this form of justice is the lasting emotional pain caused to those who were in the firing squads, shooting those found guilty.
WW1 Veterans Recall Executions
Britain was one of the last countries to withhold pardons for men executed during World War I: In 1993, John Major emphasised to the House of Commons that pardoning the men would be an insult to those who died honourably on the battlefield and that everyone was tried fairly.
However, in August 2006 the then Defence Secretary, Des Browne, reversed this decision. He stated that he did not want:
Lord Browne of Ladyton
“to second guess the decisions made by commanders in the field, who were doing their best to apply the rules and standards of the time”, but that “it is better to acknowledge that injustices were clearly done in some cases, even if we cannot say which – and to acknowledge that all these men were victims of war”
In 2007, the Armed Forces Act 2006 was passed allowing the soldiers to be pardoned posthumously, although section 359(4) of the act states that the pardon “does not affect any conviction or sentence.”
Memorial
Andy DeComyn
The memorial was created by the British public artist Andy DeComyn. It was created in 2000 as a gift from the artist to the relatives and was unveiled at the National Memorial Arboretum by Gertrude Harris, daughter of Private Harry Farr, in June 2001. Marina Brewis, the great-niece of Lance Corporal Peter Goggins, also attended the service.
The memorial portrays a young British soldier blindfolded and tied to a stake, ready to be shot by a firing squad.
The memorial was modelled on the likeness of 17-year-old Private Herbert Burden, who lied about his age to enlist in the armed forces and was later shot for desertion.
It is surrounded by a semicircle of stakes, on each of which are listed the names of the soldiers executed in this fashion.
Tables
By Nationality
*129 Australian servicemen were sentenced to death, 119 of them for desertion, but all of these sentences were commuted by the Australian Governor-General.
By Theatre of War
By Charge
This is simply the story of a boy trying to grow up, survive, thrive, have fun & discover himself against a backdro… twitter.com/i/web/status/1…— Belfast Child (@bfchild66) July 23, 2020
The Ulster Tower is Northern Ireland’s national war memorial. It was one of the first Memorials to be erected on the Western Front and commemorates the men of the 36th (Ulster) Division and all those from Ulster who served in the First World War.
The memorial was officially opened on 19 November 1921 and is a very close copy of Helen’s Tower which stands in the grounds of the Clandeboye Estate, near Bangor, County Down, Northern Ireland. Many of the men of the Ulster Division trained in the estate before moving to England and then France early in 1916.
The Tower (plus a small cafe nearby) is staffed by members of the Somme Association, which is based in Belfast.
1916 Battle
The Division attacked the Schwaben Redoubt, which is near the Ulster Tower, on 1 July 1916. The Schwaben Redoubt was a little to the north-east of where the tower stands, and was a triangle of trenches with a frontage of 300 yards, a fearsome strongpoint with commanding views. It is also located close to the Thiepval Memorial to the Missing of the Somme.
The front lines were at the edge of Thiepval Wood which lies to the south-west of the road between the Thiepval Memorial and the Ulster Tower. Troops of the 109th Brigade crossed about 400 yards of no man’s land, and kept on going. They entered the Schwaben Redoubt, and advanced on towards Stuff Redoubt, gaining in all around a mile, though not without losses. To their left, the 108th Brigade were successful in advancing near Thiepval, but less so nearer the River Ancre.
The 107th Brigade supported them, but although men of the 36th Division held out for the day the Germans mounted counterattacks, and as their stocks of bombs and ammunition dwindled, many fell back with small parties remaining in the German front lines. The casualties suffered by the 36th Division on 1 July totalled over 5,000.
Memorial
At the entrance to the tower is a plaque commemorating the names of the nine men of the Division who won the Victoria Cross during the Somme. There is also a memorial here commemorating the part played by members of the Orange Order during the battle. The inscription on this memorial reads:
“This Memorial is Dedicated to the Men and Women of the Orange Institution Worldwide, who at the call of King and country, left all that was dear to them, endured hardness, faced danger, and finally passed out of the sight of man by the path of duty and self sacrifice, giving up their own lives that others might live in Freedom. Let those who come after see to it that their names be not forgotten.”
Commemorations
The Inscription on the Memorial Reads : “This Memorial is Dedicated to the Men and Women of the Orange Institution Worldwide, who at the call of King and country, left all that was dear to them, endured hardness, faced danger, and finally passed out of the sight of man by the path of duty and self sacrifice, giving up their own lives that others might live in Freedom. Let those who come after see to it that their names be not forgotten.”
There are 5 known Orangemen who were awarded the Victoria Cross .
Private George Richardson (VC) from Cavan who was awarded the Victoria Cross for bravery during the Indian Mutiny and was recommended on 3 other occasions for the same award. He served in the 34th Regiment of Foot, later the Border Regiment. Private Richardson later emigrated to Canada.
Robert Hill Hanna, born in Kilkeel, Co. Down, emigrated to Canada, member of Ontario LOL 2226, he was awarded the Victoria Cross for gallantry at Lens, France, 21 September 1917, during the WW1, when serving with the Canadian Army.
Rev John Weir Foote, was a Captain, later Colonel, in the Canadian Chaplain Service, attached to the Royal Hamilton Light Infantry. A member of Fraserville LOL Ontario. He was with the Canadians during the Dieppe Raid, and stayed on to minister to wounded, subsequently captured by the Germans. Weir was awarded the VC in February 1946 for services above and beyond the call of duty during World War II.
Riflemen Robert Quigg from Bushmills was awarded the medal for his courage on the Somme on 1 July 1916.
Englishman Abraham Acton, from Whitehaven, Cumberland, was awarded the Victoria Cross for conspicuous bravery at Rouge Bances, 21 December in 1914. Acton was killed in action at Ypres in 1915 at the age of 22, and he has no known grave.
Orangemen Robert Dixon I2442 Toronto serving with the Princess Patricia’s Canadian Light Infantry and Lieutenant J McCormick from Canada were recommended for the Victoria Cross
The first day of the Battle of the Somme, in northern France, was the bloodiest day in the history of the British Army and one of the most infamous days of World War One.
On 1 July 1916, the British forces suffered 57,470 casualties, including 19,240 fatalities. They gained just three square miles of territory. British and German troops faced each other’s trenches only separated by a few hundred yards of “no-man’s land”.
The British force consisted of soldiers from Britain and Ireland, as well as troops from Newfoundland, South Africa and India.
The British generals staged a massive artillery bombardment and sent 100,000 men over the top to take the German trenches.
They were confident of victory. But the British soldiers were unable to break through the German defences and were mown down in their thousands by machine gun and artillery fire.
This day set a bloody precedent: the Somme campaign wore on for five months and, in all, more than a million soldiers from the British, German and French armies were wounded or killed.
The events began with a ceremony attended by Canadian PM Justin Trudeau and French President Francois Hollande.
About 25,000 people, including relatives of those who fought in the battle, are attending the commemorations at the Canadian National Memorial on the battlefield near Arras.
Many historians and writers consider the Canadian victory at Vimy a defining moment for Canada, when the country emerged from under the shadow of Britain and felt capable of greatness. Canadian troops also earned a reputation as formidable, effective troops because of the stunning success. But it was a victory at a terrible cost, with more than 10,000 killed and wounded.
The Canadian Corps was ordered to seize Vimy Ridge in April 1917. [Map] Situated in northern France, the heavily-fortified seven-kilometre ridge held a commanding view over the Allied lines. The Canadians would be assaulting over an open graveyard since previous French attacks had failed with over 100,000 casualties.
Naval 12 inch howitzer in action
To capture this difficult position, the Canadians would carefully plan and rehearse their attack. To provide greater flexibility and firepower in battle, the infantry were given specialist roles as machine-gunners, rifle-men and grenade-throwers. These same soldiers underwent weeks of training behind the lines using models to represent the battlefield, and new maps crafted from aerial photographs to guide their way. To bring men forward safely for the assault, engineers dug deep tunnels from the rear to the front. Despite this training and preparation, the key to victory would be a devastating artillery barrage that would not only isolate enemy trenches, but provide a moving wall of high explosives and shrapnel to force the Germans to stay in their deep dugouts and away from their machine-guns. “Chaps, you shall go over exactly like a railroad train, on time, or you shall be annihilated,” warned Canadian Corps commander Sir Julian Byng.
In the week leading up to the battle, Canadian and British artillery pounded the enemy positions on the ridge, killing and tormenting defenders. New artillery tactics allowed the gunners to first target, then destroy enemy positions. A nearly limitless supply of artillery shells and the new 106 fuse, which allowed shells to explode on contact, as opposed to burying themselves in ground, facilitated the destruction of hardened defences and barbed wire. The Canadian infantry would be well supported when it went into battle with over 1,000 artillery pieces laying down withering, supportive fire.
Taking Vimy Ridge, advancing with tank class=
Attacking together for the first time, the four Canadian divisions stormed the ridge at 5:30am on 9 April 1917. More than 15,000 Canadian infantry overran the Germans all along the front. Incredible bravery and discipline allowed the infantry to continue moving forward under heavy fire, even when their officers were killed.There were countless acts of sacrifice, as Canadians single-handedly charged machine-gun nests or forced the surrender of Germans in protective dugouts. Hill 145, the highest and most important feature of the Ridge, and where the Vimy monument now stands, was captured in a frontal bayonet charge against machine-gun positions. Three more days of costly battle delivered final victory. The Canadian operation was an important success, even if the larger British and French offensive, of which it had been a part, had failed. But it was victory at a heavy cost: 3,598 Canadians were killed and another 7,000 wounded.
The capture of Vimy was more than just an important battlefield victory. For the first time all four Canadian divisions attacked together: men from all regions of Canada were present at the battle. Brigadier-General A.E. Ross declared after the war, “in those few minutes I witnessed the birth of a nation.” Canadians Returning from Vimy Ridge 1917, First World War
The Battle of Vimy Ridge was a military engagement fought primarily as part of the Battle of Arras, in the Nord-Pas-de-Calais region of France, during the First World War. The main combatants were the Canadian Corps, of four divisions, against three divisions of the German Sixth Army. The battle, which took place from 9 to 12 April 1917, was part of the opening phase of the British-led Battle of Arras, a diversionary attack for the French Nivelle Offensive.
The objective of the Canadian Corps was to take control of the German-held high ground along an escarpment at the northernmost end of the Arras Offensive. This would ensure that the southern flank could advance without suffering German enfilade fire. Supported by a creeping barrage, the Canadian Corps captured most of the ridge during the first day of the attack. The town of Thélus fell during the second day of the attack, as did the crest of the ridge once the Canadian Corps overcame a salient against considerable German resistance. The final objective, a fortified knoll located outside the village of Givenchy-en-Gohelle, fell to the Canadian Corps on 12 April. The German forces then retreated to the Oppy–Méricourt line.
Historians attribute the success of the Canadian Corps in capturing the ridge to a mixture of technical and tactical innovation, meticulous planning, powerful artillery support and extensive training, as well as the failure of the German Sixth Army to properly apply the new German defensive doctrine. The battle was the first occasion when all four divisions of the Canadian Expeditionary Force participated in a battle together and it was made a symbol of Canadian national achievement and sacrifice. Recent historical research[5] has called this patriotic narrative into question, showing that it developed in the latter part of the twentieth century. The nation-building story only emerged fully formed after most of those who experienced the Great War directly or indirectly had passed from the scene. A 100-hectare (250-acre) portion of the former battleground serves as a memorial park and site of the Canadian National Vimy Memorial
William Frederick “Billy” McFadzeanVC (9 October 1895 – 1 July 1916) was born in Lurgan, County Armagh. From Ulster, he was a recipient of the Victoria Cross, the highest and most prestigious award for gallantry in the face of the enemy that can be awarded to British and Commonwealth forces.
William McFadzean
William McFadzean as shown on a mural in Cregagh, Belfast
McFadzean was a 20-year-old rifleman in the 14th Battalion, The Royal Irish Rifles, British Army during the First World War. On 1 July 1916, during the Battle of the Somme near Thiepval Wood, France, a box of hand grenades slipped into a crowded trench. Two of the safety pins in the grenades were dislodged. McFadzean threw himself on top of the grenades, which exploded, killing him but injuring only one other.
His citation read:
No. 14/18278 Pte. William Frederick McFadzean, late R. Ir. Rif.
For most conspicuous bravery. While in a concentration trench and opening a box of bombs for distribution prior to an attack, the box slipped down into the trench, which was crowded with men, and two of the safety pins fell out. Private McFadzean, instantly realising the danger to his comrades, with heroic courage threw himself on the top of the Bombs. The bombs exploded blowing him to pieces, but only one other man was injured. He well knew his danger, being himself a bomber, but without a moment’s hesitation he gave his life for his comrades.
McFadzean’s father was presented with his son’s VC by King George V in Buckingham Palace, London on 28 February 1917.
His Victoria Cross is displayed at The Royal Ulster Rifles Museum, Belfast, Northern Ireland.
The Thiepval Memorial to the Missing of the Somme is a war memorial to 72,195 missing British and South African servicemen, who died in the Battles of the Somme of the First World War between 1915 and 1918, with no known grave. It is near the village of Thiepval, Picardy in France. A visitors’ centre opened in 2004.
———————————–
———————————–
Location
The Memorial was built approximately 200 metres (220 yd) to the south-east of the former Thiepval Château, which was located on lower ground, by the side of Thiepval Wood. The grounds of the original château were not chosen as this would have required the moving of graves, dug during the war around the numerous medical aid stations.
The memorial dominates the rural scene and has 16 brick piers, faced with Portland stone. It was originally built using French bricks from Lille, but was refaced in 1973 with Accrington brick.
The main arch is aligned east to west.The memorial is 140 feet (43 m) high, above the level of its podium, which to the west is 20 feet (6.1 m) above the level of the adjoining cemetery. It has foundations 19 feet (5.8 m) thick, which were required because of extensive wartime tunnelling beneath the structure.
It is a complex form of memorial arch, comprising interlocking arches of four sizes. Each side of the main arch is pierced by a smaller arch, orientated at a right angle to the main arch. Each side of each of these smaller arches is then pierced by a still smaller arch and so on. The keystone of each smaller arch is at the level of the spring of the larger arch that it pierces; each of these levels is marked by a stone cornice.
This design results in 16 piers, having 64 stone-panelled sides. Only 48 of these are inscribed, as the panels around the outside of the memorial are blank.
More succinctly, according to the architectural historian Stephen Games, the memorial is composed of two intersecting triumphal arches, each with a larger central arch and two smaller subsidiary arches, the arches on the east-west facades being taller than those on the north-south, and all raised up from what is loosely a square four-by-four tartan grid plan. The main arch is surmounted by a tower. In the central space of the memorial a Stone of Remembrance rests on a three-stepped platform.
The memorial represents the names of over 72,000 officers and men (see below), and Lutyens’s ingenious geometry arises out of the attempt to display these names in compact form, rather than in the more usual linear form seen in the very long and much lower memorials to other vast First World War battles such as Loos, Pozières and Étaples.
Inscriptions
The inscription of names on the memorial is reserved for those missing, or unidentified, soldiers who have no known grave. A large inscription on an internal surface of the memorial reads:
Here are recorded
names of officers and men of the British Armies who fell on the Somme battlefields July 1915 February 1918 but to whom the fortune of war denied the known and honoured burial given to their
comrades in death.
On the Portland stone piers are engraved the names of over 72,000 men who were lost in the Somme battles between July 1915 and March 1918. The Commonwealth War Graves Commission states that over 90% of these soldiers died in the first Battle of the Somme between 1 July and 18 November 1916. The names are carved using the standard upper-case lettering designed for the Commission by MacDonald Gill.
Over the years since its inauguration, bodies have been regularly discovered on the former battlefield and are sometimes identified through various means. The decision was taken that to protect the integrity of the memorial as one solely for those who are missing or unidentified, that if a body were found and identified the inscription of their name would be removed from the memorial by filling in the inscription with cement. For those who are found and identified, they are given a funeral with full military honours at a cemetery close to the location at which they were discovered. This practice has resulted in numerous gaps in the lists of names.
On the top of the archway, a French inscription reads: Aux armées Française et Britannique l’Empire Britannique reconnaissant (To the French and British Armies, from the grateful British Empire). Just below this, are carved the years 1914 and 1918. On the upper edges of the side archways, split across left and right, is carved the phrase:
Cross of Sacrifice and British (left) and French (right) graves by the memorial
The Thiepval Memorial also serves as an Anglo-French battle memorial to commemorate the joint nature of the 1916 offensive. In further recognition of this, a cemetery, Thiepval Anglo-Frenchy Cemetery, containing 300 British Commonwealth and 300 French graves lies at the foot of the memorial. Most of the soldiers buried here – 239 of the British Commonwealth and 253 of the French – are unknown, the bodies having been reburied here after discovery between December 1931 and March 1932, mostly from the Somme battlefields but some from as far north as Loos and as far south as Le Quesnel.
The British Commonwealth graves have rectangular headstones made of white stone, while the French graves have grey stone crosses. On the British headstones is the inscription “A Soldier of the Great War/ Known unto God”. The French crosses bear the single word “Inconnu” (‘unknown’). The cemetery’s Cross of Sacrifice bears an inscription that acknowledges the joint British and French contributions:
“
That the world may remember the common sacrifice of two and a half million dead, here have been laid side by side Soldiers of France and of the British Empire in eternal comradeship.
”
— Thiepval Anglo-French Cemetery Cross of Sacrifice inscription
Ceremonies and services
Each year on 1 July (the anniversary of the first day on the Somme) a major ceremony is held at the memorial.
There is also a ceremony on the 11 November, beginning at 1045 CET.
The Battle of the Somme (French: Bataille de la Somme, German: Schlacht an der Somme), also known as the Somme Offensive, was a battle of the First World War fought by the armies of the British and French empires against the German Empire. It took place between 1 July and 18 November 1916 on both sides of upper reaches of the River Somme in France.
It was the largest battle of the First World War on the Western Front; more than one million men were wounded or killed, making it one of the bloodiest battles in human history.
1,000,000 Killed & Wounded
The French and British had committed themselves to an offensive on the Somme during Allieddiscussions at Chantilly, Oise, in December 1915. The Allies agreed upon a strategy of combined offensives against the Central Powers in 1916, by the French, Russian, British and Italian armies, with the Somme offensive as the Franco-British contribution. Initial plans called for the French army to undertake the main part of the Somme offensive, supported on the northern flank by the Fourth Army of the British Expeditionary Force (BEF).
When the Imperial German Army began the Battle of Verdun on the Meuse on 21 February 1916, French commanders diverted many of the divisions intended for the Somme and the “supporting” attack by the British became the principal effort.
The first day on the Somme was also the worst day in the history of the British army, which had c. 57,470 casualties, mainly on the front between the Albert–Bapaume road and Gommecourt, where the attack was defeated and few British troops reached the German front line. The British troops on the Somme comprised a mixture of the remains of the pre-war regular army, the Territorial Force and the Kitchener Army, which was composed of Pals battalions, recruited from the same places and occupations.
The battle is notable for the importance of air power and the first use of the tank. At the end of the battle, British and French forces had penetrated 6 miles (9.7 km) into German-occupied territory, taking more ground than in any of their offensives since the Battle of the Marne in 1914.
The Anglo-French armies failed to capture Péronne and halted 3 miles (4.8 km) from Bapaume, where the German armies maintained their positions over the winter. British attacks in the Ancre valley resumed in January 1917 and forced the Germans into local withdrawals to reserve lines in February, before the scheduled retirement to the Siegfriedstellung (Hindenburg Line) began in March. Debate continues over the necessity, significance and effect of the battle.
20th Century Battlefields- Episode 1- 1918 Western Front
Allied war strategy for 1916 was decided at the Chantilly Conference from 6–8 December 1915. Simultaneous offensives on the Eastern Front by the Russian army, on the Italian Front by the Italian army, and on the Western Front by the Franco-British armies, were to be carried out to deny time for the Central Powers to move troops between fronts during lulls. In December 1915, General Sir Douglas Haig replaced Field Marshal Sir John French as Commander-in-Chief of the BEF.
Haig favoured a British offensive in Flanders close to BEF supply routes, to drive the Germans from the Belgian coast and end the U-boat threat from Belgian waters. Haig was not formally subordinate to Joffre but the British played a lesser role on the Western Front and complied with French strategy. In January 1916, Joffre had agreed to the BEF making its main effort in Flanders, but in February 1916 it was decided to mount a combined offensive where the French and British armies met, astride the Somme River in Picardy before the British offensive in Flanders.
A week later the Germans began an offensive against the French at Verdun. The costly defence of Verdun forced the French army to commit divisions intended for the Somme offensive, eventually reducing the French contribution to 13 divisions in the Sixth Army, against 20 British divisions. By 31 May, the ambitious Franco-British plan for a decisive victory, had been reduced to a limited offensive to relieve pressure on the French at Verdun with a battle of attrition on the Somme.
The Chief of the German General Staff, Erich von Falkenhayn, intended to end the war by splitting the Anglo-French Entente in 1916, before its material superiority became unbeatable. Falkenhayn planned to defeat the large amount of reserves which the Entente could move into the path of a breakthrough, by threatening a sensitive point close to the existing front line and provoking the French into counter-attacking German positions. Falkenhayn chose to attack towards Verdun to take the Meuse heights and make the city untenable. The French would have to conduct a counter-offensive on ground dominated by the German army and ringed with masses of heavy artillery, leading to huge losses and bring the French army close to collapse. The British would then have to begin a hasty relief offensive and would also suffer huge losses. Falkenhayn expected the relief offensive to fall south of Arras against the Sixth Army and be destroyed.
If such Franco-British defeats were not enough, Germany would attack the remnants of both armies and end the western alliance for good. The unexpected length of the Verdun offensive and the need to replace many exhausted units at Verdun, depleted the German strategic reserve placed behind the Sixth Army, which held the Western Front from Hannescamps, 18 kilometres (11 mi) south-west of Arras to St. Eloi, south of Ypres and reduced the German counter-offensive strategy north of the Somme, to one of passive and unyielding defence.
Battle of Verdun
Total War: The Battle of Verdun
The Battle of Verdun (21 February–18 December 1916) began a week after Joffre and Haig agreed to mount an offensive on the Somme. The German offensive at Verdun was intended to threaten the capture of the city and induce the French to fight an attrition battle, in which German advantages of terrain and firepower would cause the French disproportionate casualties. The battle changed the nature of the offensive on the Somme, as French divisions were diverted to Verdun, and the main effort by the French diminished to a supporting attack for the British. German overestimation of the cost of Verdun to the French contributed to the concentration of German infantry and guns on the north bank of the Somme.
By May, Joffre and Haig had changed their expectations of an offensive on the Somme, from a decisive battle to a hope that it would relieve Verdun and keep German divisions in France, which would assist the Russian armies conducting the Brusilov Offensive. The German offensive at Verdun was suspended in July, and troops, guns, and ammunition were transferred to Picardy, leading to a similar transfer of the French Tenth Army to the Somme front. Later in the year, the Franco-British were able to attack on the Somme and at Verdun sequentially and the French recovered much of the ground lost on the east bank of the Meuse in October and December.
Brusilov Offensive
Russian infantry
The Brusilov Offensive (4 June–20 September), absorbed the extra forces that had been requested on 2 June by Fritz von Below, commanding the German Second Army, for a spoiling attack on the Somme. On 4 June, Russian armies attacked on a 200-mile (320 km) front, from the Rumanian frontier to Pinsk and eventually advanced 150 kilometres (93 mi), reaching the foothills of the Carpathian mountains, against German and Austro-Hungarian troops of Armeegruppe von Linsingen and Armeegruppe Archduke Joseph. During the offensive the Russians inflicted c. 1,500,000 losses including c. 407,000 prisoners.
Three divisions were ordered from France to the Eastern Front on 9 June and the spoiling attack on the Somme was abandoned. Only four more divisions were sent to the Somme front before the Anglo-French offensive began, bringing the total to 101⁄2 divisions. Falkenhayn, and then Hindenburg and Ludendorff, were forced to send divisions to Russia throughout the summer to prevent a collapse of the Austro-Hungarian army and then to conduct a counter-offensive against Romania, which declared war against the Central Powers on 27 August.
In July there were 112 German divisions on the Western Front and 52 divisions in Russia and in November there were 121 divisions in the west and 76 divisions in the east.
The original British Expeditionary Force (BEF) of six divisions and the Cavalry Division, had lost most of the army’s pre-war regular soldiers in the battles of 1914 and 1915. The bulk of the army was made up of volunteers of the Territorial Force and Lord Kitchener‘s New Army, which had begun forming in August 1914. Rapid expansion created many vacancies for senior commands and specialist functions, which led to many appointments of retired officers and inexperienced newcomers.
In 1914, Douglas Haig had been a lieutenant-general in command of I Corps and was promoted to command the First Army in early 1915 and then the BEF in December, which eventually comprised five armies with sixty divisions. The swift increase in the size of the army reduced the average level of experience within it and created an acute equipment shortage. Many officers resorted to directive command, to avoid delegating to novice subordinates, although divisional commanders were given great latitude in training and planning for the attack of 1 July, since the heterogeneous nature of the 1916 army made it impossible for corps and army commanders to know the capacity of each division.
Despite considerable debate among German staff officers, Erich von Falkenhayn continued the policy of unyielding defence in 1916 . On the Somme front Falkenhayn’s construction plan of January 1915 had been completed. Barbed wire obstacles had been enlarged from one belt 5–10 yards (4.6–9.1 m) wide to two, 30 yards (27 m) wide and about 15 yards (14 m) apart. Double and triple thickness wire was used and laid 3–5 feet (0.91–1.52 m) high. The front line had been increased from one trench line to three, 150–200 yards (140–180 m) apart, the first trench occupied by sentry groups, the second (Wohngraben) for the bulk of the front-trench garrison and the third trench for local reserves.
The trenches were traversed and had sentry-posts in concrete recesses built into the parapet. Dugouts had been deepened from 6–9 feet (1.8–2.7 m) to 20–30 feet (6.1–9.1 m), 50 yards (46 m) apart and large enough for 25 men. An intermediate line of strongpoints (the Stützpunktlinie) about 1,000 yards (910 m) behind the front line was also built. Communication trenches ran back to the reserve line, renamed the second line, which was as well-built and wired as the first line. The second line was beyond the range of Allied field artillery, to force an attacker to stop and move field artillery forward before assaulting the line.
British intentions evolved as the military situation changed after the Chantilly Conference. French losses at Verdun reduced the contribution available for the offensive on the Somme and increased the urgency for the commencement of operations on the Somme. The principal role in the offensive devolved to the British and on 16 June, Haig defined the objectives of the offensive as the relief of pressure on the French at Verdun and the infliction of losses on the Germans.
After a five-day artillery bombardment, the British Fourth Army was to capture 27,000 yards (25,000 m) of the German first line, from Montauban to Serre and the Third Army was to mount a diversion at Gommecourt. In a second phase, the Fourth Army was to take the German second position, from Pozières to the Ancre and then the second position south of the Albert–Bapaume road, ready for an attack on the German third position south of the road towards Flers, when the Reserve Army which included three cavalry divisions, would exploit the success to advance east and then north towards Arras.
The French Sixth Army, with one corps on the north bank from Maricourt to the Somme and two corps on the south bank southwards to Foucaucourt, would make a subsidiary attack to guard the right flank of the main attack being made by the British.
German defences on the Somme
British aerial photograph of German trenches north of Thiepval, 10 May 1916. The crenellated appearance of the trenches is due to the presence of traverses.
After the (Herbstschlacht or Autumn Battles) of 1915, a third defence line another 3,000 yards (2,700 m) back from the Stutzpunktlinie was begun in February 1916 and was almost complete on the Somme front when the battle began. German artillery was organised in a series of sperrfeuerstreifen (barrage sectors); each officer was expected to know the batteries covering his section of the front line and the batteries ready to engage fleeting targets. A telephone system was built, with lines buried 6 feet (1.8 m) deep for 5 miles (8.0 km) behind the front line, to connect the front line to the artillery.
The Somme defences had two inherent weaknesses that the rebuilding had not remedied. The front trenches were on a forward slope, lined by white chalk from the subsoil and easily seen by ground observers. The defences were crowded towards the front trench, with a regiment having two battalions near the front-trench system and the reserve battalion divided between the Stutzpunktlinie and the second line, all within 2,000 yards (1,800 m) and most troops within 1,000 yards (910 m) of the front line, accommodated in the new deep dugouts. The concentration of troops at the front line on a forward slope guaranteed that it would face the bulk of an artillery bombardment, directed by ground observers on clearly marked lines.
The first day on the Somme began 141 days of the Battle of the Somme and the opening day of the Battle of Albert. The attack was made by five divisions of the French Sixth Army either side of the Somme, eleven British divisions of the Fourth Army north of the Somme to Serre and two divisions of the Third Army opposite Gommecourt, against the German Second Army of General Fritz von Below.
A trench interior near the Albert-Bapaume road
The German defence south of the Albert–Bapaume road mostly collapsed and the French had “complete success” on both banks of the Somme, as did the British from the army boundary at Maricourt to the Albert–Bapaume road. On the south bank the German defence was made incapable of resisting another attack and a substantial retreat began; on the north bank the abandonment of Fricourt was ordered. The defenders on the commanding ground north of the road inflicted a huge defeat on the British infantry, who had an unprecedented number of casualties.
Several truces were negotiated, to recover wounded from no man’s land north of the road. The Fourth Army took 57,470 casualties, of which 19,240 men were killed, the French Sixth Army had 1,590 casualties and the German 2nd Army had 10,000–12,000 losses.
The Battle of Albert was the first two weeks of Anglo-French offensive operations in the Battle of the Somme. The Allied preparatory artillery bombardment commenced on 24 June and the Anglo-French infantry attacked on 1 July, on the south bank from Foucaucourt to the Somme and from the Somme north to Gommecourt, 2 miles (3.2 km) beyond Serre. The French Sixth Army and the right wing of the British Fourth Army inflicted a considerable defeat on the German Second Army but from the Albert–Bapaume road to Gommecourt, the British attack was a disaster where most of the c. 60,000 British casualties were incurred.
Against Joffre’s wishes, Haig abandoned the offensive north of the road, to reinforce the success in the south, where the Anglo-French forces pressed forward towards the German second line, preparatory to a general attack on 14 July.
The Fourth Army attacked the German second defensive position from the Somme past Guillemont and Ginchy, north-west along the crest of the ridge to Pozières on the Albert–Bapaume road. The objectives of the attack were the villages of Bazentin le Petit, Bazentin le Grand and Longueval which was adjacent to Delville Wood, with High Wood on the ridge beyond. The attack was made by four divisions on a front of 6,000 yards (5.5 km) at 3:25 a.m. after a five-minute hurricane artillery bombardment. Field artillery fired a creeping barrage and the attacking waves pushed up close behind it in no man’s land, leaving them only a short distance to cross when the barrage lifted from the German front trench. Most of the objective was captured and the German defence south of the Albert–Bapaume road put under great strain but the attack was not followed up due to British communication failures, casualties and disorganisation.
The Battle of Fromelles was a subsidiary attack to support the Fourth Army on the Somme 80 kilometres (50 mi) to the south, to exploit any weakening of the German defences opposite. Preparations for the attack were rushed, the troops involved lacked experience in trench warfare and the power of the German defence was “gravely” underestimated, the attackers being outnumbered 2:1. On 19 July, von Falkenhayn had judged the British attack to be the anticipated offensive against the 6th Army.
Next day Falkenhayn ordered the Guard Reserve Corps to be withdrawn to reinforce the Somme front. The Battle of Fromelles had inflicted some losses on the German defenders but gained no ground and deflected few German troops bound for the Somme. The attack was the debut of the Australian Imperial Force on the Western Front and
“the worst 24 hours in Australia’s entire history”.
Of 7,080 BEF casualties, 5,533 losses were incurred by the 5th Australian Division; German losses were 1,600–2,000, with150 taken prisoner.
The Battle of Delville Wood was an operation to secure the British right flank, while the centre advanced to capture the higher lying areas of High Wood and Pozières. After the Battle of Albert the offensive had evolved to the capture of fortified villages, woods, and other terrain that offered observation for artillery fire, jumping-off points for more attacks, and other tactical advantages. The mutually costly fighting at Delville Wood eventually secured the British right flank and marked the Western Front debut of the South African 1st Infantry Brigade (incorporating a Southern Rhodesian contingent), which held the wood from 15–20 July.
When relieved the brigade had lost 2,536 men, similar to the casualties of many brigades on 1 July.
The Battle of Pozières began with the capture of the village by the 1st Australian Division (Australian Imperial Force) of the Reserve Army, the only British success in the Allied fiasco of 22/23 July, when a general attack combined with the French further south, degenerated into a series of separate attacks due to communication failures, supply failures and poor weather.
German bombardments and counter-attacks began on 23 July and continued until 7 August. The fighting ended with the Reserve Army taking the plateau north and east of the village, overlooking the fortified village of Thiepval from the rear.
The Battle of Guillemont was an attack on the village which was captured by the Fourth Army on the first day. Guillemont was on the right flank of the British sector, near the boundary with the French Sixth Army. German defences ringed the British salient at Delville Wood to the north and had observation over the French Sixth Army area to the south towards the Somme river. The German defence in the area was based on the second line and numerous fortified villages and farms north from Maurepas at Combles, Guillemont, Falfemont Farm, Delville Wood and High Wood, which were mutually supporting.
The battle for Guillemont was considered by some observers to be the supreme effort of the German army during the battle. Numerous meetings were held by Joffre, Haig, Foch, Rawlinson and Fayolle to co-ordinate joint attacks by the four armies, all of which broke down. A pause in Anglo-French attacks at the end of August, coincided with the largest counter-attack by the German army in the Battle of the Somme.
In the Battle of Ginchy the 16th Division captured the German-held village. Ginchy was 1.5 kilometres (0.93 mi) north-east of Guillemont, at the junction of six roads on a rise overlooking Combles, 4 kilometres (2.5 mi) to the south-east. After the end of the Battle of Guillemont, British troops were required to advance to positions which would give observation over the German third position, ready for a general attack in mid-September. British attacks from Leuze Wood northwards to Ginchy had begun on 3 September, when the 7th Division captured the village and was then forced out by a German counter-attack.
The capture of Ginchy and the success of the French Sixth Army on 12 September, in its biggest attack of the battle of the Somme, enabled both armies to make much bigger attacks, sequenced with the Tenth and Reserve armies, which captured much more ground and inflicted c. 130,000 casualties on the German defenders during the month.
The Battle of Flers–Courcelette was the third and final general offensive mounted by the British Army, which attacked an intermediate line and the German third line to take Morval, Lesboeufs and Gueudecourt, which was combined with a French attack on Frégicourt and Rancourt to encircle Combles and a supporting attack on the south bank of the Somme. The strategic objective of a breakthrough was not achieved but the tactical gains were considerable, the front line being advanced by 2,500–3,500 yards (2,300–3,200 m) and many casualties were inflicted on the German defenders. The battle was the debut of the Canadian Corps, New Zealand Division and tanks of the Heavy Branch of the Machine Gun Corps on the Somme.
British troops moving up to the attack during the Battle of Morval, 25 September 1916.
The Battle of Morval was an attack by the Fourth Army on Morval, Gueudecourt and Lesboeufs held by the German 1st Army, which had been the final objectives of the Battle of Flers–Courcelette (15–22 September). The attack was postponed to combine with attacks by the French Sixth Army on Combles, south of Morval and because of rain. The combined attack was also intended to deprive the German defenders further west, near Thiepval of reinforcements, before an attack by the Reserve Army, due on 26 September. Combles, Morval, Lesboeufs and Gueudecourt were captured and a small number of tanks joined in the battle later in the afternoon.
Many casualties were inflicted on the Germans but the French made slower progress. The Fourth Army advance on 25 September was its deepest since 14 July and left the Germans in severe difficulties, particularly in a salient near Combles. The Reserve Army attack began on 26 September in the Battle of Thiepval Ridge.
Battle of the Transloy Ridges, 1 October – 11 November
The Battle of Le Transloy began in good weather and Le Sars was captured on 7 October. Pauses were made from 8–11 October due to rain and 13–18 October to allow time for a methodical bombardment, when it became clear that the German defence had recovered from earlier defeats. Haig consulted with the army commanders and on 17 October reduced the scope of operations by cancelling the Third Army plans and reducing the Reserve Army and Fourth Army attacks to limited operations, in co-operation with the French Sixth Army.
Another pause followed before operations resumed on 23 October on the northern flank of the Fourth Army, with a delay during more bad weather on the right flank of the Fourth Army and on the French Sixth Army front, until 5 November. Next day the Fourth Army ceased offensive operations, except for small attacks intended to improve positions and divert German attention from attacks being made by the Reserve/Fifth Army. Larger operations resumed in January 1917.
British Mark I male tank near Thiepval, 25 September 1916.
The Battle of Thiepval Ridge was the first large offensive mounted by the Reserve Army of Lieutenant GeneralHubert Gough and was intended to benefit from the Fourth Army attack at Morval by starting 24 hours afterwards. Thiepval Ridge was well fortified and the German defenders fought with great determination, while the British co-ordination of infantry and artillery declined after the first day, due to confused fighting in the maze of trenches, dug-outs and shell-craters.
The final British objectives were not reached until the Battle of the Ancre Heights (1 October – 11 November). Organisational difficulties and deteriorating weather frustrated Joffre’s intention to proceed by vigorous co-ordinated attacks by the Anglo-French armies, which became disjointed and declined in effectiveness during late September, at the same time as a revival occurred in the German defence. The British experimented with new techniques in gas warfare, machine-gun bombardment and tank–infantry co-operation, as the Germans struggled to withstand the preponderance of men and material fielded by the Anglo-French, despite reorganisation and substantial reinforcements of troops, artillery and aircraft from Verdun. September became the worst month for casualties for the Germans.
Battle of the Ancre Heights, 1 October – 11 November
The Battle of the Ancre Heights was fought after Haig made plans for the Third Army to take the area east of Gommecourt, the Reserve Army to attack north from Thiepval Ridge and east from Beaumont Hamel–Hébuterne and for the Fourth Army to reach the Péronne–Bapaume road around Le Transloy and Beaulencourt–Thilloy–Loupart Wood, north of the Albert–Bapaume road. The Reserve Army attacked to complete the capture of Regina Trench/Stuff Trench, north of Courcelette to the west end of Bazentin Ridge around Schwaben and Stuff Redoubts, during which bad weather caused great hardship and delay. The Marine Brigade from Flanders and fresh German divisions brought from quiet fronts counter-attacked frequently and the British objectives were not secured until 11 November.
Mametz, Western Front, a winter scene by Frank Crozier
The Battle of the Ancre was the last big British operation of the year. The Fifth (formerly Reserve) Army attacked into the Ancre valley to exploit German exhaustion after the Battle of the Ancre Heights and gain ground ready for a resumption of the offensive in 1917. Political calculation, concern for Allied morale and Joffre’s pressure for a continuation of attacks in France, to prevent German troop transfers to Russia and Italy also influenced Haig.
The battle began with another mine being detonated beneath Hawthorn Ridge Redoubt. The attack on Serre failed, although a brigade of the 31st Division, which had attacked in the disaster of 1 July, took its objectives before being withdrawn later. South of Serre, Beaumont Hamel and Beaucourt-sur-l’Ancre were captured. South of the Ancre, St. Pierre Division was captured, the outskirts of Grandcourt reached and the Canadian 4th Division captured Regina Trench north of Courcelette, then took Desire Support Trench on 18 November. Until January 1917 a lull occurred, as both sides concentrated on enduring the weather.
Aftermath
Analysis
Progress of the Battle of the Somme between 1 July and 18 November.
At the start of 1916, most of the British Army had been an inexperienced and patchily trained mass of volunteers. The Somme was the debut of the Kitchener Army created by Lord Kitchener’s call for recruits at the start of the war. The British volunteers were often the fittest, most enthusiastic and best educated citizens but British casualties were also inexperienced soldiers and it has been claimed that their loss was of lesser military significance than the losses of the remaining peace-trained officers and men of the German army.
British casualties on the first day were the worst in the history of the British army, with 57,470 British casualties, 19,240 of whom were killed.
British survivors of the battle had gained experience and the BEF learned how to conduct the mass industrial warfare, which the continental armies had been fighting since 1914. The continental powers had begun the war with trained armies of regulars and reservists, which were wasting assets. Crown Prince Rupprecht of Bavaria wrote,
“What remained of the old first-class peace-trained German infantry had been expended on the battlefield”.
A war of attrition was a logical strategy for Britain against Germany, which was also at war with France and Russia. A school of thought holds that the Battle of the Somme placed unprecedented strain on the German army and that after the battle it was unable to replace casualties like-for-like, which reduced it to a militia.
The destruction of German units in battle was made worse by lack of rest. British and French aircraft and long-range guns reached well behind the front-line, where trench-digging and other work meant that troops returned to the line exhausted.
Despite the strategic predicament of the German army, it survived the battle, withstood the pressure of the Brusilov Offensive, and conducted an invasion of Romania. In 1917, the German army in the west survived the large British and French offensives of the Nivelle Offensive and the Third Battle of Ypres, though at great cost
Falkenhayn was sacked and replaced by Hindenburg and Ludendorff at the end of August 1916. At a conference at Cambrai on 5 September, a decision was taken to build a new defensive line well behind the Somme front. The Siegfriedstellung was to be built from Arras to St. Quentin, La Fère and Condé, with another new line between Verdun and Pont-à-Mousson. These lines were intended to limit any Allied breakthrough and to allow the German army to withdraw if attacked; work began on the Siegfriedstellung (Hindenburg Line) at the end of September.
Withdrawing to the new line was not an easy decision and the German high command struggled over it during the winter of 1916–1917. Some members wanted to take a shorter step back, to a line between Arras and Sailly, while the First and Second army commanders wanted to stay on the Somme. Generalleutnant von Fuchs on 20 January 1917 said that,
Enemy superiority is so great that we are not in a position either to fix their forces in position or to prevent them from launching an offensive elsewhere. We just do not have the troops…. We cannot prevail in a second battle of the Somme with our men; they cannot achieve that any more. (20 January 1917)
and that half measures were futile, retreating to the Siegfriedstellung was unavoidable. After the loss of a considerable amount of ground around the Ancre valley to the British Fifth Army in February 1917, the German armies on the Somme were ordered on 14 February, to withdraw to reserve lines closer to Bapaume. A further retirement to the Hindenburg Line (Siegfriedstellung) in Operation Alberich began on 16 March 1917, despite the new line being unfinished and poorly sited in some places.
The British and French had advanced about 6 miles (9.7 km) on the Somme, on a front of 16 miles (26 km) at a cost of 419,654 British and 202,567 French casualties, against 465,181 German casualties.Until the 1930s the dominant view of the battle in English-language writing was that the battle was a hard-fought victory against a brave, experienced and well-led opponent.
Winston Churchill had objected to the way the battle was being fought in August 1916, Lloyd George when Prime Minister criticised attrition warfare frequently and condemned the battle in his post-war memoirs. In the 1930s a new orthodoxy of “mud, blood and futility” emerged and gained more emphasis in the 1960s when the 50th anniversaries of the Great War battles were commemorated.
Transport
Until 1916, transport arrangements for the BEF were based on an assumption that the war of movement would soon resume and make it pointless to build infrastructure, since it would be left behind. The British relied on motor transport from railheads which was insufficient where large masses of men and guns were concentrated. When the Fourth Army advance resumed in August, the wisdom of not building light railways which would be left behind was argued by some, in favour of building standard gauge lines.
Experience of crossing the beaten zone, showed that such lines or metalled roads could not be built quickly enough to sustain an advance and that pausing while communications caught up, allowed the defenders to recover. On the Somme the daily carry during attacks on a 12 miles (19 km) front was 20,000 long tons (20,000 t) and a few wood roads and rail lines were inadequate for the number of lorries and roads. A comprehensive system of transport was needed, which required a much greater diversion of personnel and equipment than had been expected.
The Battle of the Somme was one of the costliest battles of World War I. The original Allied estimate of casualties on the Somme, made at the Chantilly Conference on 15 November 1916, was 485,000 British and French casualties and 630,000 German. A German officer wrote,
Somme. The whole history of the world cannot contain a more ghastly word.
— Friedrich Steinbrecher
In 1931, Wendt published a comparison of German and British-French casualties which showed an average of 30% more Allied casualties to German losses on the Somme. In the first 1916 volume of the British Official History (1932), J. E. Edmonds wrote that comparisons of casualties were inexact, because of different methods of calculation by the belligerents but that British casualties were 419,654, from total British casualties in France in the period of 498,054, French Somme casualties were 194,451 and German casualties were c. 445,322, to which should be added 27% for woundings, which would have been counted as casualties using British criteria; Anglo-French casualties on the Somme were over 600,000 and German casualties were under 600,000.
The addition by Edmonds of c. 30 percent to German figures, to make them comparable to British criteria, was criticised as “spurious” by M. J. Williams in 1964. McRandle and Quirk in 2006 cast doubt on the Edmonds calculations, but counted 729,000 German casualties on the Western Front from July to December against 631,000 by Churchill, concluding that German losses were fewer than Anglo-French casualties, but the ability of the German army to inflict disproportionate losses had been eroded by attrition.
Sheffield wrote that the calculation by Edmonds of Anglo-French casualties was correct but the one for German casualties was discredited, quoting the official German figure of 500,000 casualties.
In the second 1916 volume of the British Official History (1938), Miles wrote that total German casualties in the battle were 660,000–680,000. against Anglo-French casualties of fewer than 630,000, using “fresh data” from the French and German official accounts.
Western Front Casualties July–December 1916
Month
Casualties
July
196,081
August
75,249
September
115,056
October
66,852
November
46,238
December
13,803
Total
British
513,289
French
c. 434,000
Total:
Anglo-French
c. 947,289
German
c. 719,000
Grand total
c. 1,666,289
In 1938, Churchill wrote that the Germans had suffered 270,000 casualties against the French, between February and June 1916 and 390,000 between July and the end of the year (see statistical tables in Appendix J of Churchill’s World Crisis) with 278,000 casualties at Verdun.
Some losses must have been in quieter sectors but many must have been inflicted by the French at the Somme. Churchill wrote that Franco-German losses at the Somme, were “much less unequal” than the Anglo-German ratio. During the Battle of the Somme German forces suffered 537,919 casualties, of which 338,011 losses were inflicted by the French and 199,908 losses by the British. In turn German forces inflicted 794,238 casualties on the Entente.
Doughty wrote that French losses on the Somme were “surprisingly high” at 202,567 men,54% of the 377,231 casualties at Verdun. Prior and Wilson used Churchill’s research and wrote that the British lost 432,000 soldiers from 1 July – mid-November (c. 3,600 per day) in inflicting c. 230,000 German casualties and offer no figures for French casualties or the losses they inflicted on the Germans. Sheldon wrote that the British lost “over 400,000″ casualties.
Harris wrote that total British losses were c. 420,000, French casualties were over 200,000 men and German losses were c. 500,000, according to the “best” German sources.Sheffield wrote that the losses were “appalling”, with 419,000 British casualties, c. 204,000 French and perhaps600,000 German casualties.
In a commentary on the debate about Somme casualties, Philpott used Miles’s figures of 419,654 British casualties and the French official figures of 154,446 Sixth Army losses and 48,131 Tenth Army casualties. German losses were described as “disputed”, ranging from 400,000–680,000. Churchill’s claims were a “snapshot” of July 1916 and not representative of the rest of the battle. Philpott called the “blood test” a crude measure compared to manpower reserves, industrial capacity, farm productivity and financial resources and that intangible factors were more influential on the course of the war.
The German army was exhausted by the end of 1916, with loss of morale and the cumulative effects of attrition and frequent defeats causing it to collapse in 1918, a process which began on the Somme, echoing Churchill that the German soldiery was never the same again.
Battle of the Somme British, French and German casualties
July–November 1916
Month
British
French
Sub-
total
German
(% of
Allied
total)
July
158,786
49,859
208,645
103,000
49.4
August
58,085
18,806
76,891
68,000
88.4
September
101,313
76,147
177,460
140,000
78.9
October
57,722
37,626
95,348
78,500
82.3
November
39,784
20,129
59,913
45,000
75.0
Total
415,690
202,567
618,257
434,500
70.3
After the Battle of the Ancre (13–18 November 1916), British attacks on the Somme front were stopped by the weather and military operations by both sides were mostly restricted to survival in the rain, snow, fog, mud fields, waterlogged trenches and shell-holes. As preparations for the offensive at Arras continued, the British attempted to keep German attention on the Somme front. British operations on the Ancre from 10 January – 22 February 1917, forced the Germans back 5 miles (8.0 km) on a 4-mile (6.4 km) front, ahead of the schedule of the Alberich Bewegung (Alberich Manoeuvre/Operation Alberich) and eventually took 5,284 prisoners.
On 22/23 February, the Germans fell back another 3 miles (4.8 km) on a 15-mile (24 km) front. The Germans then withdrew from much of the R. I Stellung to the R. II Stellung on 11 March, forestalling a British attack, which was not noticed by the British until dark on 12 March; the main German withdrawal from the Noyon salient to the Hindenburg Line (Operation Alberich) commenced on schedule on 16 March.
Defensive positions held by the German army on the Somme after November 1916 were in poor condition, the garrisons were exhausted and censors of correspondence from front-line soldiers reported tiredness and low morale. The situation left the German command doubtful that the army could withstand a resumption of the battle. The German defence of the Ancre began to collapse under British attacks, which on 28 January caused Rupprecht to urge that the retirement to the Siegfriedstellung (Hindenburg Line) begin. Ludendorff rejected the proposal next day but British attacks on the First Army, particularly the Action of Miraumont (also known as the Battle of Boom Ravine, 17–18 February) caused Rupprecht on the night of 22 February to order a preliminary withdrawal of c. 4 miles (6.4 km) to the R. I Stellung (R. I Position).
On 24 February the Germans withdrew, protected by rear guards, over roads in relatively good condition which were then destroyed. The German withdrawal was helped by a thaw, which turned roads behind the British front into bogs and by disruption to the railways which supplied the Somme front. On the night of 12 March the Germans withdrew from the R. I Stellung between Bapaume and Achiet le Petit and the British reached the R. II Stellung (R. II Position) on 13 March.
The first day of the Battle of the Somme is commemorated in Newfoundland, remembering the “Best of the Best” at 11:00 a.m. on the Sunday nearest to 1 July.
Since the 1960s the “futility” view, that the battle was an Anglo-French disaster has been criticised as a myth. In recent years a nuanced version of the original orthodoxy has arisen, which does not seek to minimise the human cost of the battle but sets it in the context of industrial warfare, compares it to the wars in the United States from 1861–1865 and Europe from 1939–1945 and describes the development of the armies of 1914 into modern all-arms organisations, using the scientific application of fire-power on land and in the air, to defeat comparable opponents in a war of exhaustion.
Little German and French writing has been translated, leaving much of the continental perspective and detail of German and French military operations inaccessible to the English-speaking world.
Haig and General Rawlinson have been criticised ever since 1916 for the human cost of the battle and for failing to achieve their territorial objectives. On 1 August 1916 Winston Churchill criticised the British Army’s conduct of the offensive to the British Cabinet, claiming that though the battle had forced the Germans to end their offensive at Verdun, attrition was damaging the British armies more than the German armies.
Though Churchill was unable to suggest an alternative, a critical view of the British on the Somme has been influential in English-language writing ever since.
A rival conclusion by some historians (Terraine, Sheffield, Duffy, Chickering, Herwig and Philpott et al.) is that there was no strategic alternative for the British in 1916 and that an understandable horror at British losses is insular, given the millions of casualties borne by the French and Russian armies since 1914.
This school of thought sets the battle in a context of a general Allied offensive in 1916 and notes that German and French writing on the battle puts it in a continental perspective. The Battle of the Somme has been called the beginning of modern all-arms warfare, during which Kitchener’s Army learned to fight the mass-industrial war, which the continental armies had been engaged in for two years. This view sees the British contribution to the battle as part of a coalition war and part of a process, which took the strategic initiative from the German Army and caused it irreparable damage, leading to its collapse in late 1918
Kitchener, wearing the cap of a British Field Marshal, stares and points at the viewer calling them to enlist in the British Army against the Central Powers. The image is considered one of the most iconic and enduring images of World War I.
A hugely influential image and slogan, it has also inspired imitations in other countries, from the United States to the Soviet Union
Lord Kitchener Wants You
“Britons: Lord Kitchener Wants You. Join Your Country’s Army! God save the King.”
Language
English
Media
watercolour; print
Release date(s)
1914
Country
United Kingdom
Development
Prior to the institution of conscription in 1916, the United Kingdom relied upon volunteers for military service. Until the outbreak of the First World War, recruiting posters had not been used in Britain on a regular basis since the Napoleonic Wars. UK government advertisements for contract work were handled by His Majesty’s Stationery Office, who passed this task onto the publishers of R. F. White & Sons in order to avoid paying the government rate to newspaper publishers.
As war loomed in late 1913 the number of advertising contracts expanded to include other firms. J. E. B. Seely, then the Secretary of State for War, awarded Sir Hedley Le Bas, Eric Field, and their Caxton Advertising Agency a contract to advertise for recruits in the major UK newspapers. Eric Field designed a prototype full-page advertisement with the Coat of Arms of King George V and the phrase “Your King and Country Need You.”
Britain declared war on the German Empire on 4 August 1914 and the first run of the full-page ran the next day in those newspapers owned by Lord Northcliffe.
Eric Field’s original design that caught the attention of Lord Kitchener
Prime Minister of the United KingdomH. H. Asquith had appointed Kitchener as Secretary of State for War. Kitchener was the first currently serving soldier to hold the post and was given the task of recruiting a large army to fight Germany.
Unlike some of his contemporaries who expected a short conflict, Kitchener foresaw a much longer war requiring hundreds of thousands of enlistees. According to Gary S. Messinger, Kitchener reacted well to Field’s advertisement although insisting “that the ads should all end with ‘God Save the King’ and that they should not be changed from the original text, except to say ‘Lord Kitchener needs YOU.'” In the following months Le Bas formed an advisory committee of ad men to develop further newspaper recruiting advertisements, most of which ran vertically 11 inches (28 cm), two columns wide.
Alfred Leete, one Caxton’s illustrators, designed the now-famous image as a cover illustration for the 5 September 1914 issue of London Opinion, a popular weekly magazine, taking cues from Field’s earlier recruiting advertisement. At the time, the magazine had a circulation of 300,000. In response to requests for reproductions, the magazine offered postcard-sized copies for sale. The Parliamentary Recruiting Committee obtained permission to use the design in poster form.
A similar poster used the words “YOUR COUNTRY NEEDS YOU”.
Kitchener, a “figure of absolute will and power, an emblem of British masculinity”, was a natural subject for Leete’s artwork as his name was directly attached to the recruiting efforts and the newly-forming Kitchener’s Army.
Sir Hedley Le Bas was the founder of the Caxton Publishing Company Limited
Le Bas of Caxton Advertising (for whom Leete worked) chose Kitchener for the advertisement because Kitchener was “the only soldier with a great war name, won in the field, within the memory of the thousands of men the country wanted.”
Kitchener’s appearance including his bushy mustache and court dress jacket was reminiscent of romanticized Victorian era styles. Kitchener, 6 ft 2 in (188 cm) tall and powerfully built, was for many the personification of military ethos so popular in the present Edwardian era. After the scorched earth tactics and hard-fought victory of the Second Boer War, Kitchener represented a return to the military victories of the colonial era.
The fact that Kitchener’s name is not used in the poster demonstrates how easily he was visually recognized. David Lubin opines that the image may be one of the earliest successful celebrity endorsements as the commercial practice expanded greatly in the 1920s.[20] Keith Surridge posits that Kitchener’s features evoked the harsh, feared militarism of the Germans which bode well for British fortune in the war.
Hampshire at anchor
Kitchener would not see the end of the war; he died onboard HMS Hampshire in 1916.
Original versions by Alfred Leete
Alfred Leete in uniform, c. 1916
See Below for more details on Alfred Leete.
The 5 September 1914 London Opinion magazine cover that inspired the posters. The caption reads “Your Country Needs YOU”
The “Britons (Lord Kitchener) Wants YOU” poster dating from September 1914
Leete’s drawing of Kitchener was the most famous image used in the British Armyrecruitment campaign of World War I. It continues to be considered a masterful piece of wartime propaganda as well as an enduring and iconic image of the war.
Recruitment posters in general have often been seen as a driving force helping to bring more than a million men into the Army. September 1914, coincident with publication of Leete’s image, saw the highest number of volunteers enlisted.
The Times recorded the scene in London on 3 January 1915; “Posters appealing to recruits are to be seen on every hoarding, in most windows, in omnibuses, tramcars and commercial vans. The great base of Nelson’s Column is covered with them. Their number and variety are remarkable. Everywhere Lord Kitchener sternly points a monstrously big finger, exclaiming ‘I Want You'”.
One contemporaneous publication decried the use of advertising methods to enlist soldiers:
“the cold, basilisk eye of a gaudily-lithographed Kitchener rivets itself upon the possible recruit and the outstretched finger of the British Minister of War is levelled at him like some revolver, with the words, ‘I want you.’ The idea is stolen from the advertisement of a 5c. American cigar.”
Although it became one of the most famous posters in history, its widespread circulation did not halt the decline in recruiting.
This 30-word poster was an official product of the Parliamentary Recruitment Committee and was more popular contemporaneously.
The use of Kitchener’s image for recruiting posters was so widespread that Lady Asquith referred to the Field Marshal simply as “the Poster.”
The placement of the Kitchener posters including Alfred Leete’s design has been examined and questioned following an Imperial War Museum publication in 1997. The War Museum suggested that the poster itself was a “non event” and was made popular by postwar advertising by the war museum, perhaps conflating Leete’s design with the so-called “30-word” poster, an official product from the Parliamentary Recruitment Committee.
The 30-word design was the most popular recruitment poster at the time having been printed ten times the volume of Leete’s image. Leete’s image has been praised for being more arresting while his accompanying text is also far less verbose. The official wording, taken from a Kitchener speech, may seem more fitting for a character in a Henry James novel.
The 30-word recruiting poster was developed as Britons’ collective hopes of the war being over by Christmas were dashed in January 1915 and volunteer enlistments fell. A 2013 book researched by James Taylor counters the popular belief that the Leete design was an influential recruitment tool during the war. He claims the original artwork was acquired by the Imperial War Museum in 1917 and catalogued as a poster in error.[8]
Though the image of Kitchener (Britain’s most popular soldier) inspired several other poster designs, Taylor says he can find no evidence in photographs of the time that the Leete poster was used, although a photograph from 15 December 1914 taken at the Lancashire and Yorkshire Railway station in Liverpool clearly depicts Leete’s depiction among other recruiting posters.[8][34]
The effectiveness of the image upon the viewer is attributed to what E. B. Goldstein has called the ‘differential rotation effect.’ Because of this effect, Kitchener’s eyes and his foreshortened arm and hand appear to follow the viewer regardless of the viewer’s orientation to the artwork.[35][36][37] Historian Carlo Ginzburg compared Leete’s image of Kitchener to similar images of Christ and Alexander the Great as depicting the viewer’s contact with a powerful figure.[38] Pearl James commented on Ginzburg’s analysis agreeing that the strength of the connotation lies with a clever use of discursive psychology and that art historical methods better illuminate why this image has such resonance.[39] The capitalized word “YOU” grabs the reader, bringing them directly to Kitchener’s message.[20] The textual focus on “you” engages the reader about their own participation in the war.[40] Nicholas Hiley differs in that Leete’s portrayal of Kitchener is less about immediate recruiting statistics but the myth that has grown around the image, including ironic parodies.[13][41] Leete’s Kitchener poster caught the attention of a then eleven-year-old George Orwell, who may have used as it the basis for his description of the “Big Brother” posters in his novel 1984.
In 1997 the British Army created a recruiting ad re-using Leete’s image substituting Kitchener’s face with that of a British Army non-commissioned officer of African descent. Leete’s image of Kitchener is featured on a 2014 £2 coin produced by sculptor John Bergdahl for the Royal Mint.
The coin was the first of a five-year series to commemorate the centennial of the war. Use of Leete’s image of Kitchener has been criticized by some for its pro-war connotation in light of the human losses of the First World War and the violence of Kitchener’s campaign in Sudan. In July 2014, one of only four original posters known to exist went to auction for more than £10,000. The other three originals exist on display in State Library of Victoria, the Museum of Brands, Packaging and Advertising, and the Imperial War Museum. Leete’s design was also used for a corn maze in the Skylark Garden Centre in Wimblington to mark the centenary of World War I.
Imitations
The image of Lord Kitchener with his hand pointing directly at the viewer has inspired numerous imitations:
British World War I recruiting poster featuring the national personification, John Bull, c. 1915. “Who’s absent? Is it you?”
His career as a paid artist had begun in 1897 when the Daily Graphic accepted one of his drawings; later he contributed regularly to a number of magazines including Punch magazine, the Strand Magazine, Tatler, etc. As a commercial artist he designed numerous posters and advertisements, especially in the 1910s and 1920s, for such brands as Rowntrees chocolates, Guinness and Bovril, and his series of advertisements for the Underground Electric Railways Company (the London Underground) were very well known; his work as a wartime propagandist includes the poster for which he is known above all, the Lord Kitchener poster design, which first appeared on the cover of the weekly magazine London Opinion on 5 September 1914.
“His prolific output was characterized by its humour, keen observation of the everyday, and an eye for strong design”
Invitation to one of the regular “smoking” evenings at the London Sketch Club, dated at 11 November 1921. Designed by Alfred Leete.
Leete died in London in 1933. In 2004, Leete’s work was on display in his native Weston at the North Somerset Museum
Operation Barbarossa (German: Unternehmen Barbarossa) was the code name for Nazi Germany‘s World War II invasion of the Soviet Union, which began on 22 June 1941. The operation was driven by Adolf Hitler‘s ideological desire to conquer Soviet territory as outlined in his 1925 manifesto Mein Kampf (“My Struggle”).
In the two years leading up to the invasion, the two countries signed political and economic pacts for strategic purposes. Nevertheless, on 18 December 1940, Hitler authorized an invasion of the Soviet Union, with a planned start date of 15 May 1941. The actual invasion began on 22 June 1941.
Over the course of the operation, about four million soldiers of the Axis powers invaded the Soviet Union along a 2,900-kilometer (1,800 mi) front, the largest invasion force in the history of warfare. In addition to troops, the Germans employed some 600,000 motor vehicles and between 600,000 and 700,000 horses. It marked the beginning of the rapid escalation of the war, both geographically and in the formation of the Allied coalition.
Operationally, the Germans won resounding victories and occupied some of the most important economic areas of the Soviet Union, mainly in Ukraine, both inflicting and sustaining heavy casualties. Despite their successes, the German offensive stalled on the outskirts of Moscow and was subsequently pushed back by a Soviet counteroffensive.
Military insignia of the Red Army, 1919–1924
The Red Army repelled the Wehrmacht‘s strongest blows and forced Germany into a war of attrition for which it was unprepared. The Germans would never again mount a simultaneous offensive along the entire strategic Soviet-Axis front. The failure of the operation drove Hitler to demand further operations inside the USSR of increasingly limited scope, all of which eventually failed, such as Case Blue and Operation Citadel.
The failure of Operation Barbarossa was a turning point in the fortunes of the Third Reich. Most importantly, the operation opened up the Eastern Front, to which more forces were committed than in any other theater of war in world history.
The Eastern Front became the site of some of the largest battles, most horrific atrocities, and highest casualties for Soviets and Germans alike, all of which influenced the course of both World War II and the subsequent history of the 20th century. The German forces captured millions of Soviet prisoners who were not granted protections stipulated in the Geneva Conventions. Most of them never returned alive; Germany deliberately starved the prisoners to death as part of a “Hunger Plan” that aimed to reduce the population of Eastern Europe and then re-populate it with ethnic Germans. Over a million Soviet Jews were murdered by Einsatzgruppen death squads and gassing as part of the Holocaust.
Background
Racial policies of Nazi Germany
—————————-
The Path to Nazi Genocide
—————————-
As early as 1925, Adolf Hitler vaguely declared in his political manifesto and autobiography Mein Kampf that he would invade the Soviet Union, asserting that the German people needed to secure Lebensraum (“living space”) to ensure the survival of Germany for generations to come.
On 10 February 1939, Hitler told his army commanders that the next war would be :
“purely a war of Weltanschauungen… totally a people’s war, a racial war.” On 23 November, once World War II had already started, Hitler declared that “racial war has broken out and this war shall determine who shall govern Europe, and with it, the world.”
Racial policy of Nazi Germany viewed the Soviet Union (and all of Eastern Europe) as populated by non-Aryan Untermenschen (“sub-humans”), ruled by “Jewish Bolshevik conspirators”. Hitler claimed in Mein Kampf that Germany’s destiny was to “turn to the East” as it did “six hundred years ago”. Accordingly, it was stated Nazi policy to kill, deport, or enslave the majority of Russian and other Slavic populations and repopulate the land with Germanic peoples, under the Generalplan Ost.
The Germans’ belief in their ethnic superiority is discernible in official German records and by pseudoscientific articles in German periodicals at the time, which covered topics such as “how to deal with alien populations”.
While older historiography tended to emphasize the notion of a “clean” Wehrmacht, the historian Jürgen Förster (de) notes that “In fact, the military commanders were caught up in the ideological character of the conflict, and involved in its implementation as willing participants.”
Before and during the invasion of the Soviet Union, German troops were heavily indoctrinated with anti-Bolshevik, anti-Semitic and anti-Slavic ideology via movies, radio, lectures, books and leaflets.
Likening the Soviets to the forces of Genghis Khan, Hitler told Croatian military leader Slavko Kvaternik that the “Mongolian race” threatened Europe.
Following the invasion, Wehrmacht officers told their soldiers to target people who were described as “Jewish Bolshevik subhumans”, the “Mongol hordes”, the “Asiatic flood” and the “Red beast”.
Nazi propaganda portrayed the war against the Soviet Union as both an ideological war between German National Socialism and Jewish Bolshevism and a racial war between the Germans and the Jewish, Gypsies and Slavic Untermenschen.
German army commanders cast the Jews as the major cause behind the “partisan struggle”. The main guideline policy for German troops was “Where there’s a partisan, there’s a Jew, and where there’s a Jew, there’s a partisan,” or “The partisan is where the Jew is.”
Many German troops viewed the war in Nazi terms and regarded their Soviet enemies as sub-human.
After the war began, the Nazis issued a ban on sexual relations between Germans and foreign slave workers. There were regulations enacted against the Ost-Arbeiter (“Eastern Workers”) that included the death penalty for sexual relations with a German person.
Heinrich Himmler, in his secret memorandum, Reflections on the Treatment of Peoples of Alien Races in the East, (dated 25 May 1940) outlined the future plans for the non-German populations in the East. Himmler believed the Germanization process in Eastern Europe would be complete when “in the East dwell only men with truly German, Germanic blood”.
In their plan to create the Greater Germanic Reich the Nazi leadership aimed to conquer Eastern European territories, Germanise those seen as part of the Aryan race, subjugate and exterminate the Soviet populations, and colonise the territory with ethnic German settlers.
The Nazi secret plan Generalplan Ost (“General Plan for the East”), which was prepared in 1941 and confirmed in 1942, called for a “new order of ethnographical relations” in the territories occupied by Nazi Germany in Eastern Europe. The plan envisaged ethnic cleansing, executions and enslavement of the overwhelming majority of the populations of conquered counties with very small differing percentages of the various conquered nations undergoing Germanization, expulsion into the depths of Russia and other fates.
The net effect of this plan would be to ensure that the conquered territories would be Germanized. It was divided into two parts: the Kleine Planung (“Small Plan”), which covered actions to be taken during the war, and the Große Planung (“Large Plan”), which covered actions to be undertaken after the war was won, and to be implemented gradually over a period of 25 to 30 years.
Evidence from a speech given by General Erich Hoepner indicates the disposition of Operation Barbarossa and the Nazi racial plan, as he informed the 4th Panzer Group that the war against the Soviet Union was “an essential part of the German people’s struggle for existence” (Daseinkampf), also referring to the imminent battle as the “old struggle of Germans against Slavs” and even stated, “the struggle must aim at the annihilation of today’s Russia and must therefore be waged with unparalleled harshness.”
To Hoepner, the imminent conflict would be “the old battle of the Germanic against the Slav peoples… the defense of European culture against Moscovite-Asiatic inundation, and the repulse of Jewish Bolshevism… No adherents of the present Russian-Bolshevik system are to be spared.” Walther von Brauchitsch also told his subordinates that troops should view the war as a “struggle between two different races and [should] act with the necessary severity.”
Racial motivations were central to Nazi ideology and played a key role in planning for Operation Barbarossa since both Jews and communists were considered equivalent enemies of the Nazi state. Nazi imperialist ambitions were exercised without moral consideration for either group in their ultimate struggle for Lebensraum.
In the eyes of the Nazis, the war against the Soviet Union would be a Vernichtungskrieg, a war of annihilation.
German-Soviet relations of 1939–40
The geopolitical disposition of Europe in 1941, immediately before the start of Operation Barbarossa. The grey area represents Nazi Germany, its allies, and countries under its firm control.
In August 1939, Germany and the Soviet Union signed a non-aggression pact in Moscow known as the Molotov–Ribbentrop Pact shortly before the German invasion of Poland that triggered the outbreak of World War II in Europe. A secret protocol to the pact outlined an agreement between Germany and the Soviet Union on the division of the eastern European border states between their respective “spheres of influence“: the Soviet Union and Germany would partition Poland in the event of an invasion by Germany, and the Soviets would be allowed to overrun the Baltic states and Finland.
On 23 August 1939 the rest of the world learned of the pact between the Nazis and the Soviets but were unaware of the provisions to partition Poland.
The conclusion of this pact was indeed followed by a Soviet invasion of Poland that led to the annexation of the eastern part of the country. The pact stunned the world because of the parties’ earlier mutual hostility and their conflicting ideologies. As a result of the pact, Germany and the Soviet Union maintained reasonably strong diplomatic relations for two years and fostered an important economic relationship. The countries entered a trade pact in 1940 by which the Soviets received German military equipment and trade goods in exchange for raw materials, such as oil and wheat, to help the Nazis circumvent a British blockade of Germany.
After two days of negotiations in Berlin from 12 to 14 November 1940, Germany presented a written proposal for a Soviet entry into the Axis. On 25 November 1940, the Soviet Union offered a written counter-proposal to join the Axis if Germany would agree to refrain from interference in the Soviet Union’s sphere of influence, but Germany did not respond.
As both sides began colliding with each other in Eastern Europe, conflict appeared more likely, although they did sign a border and commercial agreement addressing several open issues in January 1941. Historian Robert Service avows that Soviet leader Joseph Stalin was convinced that the overall military strength of the USSR was such that he had nothing to fear and anticipated an easy victory should Germany attack; moreover, Stalin believed that since the Germans were still fighting the British in the west, Hitler would be unlikely to open up a two front war and subsequently delayed the reconstruction of defensive fortifications in the border regions
When German soldiers swam across the Bug River to warn the Red Army of an impending attack, they were treated like enemy agents and shot. Some historians believe that Stalin, despite providing an amicable front to Hitler, did not wish to remain allies with Germany. Rather, Stalin might have had intentions to break off from Germany and proceed with his own campaign against Germany to be followed by one against the rest of Europe.
——————–
[Barbarossa] Just a Stupid Idea or not? An Analysis
The Marcks Plan (published 5 August 1940) showing the A-A line objective of any invasion of the Soviet Union.
Stalin’s reputation as a brutal dictator contributed both to the Nazis’ justification of their assault and their faith in success; many competent and experienced military officers were killed in the Great Purge of the 1930s, leaving the Red Army with a relatively inexperienced leadership compared to that of their German counterparts. The Nazis often emphasized the Soviet regime’s brutality when targeting the Slavs with propaganda.
In the middle of 1940, following the rising tension between the Soviet Union and Germany over territories in the Balkans, an eventual invasion of the Soviet Union seemed to Hitler to be the only solution.
While no concrete plans were made yet, Hitler told one of his generals in June that the victories in Western Europe finally freed his hands for his important real task: the showdown with Bolshevism. With the successful end to the campaign in France, General Erich Marcks was assigned to the working group drawing up the initial invasion plans of the Soviet Union. The first battle plans were entitled Operation Draft East (but colloquially it was known as the Marcks Plan).
His report advocated the A-A line to be the operational objective of any invasion of the Soviet Union. This goal would extend from northern city of Arkhangelsk on the Arctic Sea through Gorky and Rostov to the port city of Astrakhan at the mouth of the Volga on the Caspian Sea. The report concluded that this military border would reduce the threat to Germany (and the Third Reich) from attacks by enemy bombers.
Although Hitler was warned by his general staff that occupying “Western Russia” would create “more of a drain than a relief for Germany’s economic situation”, he anticipated compensatory benefits, such as the demobilization of entire divisions to relieve the acute labor shortage in German industry; the exploitation of Ukraine as a reliable and immense source of agricultural products; the use of forced labor to stimulate Germany’s overall economy; and the expansion of territory to improve Germany’s efforts to isolate Great Britain.
Hitler was convinced that Britain would sue for peace once the Germans triumphed in the Soviet Union.
On 5 December 1940, Hitler received the final military plans for the invasion on which the German High Command had been working since July 1940 under the codename “Operation Otto”. Hitler, however, was dissatisfied with these plans and on 18 December issued Führer Directive 21, which called for a new battle plan, now codenamed “Operation Barbarossa”.
Bust of Friedrich I., “Barbarossa”,
The operation was named after medieval Emperor Frederick Barbarossa of the Holy Roman Empire, a leader of the Third Crusade in the 12th century. The invasion was set for 15 May 1941, though it was delayed for about 7 weeks in favor of further time for preparation because of the war in the Balkans.
According to a 1978 essay by German historian Andreas Hillgruber, the invasion plans drawn up by the German military elite were coloured by hubris stemming from the rapid defeat of France at the hands of the “invincible” Wehrmacht and by ignorance tempered by traditional German stereotypes of Russia as a primitive, backward “Asiatic” country. Red Army soldiers were considered brave and tough, but the officer corps was held in contempt. The leadership of the Wehrmacht paid little attention to politics, culture and the considerable industrial capacity of the Soviet Union, in favour of a very narrow military view.
Hillgruber argued that because these assumptions were shared by the entire military elite, Hitler was able to push through with a “war of annihilation” that would be waged in the most inhumane fashion possible with the complicity of “several military leaders”, even though it was quite clear that this would be in violation of all accepted norms of warfare.
In autumn 1940, high-ranking German officials drafted a memorandum on the dangers of an invasion of the Soviet Union. They said Ukraine, Belorussia and the Baltic States would end up as only a further economic burden for Germany.
It was argued that the Soviets in their current bureaucratic form were harmless and that the occupation would not benefit Germany. Hitler disagreed with economists about the risks and told his right-hand man Hermann Göring, the chief of the Luftwaffe, that he would no longer listen to misgivings about the economic dangers of a war with Russia.
It is speculated that this was passed on to General Georg Thomas, who had produced reports that predicted a net economic drain for Germany in the event of an invasion of the Soviet Union unless its economy was captured intact and the Caucasus oilfields seized in the first blow, and he consequently revised his future report to fit Hitler’s wishes.
The Red Army‘s ineptitude in the Winter War against Finland in 1939–40 convinced Hitler of a quick victory within a few months. He did not anticipate a long campaign lasting into the winter, and therefore adequate preparations, such as the distribution of warm clothing and winterization of vehicles and lubricants, were not made.
Beginning in March 1941, Göring’s Green Folder laid out details for the disposal of the Soviet economy after conquest. The Hunger Plan outlined how the entire urban population of conquered territories was to be starved to death, thus creating an agricultural surplus to feed Germany and urban space for the German upper class.
Nazi policy aimed to destroy the Soviet Union as a political entity in accordance with the geopoliticalLebensraum ideals for the benefit of future generations of the “Nordicmaster race“.
n 1941, Nazi ideologue Alfred Rosenberg, later appointed Reich Minister of the Occupied Eastern Territories, suggested that conquered Soviet territory should be administered in the following Reichskommissariate (“Reich Commissionerships”):
Administration of conquered Soviet territory by Alfred Rosenberg
German military planners also researched Napoleon’s failed invasion of Russia. In their calculations, they concluded that there was little danger of a large-scale retreat of the Red Army into the Russian interior, as it could not afford to give up the Baltic states, Ukraine, or the Moscow and Leningrad regions, all of which were vital to the Red Army for supply reasons and would thus have to be defended.
Hitler and his generals disagreed on where Germany should focus its energy. Hitler, in many discussions with his generals, repeated his order of “Leningrad first, the Donbass second, Moscow third”; but he consistently emphasized the destruction of the Red Army over the achievement of specific terrain objectives.
Hitler believed Moscow to be of “no great importance” in the defeat of the Soviet Union and instead believed victory would come with the destruction of the Red Army west of the capital, especially west of the Western Dvina and Dnieper rivers, and this pervaded the plan for Barbarossa. This belief later led to disputes between Hitler and several German senior officers, including Heinz Guderian, Gerhard Engel, Fedor von Bock and Franz Halder, who believed the decisive victory could only be delivered at Moscow.
Hitler had grown overconfident in his own military judgment as a result of the rapid successes in Western Europe.
German preparations
German soldiers (Flamethrower team) in the Soviet Union, June 1941
The Germans had begun massing troops near the Soviet border even before the campaign in the Balkans had finished. By the third week of February 1941, 680,000 German soldiers were gathered in assembly areas on the Romanian-Soviet border. In preparation for the attack, Hitler moved more than 3.2 million German and about 500,000 Axis soldiers to the Soviet border, launched many aerial surveillance missions over Soviet territory, and stockpiled war materiel in the East.
Stalin and Ribbentrop after the signature of the Soviet–Nazi German pact. August 23, 1939
Although the Soviet High Command was alarmed by this, Stalin’s belief that the Third Reich was unlikely to attack only two years after signing the Molotov–Ribbentrop Pact resulted in a slow Soviet preparation. Since April 1941, the Germans had begun setting up Operation Haifisch to substantiate their claims that Britain was the real target. These simulated preparations in Norway and the English Channel coast included activities such as ship concentrations, reconnaissance flights and training exercises.
We have only to kick in the door and the whole rotten structure will come crashing down.
Adolf Hitler
The postponement of Barbarossa from the initially planned date of 15 May to the actual invasion date of 22 June 1941 (a 38-day delay) occurred for a number of reasons. Most importantly, the Balkans Campaign required a diversion of troops and resources that hampered preparations, and an unusually wet winter kept rivers at full flood until late spring. The full floods could have discouraged an earlier attack, even if it was unlikely to have happened before the end of the Balkans Campaign.
The importance of the delay is still debated. William Shirer argued that Hitler’s Balkans Campaign had delayed the commencement of Barbarossa by several weeks and thereby jeopardized it. He cited the deputy chief of the German General Staff in 1941 Friedrich Paulus, who claimed the campaign resulted in a delay of “about five weeks.”
This figure is corroborated by both the German Naval War Diary and Gerd von Rundstedt. Antony Beevor names a variety of factors that delayed Barbarossa, including the delay in distributing motor transport, problems with fuel distribution, and the difficulty in establishing forward airfields for the Luftwaffe.
The Germans deployed one independent regiment, one separate motorized training brigade and 153 divisions for Barbarossa, which included 104 infantry, 19 panzer and 15 motorized infantry divisions in three army groups, nine security divisions to operate in conquered territories, four divisions in Finland and two divisions as reserve under the direct control of OKH.
These were equipped with about 3,350 tanks, 7,200 artillery pieces, 2,770 aircraft (that amounted to 65 percent of the Luftwaffe), about 600,000 motor vehicles and 625,000–700,000 horses. Finland slated 14 divisions for the invasion, and Romania offered 13 divisions and eight brigades over the course of Barbarossa.
Army Norway was to operate in far northern Scandinavia and bordering Soviet territories. Army Group North was to march through the Baltic states into northern Russia, either take or destroy the city of Leningrad and link up with Finnish forces. Army Group Center, the army group equipped with the most armour and air power, was to strike from Poland into Belorussia and the west-central regions of Russia proper, and advance to Smolensk and then Moscow.
Army Group South was to strike the heavily populated and agricultural heartland of Ukraine, taking Kiev before continuing eastward over the steppes of southern USSR to the Volga with the aim of controlling the oil-rich Caucasus. Army Group South was deployed in two sections separated by a 198-mile (319 km) gap. The northern section, which contained the army group’s only panzer group, was in southern Poland right next to Army Group Center, and the southern section was in Romania.
On 17 June, Reich Main Security Office (RSHA) chief Reinhard Heydrich briefed around thirty to fifty Einsatzgruppen commanders on “the policy of eliminating Jews in Soviet territories, at least in general terms.”
While the Einsatzgruppen were assigned to the Wehrmacht’s units, which provided them with supplies such as gasoline and food, they were controlled by the RSHA. The official plan for Barbarossa assumed that the army groups would be able to advance freely to their primary objectives simultaneously, without spreading thin, once they had won the border battles and destroyed the Red Army’s forces in the border area.
Soviet preparations
In 1930, Mikhail Tukhachevsky, a prominent military theorist in tank warfare in the interwar period and later Marshal of the Soviet Union, forwarded a memo to the Kremlin that lobbied for colossal investment in the resources required for the mass production of weapons, pressing the case for “40,000 aircraft and 50,000 tanks”. In the early 1930s, a very modern operational doctrine for the Red Army was developed and promulgated in the 1936 Field Regulations in the form of the Deep Battle Concept. Defense expenditure also grew rapidly from just 12 percent of the gross national product in 1933 to 18 percent by 1940.
However, during Stalin’s Great Purge in the late 1930s, which was still partially ongoing at the start of the war in June 1941, the officer corps of the Red Army was decimated and their replacements, appointed by Stalin for political reasons, often lacked military competence.
Of the five Marshals of the Soviet Union appointed in 1935, only two survived Stalin’s purge. 15 out of 16 army commanders, 50 out of the 57 corps commanders, 154 out of the 186 divisional commanders and 401 out of 456 colonels were killed, and many other officers were dismissed.
In total, about 30,000 Red Army personnel were executed. Stalin further underscored his control by reasserting the role of political commissars at the divisional level and below to oversee the political loyalty of the Army to the regime. The commissars held a position equal to that of the commander of the unit they were overseeing. But in spite of efforts to ensure the political subservience of the armed forces, in the wake of Red Army’s poor performance in Poland and in the Winter War, about 80 percent of the officers dismissed during the Great Purge were reinstated by 1941.
Also, between January 1939 and May 1941, 161 new divisions were activated. Although about 75 percent of all the officers had been in their position for less than one year at the start of the German invasion of 1941, many of the short tenures can be attributed not only to the purge, but also to the rapid increase in creation of military units.
In the Soviet Union, speaking to his generals in December 1940, Stalin mentioned Hitler’s references to an attack on the Soviet Union in Mein Kampf and Hitler’s belief that the Red Army would need four years to ready itself. Stalin declared “we must be ready much earlier” and “we will try to delay the war for another two years”.
As early as August 1940, British intelligence had received hints of German plans to attack the Soviets only a week after Hitler informally approved the plans for Barbarossa and warned the Soviet Union accordingly. But Stalin’s distrust of the British led him to ignore their warnings in the belief that they were a trick designed to bring the Soviet Union into the war on their side.
He had an ill-founded confidence in the Molotov–Ribbentrop Pact and suspected the British of trying to spread false rumours in order to trigger a war between Germany and the USSR.
In early 1941, Stalin’s own intelligence services and American intelligence gave regular and repeated warnings of an impending German attack. Soviet spy Richard Sorge also gave Stalin the exact German launch date, but Sorge and other informers had previously given different invasion dates that passed peacefully before the actual invasion.
Stalin acknowledged the possibility of an attack in general and therefore made significant preparations, but decided not to run the risk of provoking Hitler.
Marshal Zhukov speaking at a military conference in Moscow, September 1941
Beginning in July 1940, the Red Army General Staff developed war plans that identified the Wehrmacht as the most dangerous threat to the Soviet Union, and that in the case of a war with Germany, the Wehrmacht’s main attack would come through the region north of the Pripyat Marshes into Belorussia; which later proved to be correct.
But Stalin disagreed, and in October he authorized the development of new plans that assumed a German attack would focus on the region south of Pripyat Marshes towards the economically vital regions in Ukraine. This became the basis for all subsequent Soviet war plans and the deployment of their armed forces in preparation for the German invasion.
In early 1941 Stalin authorized the State Defense Plan 1941 (DP-41), which along with the Mobilization Plan 1941 (MP-41), called for the deployment of 186 divisions, as the first strategic echelon, in the four military districts of the western Soviet Union that faced the Axis territories; and the deployment of another 51 divisions along the Dvina and Dnieper rivers as the second strategic echelon under Stavka control, which in the case of a German invasion was tasked to spearhead a Soviet counteroffensive along with the remaining forces of the first echelon.
But on 22 June 1941 the first echelon only contained 171 divisions, numbering 2.6–2.9 million; and the second strategic echelon contained 57 divisions that were still mobilizing, most of which were still seriously understrength. The second echelon was undetected by German intelligence until days after the invasion commenced, in most cases only when the German ground forces bumped into them.
At the start of the invasion, the manpower of the Soviet military force that had been mobilized was 5.3–5.5 million, and it was still increasing as the Soviet reserve force of 14 million, with at least basic military training, continued to mobilize.
—————————-
The Red Army before operation Barbarossa
—————————-
The Red Army was dispersed and still preparing when the invasion commenced. Their units were often separated and lacked adequate transportation.
The Soviet Union had some 23,000 tanks in service, of which about 11,000 were in the western military districts that faced the German invasion force.
Hitler later declared to some of his generals, “If I had known about the Russian tank strength in 1941 I would not have attacked”. However, maintenance and readiness standards were very poor; ammunition and radios were in short supply, and many armoured units lacked the trucks for supplies.
The most advanced Soviet tank models – the KV-1 and T-34 – which were superior to all current German tanks, as well as all designs still in development as of the summer 1941, were not available in large numbers at the time the invasion commenced.
Furthermore, in the autumn of 1939, the Soviets disbanded their mechanized corps and partly dispersed their tanks to infantry divisions; but following their observation of the German campaign in France, in late 1940 they began to reorganize most of their armored assets back into mechanized corps with a target strength of 1,031 tanks each. But these large armoured formations were unwieldy, and moreover they were spread out in scattered garrisons, with their subordinate divisions up to 100 kilometres apart.
Furthermore, the reorganization was still in progress and incomplete when Barbarossa commenced. Soviet tank units were rarely well equipped, and they lacked training and logistical support. Units were sent into combat with no arrangements in place for refueling, ammunition resupply, or personnel replacement. Often, after a single engagement, units were destroyed or rendered ineffective . The Soviet numerical advantage in heavy equipment was thoroughly offset by the superior training and organization of the Wehrmacht.
The Soviet Air Force (VVS) held the numerical advantage with a total of approximately 19,533 aircraft, which made it the largest air force in the world in the summer of 1941. About 7,133–9,100 of these were deployed in the five western military districts, and an additional 1445 were under Naval control.
Development of the Soviet Armed Forces –
Compiled by Russian military historian Mikhail Meltyukhov from various sources
1 January 1939
22 June 1941
Increase
Divisions calculated
131.5
316.5
140.7%
Personnel
2,485,000
5,774,000
132.4%
Guns and mortars
55,800
117,600
110.7%
Tanks
21,100
25,700
21.8%
Aircraft
7,700
18,700
142.8%
Historians have debated whether Stalin was planning an invasion of German territory in the summer of 1941. The debate began in the late 1980s when Viktor Suvorov published a journal article and later the book Icebreaker in which he stated that Stalin had seen the outbreak of war in western Europe as an opportunity to spread communist revolutions throughout the continent, and that the Soviet military was being deployed for an imminent attack at the time of the German invasion. This view had also been advanced by former German generals following the war. Suvorov’s thesis was fully or partially accepted by some historians, including Valeri Danilov, Joachim Hoffmann, Mikhail Meltyukhov and Vladimir Nevezhin, and attracted public attention in Germany, Israel and Russia.
However, it has been strongly rejected by most historians of this period, and Icebreaker is generally considered to be an “anti-Soviet tract” in western countries. David Glantz and Gabriel Gorodetsky wrote books to rebut Suvorov’s arguments, and most historians believe that Stalin was seeking to avoid war in 1941 as he believed that his military was not ready to fight the German forces.
20th Rifle, 45th Rifle, 67th Rifle and 21st Mechanized Corps.
Invasion
German infantryman in front of a burning BT-5 tank and a dead crew member in Ukraine, June 1941
At around 1:00 am on 22 June 1941, the Soviet military districts in the border area were alerted by NKO Directive No. 1, which was issued late on night of 21 June. It called on them to “bring all forces to combat readiness,” but to “avoid provocative actions of any kind.”
It took up to 2 hours for several of the units subordinate to the Fronts to receive the order of the directive, and the majority did not receive it before the invasion commenced.
At around 3:15 am on 22 June 1941, the Axis Powers commenced the invasion of the Soviet Union with the bombing of major cities in Soviet-occupied Poland and an artillery barrage on Red Army defences on the entire front. The heavy air-raids reached as far as Kronstadt near Leningrad, Ismail in Bessarabia, and Sevastopol in the Crimea. Meanwhile, ground troops crossed the border, accompanied in some locales by Lithuanian and Ukrainian fifth columnists.
Roughly three million soldiers of the Wehrmacht went into action and faced slightly fewer Soviet troops at the border.
At around noon, the news of the invasion was broadcast to the population by Soviet foreign minister Vyacheslav Molotov: “… Without a declaration of war, German forces fell on our country, attacked our frontiers in many places… The Red Army and the whole nation will wage a victorious Patriotic War for our beloved country, for honour, for liberty … Our cause is just. The enemy will be beaten. Victory will be ours!”
By calling upon the population’s devotion to their nation rather than the Party, Molotov struck a patriotic chord that helped a stunned people absorb the shattering news. Within the first few days of the invasion, the Soviet High Command and Red Army were extensively reorganized so as to place them on the necessary war footing. Stalin did not address the nation about the German invasion until 3 July, when he also called for a “Patriotic War … of the entire Soviet people”.
In Germany, on the morning of 22 June, Nazi propaganda minister Joseph Goebbels announced the invasion to the waking nation in a radio broadcast, “At this moment a march is taking place that, for its extent, compares with the greatest the world has ever seen. I have decided today to place the fate and future of the Reich and our people in the hands of our soldiers. May God aid us, especially in this fight!”
Later the same morning, Hitler proclaimed to his colleagues, “Before three months have passed, we shall witness a collapse of Russia, the like of which has never been seen in history.”
Phase one
German advances from June to August 1941
The initial momentum of the German ground and air attack completely destroyed the Soviet organizational command and control within the first few hours, paralyzing every level of command from the infantry platoon to the Soviet High Command in Moscow.
Therefore, Moscow failed to grasp the magnitude of the catastrophe that confronted the Soviet forces in the border area. At around 7:15 am, Stalin issued NKO Directive No. 2, which announced the invasion to the Soviet Armed Forces, and called on them to attack Axis forces wherever they had violated the borders and launch air strikes into the border regions of German territory.
At around 9:15 pm, Stalin issued NKO Directive No. 3, signed by Marshal Semyon Timoshenko, which now called for a general counteroffensive on the entire front “without any regards for borders” that both men hoped would sweep the enemy from Soviet territory . Timoshenko’s order was not based on a realistic appraisal of the military situation at hand, and it resulted in devastating casualties.
Air war
Luftwaffe reconnaissance units worked frantically to plot Soviet troop concentration, supply dumps, and airfields, and mark them down for destruction. In contrast, Soviet artillery observers based at the border area had been under the strictest instructions not to open fire on German aircraft prior to the invasion. The Luftwaffe reported to have destroyed 1,489 aircraft on the first day of the invasion and over 3,100 over the first three days.
Hermann Göring, Minister of Aviation and Commander-in-Chief of the Luftwaffe, distrusted the reports and ordered the figure checked. Luftwaffe staffs surveyed the wreckage on Soviet airfields, and their original figure proved conservative, as over 2,000 Soviet aircraft were estimated to have been destroyed on the first day of the invasion. In reality, Soviet losses were likely higher; a Soviet archival document recorded the loss of 3,922 Soviet aircraft in the first three days against an estimated loss of 78 German aircraft.
The Luftwaffe reported the loss of only 35 aircraft on the first day of combat.
A document from the German Federal Archives puts the Luftwaffe’s loss at 63 aircraft for the first day.
By the end of the first week, the Luftwaffe had achieved air supremacy over the battlefields of all the army groups, but was unable to effect this air dominance over the vast expanse of the western Soviet Union. According to the war diaries of the German High Command, the Luftwaffe by 5 July had lost 491 aircraft with 316 more damaged, leaving it with only about 70 percent of the strength it had at the start of the invasion.
On 22 June, Army Group North attacked the Soviet Northwestern Front and broke through its 8th and 11th Armies. The Soviets immediately launched a powerful counterattack against the German 4th Panzer Group with the Soviet 3rd and 12th Mechanized Corps, but the Soviet attack was defeated.
On 25 June, the 8th and 11th Armies were ordered to withdraw to the Western Dvina River, where it was planned to meetup with the 21st Mechanized Corps and the 22nd and 27th Armies. However, on 26 June, Erich von Manstein‘s LVI Panzer Corps reached the river first and secured a bridgehead across it.
The Northwestern Front was forced to abandon the river defenses, and on 29 June Stavka ordered the Front to withdraw to the Stalin Line on the approaches to Leningrad. On 2 July, Army Group North began its attack on the Stalin Line with its 4th Panzer Group, and on 8 July captured Pskov, devastating the defenses of the Stalin Line and reaching Leningrad oblast.
The 4th Panzer Group had advanced about 450 kilometres (280 mi) since the start of the invasion and was now only about 250 kilometres (160 mi) from its primary objective Leningrad. On 9 July it began its attack towards the Soviet defenses along the Luga River in Leningrad oblast.
The northern section of Army Group South faced the Southwestern Front, which had the largest concentration of Soviet forces, and the southern section faced the Southern Front. In addition, the Pripyat Marshes and the Carpathian Mountains posed a serious challenge to the army group’s northern and southern sections respectively.
On 22 June, only the northern section of Army Group South attacked, but the terrain impeded their assault, giving the Soviet defenders ample time to react. The German 1st Panzer Group and 6th Army attacked and broke through the Soviet 5th Army Starting on the night of 23 June, the Soviet 22nd and 15th Mechanized Corps attacked the flanks of the 1st Panzer Group from north and south respectively. Although intended to be concerted, Soviet tank units were sent in piecemeal due to poor coordination. The 22nd Mechanized Corp ran into the 1st Panzer Army’s III Motorized Corps and was decimated, and its commander killed.
The 1st Panzer Group bypassed much of the 15th Mechanized Corps, which engaged the German 6th Army’s 297th Infantry Division, where it was defeated by antitank fire and Luftwaffe attacks. On 26 June, the Soviets launched another counterattack on the 1st Panzer Group from north and south simultaneously with the 9th, 19th and 8th Mechanized Corps, which altogether fielded 1649 tanks, and supported by the remnants of the 15th Mechanized Corps. The battle lasted for four days, ending in the defeat of the Soviet tank units On 30 June Stavka ordered the remaining forces of the Southwestern Front to withdraw to the Stalin Line, where it would defend the approaches to Kiev.
On 2 July, the southern section of Army Group South – the Romanian 3rd and 4th Armies, alongside the German 11th Army – invaded Soviet Moldavia, which was defended by the Southern Front.
Counterattacks by the Front’s 2nd Mechanized Corps and 9th Army were defeated, but on 9 July the Axis advance stalled along the defenses of the Soviet 18th Army between the Prut and Dniester Rivers.
In the opening hours of the invasion, the Luftwaffe destroyed the Western Front’s air force on the ground, and with the aid of Abwehr and their supporting anti-communist fifth columns operating in the Soviet rear paralyzed the Front’s communication lines, which particularly cut off the Soviet 4th Army headquarters from headquarters above and below it.
On the same day, the 2nd Panzer Group crossed the Bug River, broke through the 4th Army, bypassed Brest Fortress, and pressed on towards Minsk, while the 3rd Panzer Group bypassed most of the 3rd Army and pressed on towards Vilnius. Simultaneously, the German 4th and 9th Armies engaged the Western Front forces in the environs of Białystok On the order of Dmitry Pavlov, the commander of the Western Front, the 6th and 11th Mechanized Corps and the 6th Cavalry Corps launched a strong counterstrike towards Grodno on 24–25 June in hopes of destroying the 3rd Panzer Group. However, the 3rd Panzer Group had already moved on, with its forward units reaching Vilnius on the evening of 23 June, and the Western Front’s armoured counterattack instead ran into infantry and antitank fire from the V Army Corps of the German 9th Army, supported by Luftwaffe air attacks.
By the night of 25 June, the Soviet counterattack was defeated, and the commander of the 6th Cavalry Corps was captured. The same night, Pavlov ordered all the remnants of the Western Front to withdraw to Slonim towards Minsk. Subsequent counterattacks to buy time for the withdrawal were launched against the German forces, but all of them failed.
On 27 June, the 2nd and 3rd Panzer Groups met near Minsk and captured the city the next day, completing the encirclement of almost all of the Western Front in two pockets: one around Białystok and another west of Minsk.
The Germans destroyed the Soviet 3rd and 10th Armies while inflicting serious losses on the 4th, 11th and 13th Armies, and reported to have captured 324,000 Soviet troops, 3,300 tanks, 1,800 artillery pieces. On 30 June, Stalin relieved Pavlov of his command, and on 22 July tried and executed him along with many members of his staff on charges of “cowardice” and “criminal incompetence”.
A Soviet directive was issued on 29 June to combat the mass panic rampant among the civilians and the armed forces personnel. The order stipulated swift, severe measures against anyone inciting panic or displaying cowardice. The NKVD worked with commissars and military commanders to scour possible withdrawal routes of soldiers retreating without military authorization. Field expedient general courts were established to deal with civilians spreading rumours and military deserte.
On 29 June, Hitler, through the Commander-in-Chief of the German Army Walther von Brauchitsch, instructed the commander of Army Group Center Fedor von Bock to halt the advance of his panzers until the infantry formations liquidating the pockets catch up. But the commander of the 2nd Panzer Group Heinz Guderian, with the tacit support of Fedor von Bock and the chief of OKH Franz Halder, ignored the instruction and attacked on eastward towards Bobruisk, albeit reporting the advance as a reconnaissance-in-force. He also personally conducted an aerial inspection of the Minsk-Białystok pocket on 30 June and concluded that his panzer group was not needed to contain it, since Hermann Hoth‘s 3rd Panzer Group was already involved in the Minsk pocket.
On the same day, some of the infantry corps of the 9th and 4th Armies, having sufficiently liquidated the Białystok pocket, resumed their march eastward to catch up with the panzer groups. On 1 July, Fedor von Bock ordered the panzer groups to resume their full offensive eastward on the morning of 3 July. But Brauchitsch, upholding Hitler’s instruction, and Halder, unwillingly going along with it, opposed Bock’s order. However, Bock insisted on the order by stating that it would be flatly irresponsible to reverse orders already issued. The panzer groups, however, resumed their offensive on 2 July before the infantry formations had sufficiently caught up.
German advances during the opening phases of Operation Barbarossa, August 1941
On 2 July and through the next six days, a rainstorm typical of Belarusian summers slowed the progress of the panzers of Army Group Center, and Soviet defenses stiffened.
The delays gave the Soviets time to organize a massive counterattack against Army Group Center. The army group’s ultimate objective was Smolensk, which commanded the road to Moscow. Facing the Germans was an old Soviet defensive line held by six armies. On 6 July, the Soviets attacked the 3rd Panzer Group with 1000 tanks. The Germans defeated this counterattack with overwhelming air superiority.
The 2nd Panzer Group crossed the Dnieper River and closed in on Smolensk from the south while the 3rd Panzer Group, after defeating the Soviet counterattack, closed on Smolensk from the north. Trapped between their pincers were three Soviet armies. On 18 July, the Panzer Groups came to within sixteen kilometres of closing the gap, but the trap did not snap shut until 26 July.
When the Panzer Groups finally closed the gap, 300,000 Red Army soldiers were captured, but 200,000 Red Army soldiers escaped to stand between the Germans and Moscow.
Four weeks into the campaign, the Germans realized they had grossly underestimated Soviet strength. The German troops had used their initial supplies without attaining the expected strategic freedom of movement.
Operations were now slowed down to allow for resupply; the delay was to be used to adapt strategy to the new situation. Hitler by now had lost faith in battles of encirclement as large numbers of Soviet soldiers had escaped the pincers. He now believed he could defeat the Soviets by economic damage, depriving them of the industrial capacity to continue the war. That meant seizing the industrial center of Kharkov, the Donbass and the oil fields of the Caucasus in the south and the speedy capture of Leningrad, a major center of military production, in the north
Fedor von Bock, the commander of Army Group Center, and almost all the German generals involved in Operation Barbarossa argued vehemently in favor of continuing the all-out drive toward Moscow. Besides the psychological importance of capturing the enemy’s capital, the generals pointed out that Moscow was a major center of arms production, the center of the Soviet communications system and an important transportation hub. More significantly, intelligence reports indicated that the bulk of the Red Army was deployed near Moscow under Semyon Timoshenko for an all-out defense of the capital.
But Hitler was adamant, and he issued a direct order to the panzer commander Heinz Guderian—bypassing Guderian’s commanding officer, von Bock—to send Army Group Center’s tanks to the north and south, temporarily halting the drive to Moscow.
By mid-July, the Germans had advanced within a few kilometers of Kiev below the Pripyat Marshes. The 1st Panzer Group then went south while the 17th Army struck east and trapped three Soviet armies near Uman
As the Germans eliminated the pocket, the tanks turned north and crossed the Dnieper. Meanwhile, the 2nd Panzer Group, diverted from Army Group Center, had crossed the Desna River with 2nd Army on its right flank. The two Panzer armies now trapped four Soviet armies and parts of two other.
By August, as the serviceability and the quantity of the Luftwaffe’s inventory steadily reduced due to combat, while demand for air support only increased as the VVS stubbornly resurged, the Luftwaffe found itself struggling to maintain local air superiority in the front lines.
Also with the onset of bad weather in October, the Luftwaffe was on several occasions forced to halt nearly all aerial operations. The VVS, although faced with the same weather difficulties, had a clear advantage thanks to the prewar experience with cold-weather flying techniques, and the fact that they were operating from intact airbases and airports.
By December, the VVS had matched the Luftwaffe and was even pressing to achieve air supremacy over the battlefields.
For its final attack on Leningrad, the 4th Panzer Group was reinforced by tanks from Army Group Center. On 8 August, the Panzers broke through the Soviet defenses. By the end of August, 4th Panzer Group had penetrated to within 48 kilometers of Leningrad. The Finns had pushed southeast on both sides of Lake Ladoga to reach the old Finnish-Soviet frontier.
General Guderian at a forward command post of a Panzer regiment near Kiev, 1941
The Germans attacked Leningrad in August 1941; in the following three “black months” of 1941, 400,000 residents of the city worked to build the city’s fortifications as fighting continued, while 160,000 others joined the ranks of the Red Army. On 7 September, the German 20th Motorized Division seized Shlisselburg, cutting off all land routes to Leningrad. The Germans severed the railroads to Moscow and captured the railroad to Murmansk with Finnish assistance to inaugurate the start of a siege that would last for over two years.
At this stage, Hitler ordered the final destruction of Leningrad with no prisoners taken, and on 9 September, Army Group North began the final push. Within ten days it had advanced within 11 kilometers of the city.
However, the push over the last 10 km (6.2 mi) proved very slow and casualties mounted. Hitler, now out of patience, ordered that Leningrad should not be stormed, but rather starved into submission. Deprived of its Panzer forces, Army Group Center remained static and was subjected to numerous Soviet counterattacks, in particular the Yelnya Offensive, in which the Germans suffered their first major tactical defeat since their invasion began.
These attacks prompted Hitler to concentrate his attention back to Army Group Center and its drive on Moscow. The Germans ordered the 3rd and 4th Panzer Armies to break off their Siege of Leningrad and support Army Group Center in its attack on Moscow.
Before it could begin, operations in Kiev needed to be finished. Half of Army Group Center had swung to the south in the back of the Kiev position, while Army Group South moved to the north from its Dniepr bridgehead.
The encirclement of Soviet forces in Kiev was achieved on 16 September. A savage battle ensued in which the Soviets were hammered with tanks, artillery, and aerial bombardment. After ten days of vicious fighting, the Germans claimed over 600,000 Soviet soldiers captured. Actual losses were 452,720 men, 3,867 artillery pieces and mortars from 43 divisions of the 5th, 21st, 26th, and 37th Soviet Armies.
Soviet planes flying over German positions near Moscow
After Kiev, the Red Army no longer outnumbered the Germans and there were no more trained reserves directly available. To defend Moscow, Stalin could field 800,000 men in 83 divisions, but no more than 25 divisions were fully effective. Operation Typhoon, the drive to Moscow, began on 2 October . In front of Army Group Center was a series of elaborate defense lines, the first centered on Vyazma and the second on Mozhaysk.
The first blow took the Soviets completely by surprise when the 2nd Panzer Group, returning from the south, took Oryol, just 121 km (75 mi) south of the Soviet first main defense line. Three days later, the Panzers pushed on to Bryansk, while the 2nd Army attacked from the west
The Soviet 3rd and 13th Armies were now encircled. To the north, the 3rd and 4th Panzer Armies attacked Vyazma, trapping the 19th, 20th, 24th and 32nd Armies. Moscow’s first line of defense had been shattered. The pocket eventually yielded over 500,000 Soviet prisoners, bringing the tally since the start of the invasion to three million. The Soviets had now only 90,000 men and 150 tanks left for the defense of Moscow .
The German government now publicly predicted the imminent capture of Moscow and convinced foreign correspondents of a pending Soviet collapse.
On 13 October, the 3rd Panzer Group penetrated to within 140 km (87 mi) of the capital. Martial law was declared in Moscow. Almost from the beginning of Operation Typhoon, however, the weather worsened. Temperatures fell while there was a continued rainfall. This turned the unpaved road network into mud and steadily slowed the German advance on Moscow to as little as 3.2 km (2.0 mi) a day
At the same time, the supply situation for the Germans rapidly deteriorated. On 31 October, the German Army High Command ordered a halt to Operation Typhoon while the armies were reorganized. The pause gave the Soviets, who were in a far better supply situation, time to consolidate their positions and organize formations of newly activated reservists. In little over a month, the Soviets organized eleven new armies that included 30 divisions of Siberian troops. These had been freed from the Soviet Far East after Soviet intelligence assured Stalin that there was no longer a threat from the Japanese.
Over 1,000 tanks and 1,000 aircraft arrived along with the Siberian forces.
On 15 November, with the ground hardening due to the cold weather, the Germans once again began the attack on Moscow.[171] Although the troops themselves were now able to advance again, there had been no delay allowed to improve the supply situation. Facing the Germans were the 5th, 16th, 30th, 43rd, 49th, and 50th Soviet armies. The Germans intended to let the 3rd and 4th Panzer Armies cross the Moscow Canal and envelop Moscow from the northeast. The 2nd Panzer Group would attack Tula and then close in on Moscow from the south.
As the Soviets reacted to the flanks, the 4th Army would attack the center. In two weeks of desperate fighting, lacking sufficient fuel and ammunition, the Germans slowly crept towards Moscow.
However, in the south, the 2nd Panzer Group was being blocked. On 22 November, Soviet Siberian units, augmented with the 49th and 50th Soviet Armies, attacked the 2nd Panzer Group and inflicted a shocking defeat on the Germans. The 4th Panzer Group pushed the Soviet 16th Army back, however, and succeeded in crossing the Moscow canal to begin the attempted encirclement of Moscow.
The German position of advances before the start of Operation Typhoon, September 1941
On 2 December, part of the 258th Infantry Division advanced to within 24 km (15 mi) of Moscow and could see the spires of the Kremlin, but by then the first blizzards had already begu
A reconnaissance battalion also managed to reach the town of Khimki, only about 8 km (5.0 mi) away from the Soviet capital. It captured the bridge over the Moscow-Volga Canal as well as the railway station, which marked the farthest eastern advance of German forces.
But in spite of the progress made, the Wehrmacht was not equipped for winter warfare, and the bitter cold caused severe problems for their guns and equipment. Furthermore, weather conditions grounded the Luftwaffe from conducting any large-scale operations. Newly created Soviet units near Moscow now numbered over 500,000 men, and on 5 December, they launched a massive counterattack as part of the Battle of Moscow that pushed the Germans back over 320 km (200 mi). By late December 1941, the Germans had lost the Battle for Moscow, and the invasion had cost the German army over 830,000 casualties in killed, wounded, captured or missing in action.
Aftermath
With the failure of the Battle of Moscow, all German plans for a quick defeat of the Soviet Union had to be revised. The Soviet counteroffensives in December 1941 caused heavy casualties on both sides, but ultimately eliminated the German threat to Moscow.
In addition to this devastating setback for Germany, the Soviet Union also suffered heavily from the conflict, losing huge tracts of territory, and vast losses in men and material. Despite the rapid relocation of Red Army armaments installations east of the Urals and a dramatic increase of production in 1942, especially of armour, new aircraft types and artillery, the Wehrmacht was able to mount another large-scale offensive in July 1942. Hitler, having realized that Germany’s oil supply was “severely depleted,” aimed to capture the oil fields of Baku in an offensive, codenamed Case Blue.
Once again, the Germans quickly overran great expanses of Soviet territory, but they failed to achieve their ultimate goals in the wake of their decisive defeat at the Battle of Stalingrad
By 1943, Soviet armaments production was fully operational and increasingly outproducing the German war economy. The Red Army through steadily more ambitious and tactically sophisticated offensives was able to liberate the areas previously occupied by the German invasion by the summer of 1944. The war ended with the total defeat and occupation of Nazi Germany in May 1945.
While the Soviet Union had not signed the Geneva convention, this did not mean their soldiers were entirely exempted from the protection it afforded; Germany had signed the treaty and was thus obligated to offer Soviet POWs treatment according to its provisions (as they generally did with other Allied POWs).
Article 82 of the convention specified that “In case, in time of war, one of the belligerents is not a party to the Convention, its provisions shall nevertheless remain in force as between the belligerents who are parties thereto.”
Despite this Hitler called for the battle against the Soviet Union to be a “struggle for existence” and accordingly authorized crimes against Soviet prisoners of war. A Nazi memorandum from 16 July 1941, recorded by Martin Bormann, quotes Hitler saying, “The giant [occupied] area must naturally be pacified as quickly as possible; this will happen at best if anyone who just looks funny should be shot”.
Himmler inspecting a prisoner of war camp
Before the war, Hitler issued the notorious Commissar Order, which called for all Soviet political commissars taken prisoner at the front to be shot immediately without trial. German soldiers both willingly and unwillingly participated in these mass killings.
On the eve of the invasion, German soldiers were informed that their battle “demands ruthless and vigorous measures against Bolshevik inciters, guerrillas, saboteurs, Jews and the complete elimination of all active and passive resistance.” Collective punishment was authorized against partisan attacks; if a perpetrator could not be quickly identified, then burning villages and mass executions were considered acceptable reprisals.
An estimated two million Soviet prisoners of war died of starvation during Barbarossa alone; nothing was done for their survival. The famished prisoners of war were hardly able to walk by themselv
By the end of the war, 58 percent of all Soviet prisoners of war died in German captivity.
Organized crimes against civilians, including women and children, were also carried out on a huge scale by the German police and military forces, as well as the local collaborators. Under the command of the Reich Main Security Office, the Einsatzgruppen killing squads conducted large-scale massacres of Jews and communists in conquered Soviet territories. Holocaust historian Raul Hilberg puts the number of Jews murdered by “mobile killing operations” at 1,400,000.
The original instructions to kill “Jews in party and state positions” was broadened to include “all male Jews of military age” and was expanded once more to “all male Jews regardless of age.” By the end of July, the Germans were regularly killing women and children.
On 18 December 1941, Himmler and Hitler discussed the “Jewish question”, and Himmler noted the meeting’s result in his appointment book: “To be annihilated as partisans.” According to Christopher Browning, this represented the Nazi decision of “annihilating Jews and solving the so-called ‘Jewish question’ under the cover of killing partisans.”
In accordance with Nazi policies against “inferior” Asian peoples, Turkmens were also persecuted; according to a post-war report by Prince Veli Kajum Khan, they were imprisoned in concentration camps in terrible conditions, where those deemed to have “Mongolian” features were murdered daily. Asians were also targeted by the Einsatzgruppen and were the subjects of lethal medical experiments and murder at a “pathological institute” in Kiev.
Burning houses suspected of being partisan meeting places and poisoning water wells became common practice for soldiers of the German 9th Army. At Kharkov, the fourth largest city in the Soviet Union, food was provided only to the small number of civilians who worked for the Germans, with the rest designated to slowly starve.
The citizens of Leningrad were subjected to heavy bombardment and a siege that would last 872 days and starve more than a million people to death, of whom approximately 400,000 were children below the age of 14. The German-Finnish blockade cut off access to food, fuel and raw materials, and rations reached a low, for the non-working population, of four ounces (five thin slices) of bread and a little watery soup per day.
Starving Soviet civilians began to eat their domestic animals, along with hair tonic and Vaseline. Some desperate citizens resorted to cannibalism; Soviet records list 2,000 people arrested for “the use of human meat as food” during the siege, 886 of them during the first winter of 1941–42.
The Wehrmacht planned to seal off Leningrad, starve out the population, and then demolish the city entirely.
Historical significance
Operation Barbarossa was the largest military operation in human history—more men, tanks, guns and aircraft were committed than had ever been deployed before in a single offensive. A total of 75 percent of the entire German military participated The invasion opened up the Eastern Front of World War II, the largest theater of war during that conflict, and it witnessed titanic clashes of unprecedented violence and destruction for four years that resulted in the deaths of more than 26 million people.[205]
More people died fighting on the Eastern Front than in all other fighting across the globe during World War II
Germany’s High Seas Fleet’s intention was to lure out, trap and destroy a portion of the Grand Fleet, as the German naval force was insufficient to openly engage the entire British fleet. This formed part of a larger strategy to break the British blockade of Germany and to allow German naval vessels access to the Atlantic. Meanwhile, Great Britain’s Royal Navy pursued a strategy to engage and destroy the High Seas Fleet, thereby keeping the German force contained and away from Britain and her shipping lanes.
The German plan was to use Vice-Admiral Franz Hipper‘s fast scouting group of five modern battlecruisers to lure Vice-Admiral Sir David Beatty’s battlecruiser squadrons into the path of the main German fleet. Submarines were stationed in advance across the likely routes of the British ships. However, the British learned from signal intercepts that a major fleet operation was likely, so on 30 May Jellicoe sailed with the Grand Fleet to rendezvous with Beatty, passing over the locations of the German submarine picket lines while they were unprepared. The German plan had been delayed, causing further problems for their submarines which had reached the limit of their endurance at sea.
On the afternoon of 31 May, Beatty encountered Hipper’s battlecruiser force long before the Germans had expected. In a running battle, Hipper successfully drew the British vanguard into the path of the High Seas Fleet. By the time Beatty sighted the larger force and turned back towards the British main fleet, he had lost two battlecruisers from a force of six battlecruisers and four battleships, against the five ships commanded by Hipper. The battleships, commanded by Rear-Admiral Sir Hugh Evan-Thomas, were the last to turn and formed a rearguard as Beatty withdrew, now drawing the German fleet in pursuit towards the main British positions. Between 18:30, when the sun was lowering on the western horizon, back-lighting the German forces, and nightfall at about 20:30, the two fleets – totalling 250 ships between them – directly engaged twice.
HMS Invincible sinks
Fourteen British and eleven German ships were sunk, with great loss of life. After sunset, and throughout the night, Jellicoe manoeuvred to cut the Germans off from their base, hoping to continue the battle the next morning, but under the cover of darkness Scheer broke through the British light forces forming the rearguard of the Grand Fleet and returned to port.
Both sides claimed victory. The British lost more ships and twice as many sailors but succeeded in containing the German fleet. However, the British press criticised the Grand Fleet’s failure to force a decisive outcome while Scheer’s plan of destroying a substantial portion of the British fleet also failed. Finally, the British strategy to prevent Germany access to both Great Britain and the Atlantic did succeed which was the British long term goal.
The Germans’ “fleet in being” continued to pose a threat, requiring the British to keep their battleships concentrated in the North Sea, but the battle confirmed the German policy of avoiding all fleet-to-fleet contact. At the end of the year, after further unsuccessful attempts to reduce the Royal Navy’s numerical advantage, the German Navy accepted that their surface ships had been successfully contained, subsequently turning its efforts and resources to unrestricted submarine warfare and the destruction of Allied and neutral shipping which by April 1917 triggered the United States of America’s declaration of war on Germany.
Subsequent reviews commissioned by the Royal Navy generated strong disagreement between supporters of Jellicoe and Beatty concerning the two admirals’ performance in the battle. Debate over their performance and the significance of the battle continues to this day.
With 16 dreadnought-type battleships, compared with the Royal Navy’s 28, the German High Seas Fleet stood little chance of winning a head-to-head clash. The Germans therefore adopted a divide-and-conquer strategy. They would stage raids into the North Sea and bombard the English coast, with the aim of luring out small British squadrons and pickets, which could then be destroyed by superior forces or submarines.
In January 1916, Admiral von Pohl, commander of the German fleet, fell ill. He was replaced by Scheer, who believed that the fleet had been used too defensively, had better ships and men than the British, and ought to take the war to them.
According to Scheer, the German naval strategy should be:
to damage the English fleet by offensive raids against the naval forces engaged in watching and blockading the German Bight, as well as by mine-laying on the British coast and submarine attack, whenever possible. After an equality of strength had been realised as a result of these operations, and all our forces had been made ready and concentrated, an attempt was to be made with our fleet to seek battle under circumstances unfavourable to the enemy.
On 25 April 1916, a decision was made by the German admiralty to halt indiscriminate attacks by submarine on merchant shipping. This followed protests from neutral countries, notably the United States, that their nationals had been the victims of attacks. Germany agreed that future attacks would only take place in accord with internationally agreed prize rules, which required an attacker to give a warning and allow the crews of vessels time to escape, and not to attack neutral vessels at all. Scheer believed that it would not be possible to continue attacks on these terms, which took away the advantage of secret approach by submarines and left them vulnerable to even relatively small guns on the target ships. Instead, he set about deploying the submarine fleet against military vessels.
It was hoped that, following a successful German submarine attack, fast British escorts, such as destroyers, would be tied down by anti-submarine operations. If the Germans could catch the British in the expected locations, good prospects were thought to exist of at least partially redressing the balance of forces between the fleets. “After the British sortied in response to the raiding attack force”, the Royal Navy’s centuries-old instincts for aggressive action could be exploited to draw its weakened units towards the main German fleet under Scheer. The hope was that Scheer would thus be able to ambush a section of the British fleet and destroy it.
Submarine deployments
A plan was devised to station submarines offshore from British naval bases, and then stage some action that would draw out the British ships to the waiting submarines. The battlecruiser SMS Seydlitz had been damaged in a previous engagement, but was due to be repaired by mid May, so an operation was scheduled for 17 May 1916. At the start of May, difficulties with condensers were discovered on ships of the third battleship squadron, so the operation was put back to 23 May. Ten submarines—U-24, U-32, U-43, U-44, UC-47, U-51, U-52, U-63, U-66, and U-70—were given orders first to patrol in the central North Sea between 17 and 22 May, and then to take up waiting positions. U-43 and U-44 were stationed in the Pentland Firth, which the Grand Fleet was likely to cross leaving Scapa Flow, while the remainder proceeded to the Firth of Forth, awaiting battlecruisers departing Rosyth. Each boat had an allocated area, within which it could move around as necessary to avoid detection, but was instructed to keep within it. During the initial North Sea patrol the boats were instructed to sail only north–south so that any enemy who chanced to encounter one would believe it was departing or returning from operations on the west coast (which required them to pass around the north of Britain). Once at their final positions, the boats were under strict orders to avoid premature detection that might give away the operation. It was arranged that a coded signal would be transmitted to alert the submarines exactly when the operation commenced:
“Take into account the enemy’s forces may be putting to sea”
Additionally, UB-27 was sent out on 20 May with instructions to work its way into the Firth of Forth past May Island. U-46 was ordered to patrol the coast of Sunderland, which had been chosen for the diversionary attack, but because of engine problems it was unable to leave port and U-47 was diverted to this task. On 13 May, U-72 was sent to lay mines in the Firth of Forth; on the 23rd, U-74 departed to lay mines in the Moray Firth; and on the 24th, U-75 was dispatched similarly west of the Orkney Islands. UB-21 and UB-22 were sent to patrol the Humber, where (incorrect) reports had suggested the presence of British warships. U-22, U-46 and U-67 were positioned north of Terschelling to protect against intervention by British light forces stationed at Harwich.
On 22 May 1916, it was discovered that Seydlitz was still not watertight after repairs and would not now be ready until the 29th. The ambush submarines were now on station and experiencing difficulties of their own: visibility near the coast was frequently poor due to fog, and sea conditions were either so calm the slightest ripple, as from the periscope, could give away their position, or so rough as to make it very hard to keep the vessel at a steady depth. The British had become aware of unusual submarine activity, and had begun counter patrols that forced the submarines out of position. UB-27 passed Bell Rock on the night of 23 May on its way into the Firth of Forth as planned, but was halted by engine trouble. After repairs it continued to approach, following behind merchant vessels, and reached Largo Bay on 25 May.
There the boat became entangled in nets that fouled one of the propellers, forcing it to abandon the operation and return home. U-74 was detected by four armed trawlers on 27 May and sunk 25 mi (22 nmi; 40 km) south-east of Peterhead. U-75 laid its mines off the Orkney Islands, which, although they played no part in the battle, were responsible later for sinking the cruiser Hampshire carrying Lord Kitchener (head of the army) on a mission to Russia on 5 June. U-72 was forced to abandon its mission without laying any mines when an oil leak meant it was leaving a visible surface trail astern
Zeppelins
The throat of the Skagerrak, the strategic gateway to the Baltic and North Atlantic, waters off Jutland and Norway
The Germans maintained a fleet of Zeppelins that they used for aerial reconnaissance and occasional bombing raids. The planned raid on Sunderland intended to use Zeppelins to watch out for the British fleet approaching from the north, which might otherwise surprise the raiders.
By 28 May, strong north-easterly winds meant that it would not be possible to send out the Zeppelins, so the raid again had to be postponed. The submarines could only stay on station until 1 June before their supplies would be exhausted and they had to return, so a decision had to be made quickly about the raid.
It was decided to use an alternative plan, abandoning the attack on Sunderland but instead sending a patrol of battlecruisers to the Skagerrak, where it was likely they would encounter merchant ships carrying British cargo and British cruiser patrols. It was felt this could be done without air support, because the action would now be much closer to Germany, relying instead on cruiser and torpedo boat patrols for reconnaissance.
Orders for the alternative plan were issued on 28 May, although it was still hoped that last-minute improvements in the weather would allow the original plan to go ahead. The German fleet assembled in the Jade River and at Wilhelmshaven and was instructed to raise steam and be ready for action from midnight on 28 May.
Franz Hipper, commander of the German battlecruiser squadron
By 14:00 on 30 May, the wind was still too strong and the final decision was made to use the alternative plan. The coded signal “31 May G.G.2490” was transmitted to the ships of the fleet to inform them the Skagerrak attack would start on 31 May. The pre-arranged signal to the waiting submarines was transmitted throughout the day from the E-Dienst radio station at Brugge, and the U-boat tender Arcona anchored at Emden. Only two of the waiting submarines, U-66 and U-32, received the order.
British response
Unfortunately for the German plan, the British had obtained a copy of the main German codebook from the light cruiser SMS Magdeburg, which had been boarded by the Russian Navy after the ship ran aground in Russian territorial waters in 1914. German naval radio communications could therefore often be quickly deciphered, and the British Admiralty usually knew about German activities.
The British Admiralty’s Room 40 maintained direction finding and interception of German naval signals. It had intercepted and decrypted a German signal on 28 May that provided “ample evidence that the German fleet was stirring in the North Sea.” Further signals were intercepted, and although they were not decrypted it was clear that a major operation was likely. At 11:00 on 30 May, Jellicoe was warned that the German fleet seemed prepared to sail the following morning. By 17:00, the Admiralty had intercepted the signal from Scheer, “31 May G.G.2490”, making it clear something significant was imminent.
Not knowing the Germans’ objective, Jellicoe and his staff decided to position the fleet to head off any attempt by the Germans to enter the North Atlantic, or the Baltic through the Skagerrak, by taking up a position off Norway where they could possibly cut off any German raid into the shipping lanes of the Atlantic, or prevent the Germans from heading into the Baltic. A position further west was unnecessary, as that area of the North Sea could be patrolled by air using blimps and scouting aircraft.
Consequently, Admiral Jellicoe led the sixteen dreadnought battleships of the 1st and 4th Battle Squadrons of the Grand Fleet and three battlecruisers of the 3rd Battlecruiser Squadron eastwards out of Scapa Flow at 22:30 on 30 May. He was to meet the 2nd Battle Squadron of eight dreadnought battleships commanded by Vice-Admiral Martyn Jerram coming from Cromarty. Hipper’s raiding force did not leave the Outer Jade Roads until 01:00 on 31 May, heading west of Heligoland Island following a cleared channel through the minefields, heading north at 16 knots (30 km/h; 18 mph).
The main German fleet of sixteen dreadnought battleships of 1st and 3rd Battle Squadrons left the Jade at 02:30, being joined off Heligoland at 04:00 by the six pre-dreadnoughts of the 2nd Battle Squadron coming from the Elbe River. Beatty’s faster force of six ships of the 1st and 2nd Battlecruiser Squadrons plus the 5th Battle Squadron of four fast battleships left the Firth of Forth on the next day; Jellicoe’s intention was to rendezvous with him 90 mi (78 nmi; 140 km) west of the mouth of the Skagerrak off the coast of Jutland and wait for the Germans to appear or for their intentions to become clear. The planned position would give him the widest range of responses to likely German moves.[17]
Naval tactics in 1916
The principle of concentration of force was fundamental to the fleet tactics of this time (as in earlier periods). Tactical doctrine called for a fleet approaching battle to be in a compact formation of parallel columns, allowing relatively easy manoeuvring, and giving shortened sight lines within the formation, which simplified the passing of the signals necessary for command and control.
A fleet formed in several short columns could change its heading faster than one formed in a single long column. Since most command signals were made with flags or signal lamps between ships, the flagship was usually placed at the head of the centre column so that its signals might be more easily seen by the many ships of the formation. Wireless telegraphy was in use, though security (radio direction finding), encryption, and the limitation of the radio sets made their extensive use more problematic. Command and control of such huge fleets remained difficult.
Thus, it might take a very long time for a signal from the flagship to be relayed to the entire formation. It was usually necessary for a signal to be confirmed by each ship before it could be relayed to other ships, and an order for a fleet movement would have to be received and acknowledged by every ship before it could be executed. In a large single-column formation, a signal could take 10 minutes or more to be passed from one end of the line to the other, whereas in a formation of parallel columns, visibility across the diagonals was often better (and always shorter) than in a single long column, and the diagonals gave signal “redundancy”, increasing the probability that a message would be quickly seen and correctly interpreted.
However, before battle was joined the heavy units of the fleet would, if possible, deploy into a single column. To form the battle line in the correct orientation relative to the enemy, the commanding admiral had to know the enemy fleet’s distance, bearing, heading, and speed. It was the task of the scouting forces, consisting primarily of battlecruisers and cruisers, to find the enemy and report this information in sufficient time, and, if possible, to deny the enemy’s scouting forces the opportunity of obtaining the equivalent information.
Ideally, the battle line would cross the intended path of the enemy column so that the maximum number of guns could be brought to bear, while the enemy could fire only with the forward guns of the leading ships, a manoeuvre known as “crossing the T“. Admiral Tōgō, commander of the Japanese battleship fleet, had achieved this against Admiral Zinovy Rozhestvensky‘s Russian battleships in 1905 at the Battle of Tsushima, with devastating results.
Jellicoe was to achieve this twice in one hour against the High Seas Fleet at Jutland, but on both occasions Scheer managed to turn away and disengage, thereby avoiding a decisive action.
Ship design
Within the existing technological limits, a trade-off had to be made between the weight and size of guns, the weight of armour protecting the ship, and the maximum speed. Battleships sacrificed speed for armour and heavy naval guns (11 in (280 mm) or larger). British battlecruisers sacrificed weight of armour for greater speed, while their German counterparts were armed with lighter guns and heavier armour. These weight savings allowed them to escape danger or catch other ships. Generally, the larger guns mounted on British ships allowed an engagement at greater range. In theory, a lightly armoured ship could stay out of range of a slower opponent while still scoring hits. The fast pace of development in the pre-war years meant that every few years, a new generation of ships rendered its predecessors obsolete. Thus, fairly young ships could still be obsolete compared to the newest ships, and fare badly in an engagement against them.[20]
Admiral John Fisher, responsible for reconstruction of the British fleet in the pre-war period, favoured large guns, oil fuel, and speed. Admiral Tirpitz, responsible for the German fleet, favoured ship survivability and chose to sacrifice some gun size for improved armour. The German battlecruiser SMS Derfflinger had belt armour equivalent in thickness—though not as comprehensive—to the British battleship HMS Iron Duke, significantly better than on the British battlecruisers such as Tiger. German ships had better internal subdivision and had fewer doors and other weak points in their bulkheads, but with the disadvantage that space for crew was greatly reduced. As they were only designed for sorties in the North Sea they did not need to be as habitable as the British vessels and their crews could live in barracks ashore when in harbour.
Warships of the period were armed with guns firing projectiles of varying weights, bearing high explosive warheads. The sum total of weight of all the projectiles fired by all the ship’s guns is referred to as “weight of broadside”. At Jutland, the total of the British ships’ weight of broadside was 332,360 lb (150,760 kg), while the German fleet’s total was 134,216 lb (60,879 kg). This does not take into consideration the ability of some ships and their crews to fire more or less rapidly than others, which would increase or decrease amount of fire that one combatant was able to bring to bear on their opponent for any length of time.
Jellicoe’s Grand Fleet was split into two sections. The dreadnought Battle Fleet with which he sailed formed the main force and was composed of 24 battleships and three battlecruisers. The battleships were formed into three squadrons of eight ships, further subdivided into divisions of four, each led by a flag officer. Accompanying them were eight armoured cruisers (classified by the Royal Navy since 1913 as “cruisers”), eight light cruisers, four scout cruisers, 51 destroyers, and one destroyer-minelayer.
David Beatty, commander of the British battlecruiser fleet
The Grand Fleet sailed without three of its battleships: Emperor of India in refit at Invergordon, Queen Elizabeth dry-docked at Rosyth and Dreadnought in refit at Devonport. The brand new Royal Sovereign was left behind, with only three weeks in service, her untrained crew judged unready for battle.
The German High Seas Fleet under Scheer was also split into a main force and a separate reconnaissance force. Scheer’s main battle fleet was composed of 16 battleships and six pre-dreadnought battleships arranged in an identical manner to the British. With them were six light cruisers and 31 torpedo-boats, (the latter being roughly equivalent to a British destroyer).
The German scouting force, commanded by Franz Hipper, consisted of five battlecruisers, five light cruisers and 30 torpedo-boats. The Germans had no equivalent to Engadine and no heavier-than-air aircraft to operate with the fleet but had the Imperial German Naval Airship Service’s force of rigid airships available to patrol the North Sea.
All of the battleships and battlecruisers on both sides carried torpedoes of various sizes, as did the lighter craft. The British battleships carried three or four underwater torpedo tubes. The battlecruisers carried from two to five. All were either 18-inch or 21-inch diameter. The German battleships carried five or six underwater torpedo tubes in three sizes from 18 to 21 inch and the battlecruisers carried four or five tubes.
The German battle fleet was hampered by the slow speed and relatively poor armament of the six pre-dreadnoughts of II Squadron, which limited maximum fleet speed to 18 knots (33 km/h; 21 mph), compared to maximum British fleet speed of 21 knots (39 km/h; 24 mph). On the British side, the eight armoured cruisers were deficient in both speed and armour protection. Both of these obsolete squadrons were notably vulnerable to attacks by more modern enemy ships.
Battlecruiser action
——————————-
The Battle of Jutland Animation
——————————-
The route of the British battlecruiser fleet took it through the patrol sector allocated to U-32. After receiving the order to commence the operation, the U-boat moved to a position 80 mi (70 nmi; 130 km) east of May Island at dawn on 31 May. At 03:40, it sighted the cruisers HMS Galatea and Phaeton leaving the Forth at 18 knots (33 km/h; 21 mph). It launched one torpedo at the leading cruiser at a range of 1,000 yd (910 m), but its periscope jammed ‘up’, giving away the position of the submarine as it manoeuvred to fire a second. The lead cruiser turned away to dodge the torpedo, while the second turned towards the submarine, attempting to ram. U-32crash dived, and on raising its periscope at 04:10 saw two battlecruisers (the 2nd Battlecruiser Squadron) heading south-east. They were too far away to attack, but Kapitänleutnant von Spiegel reported the sighting of two battleships and two cruisers to Germany.
U-66 was also supposed to be patrolling off the Firth of Forth but had been forced north to a position 60 mi (52 nmi; 97 km) off Peterhead by patrolling British vessels. This now brought it into contact with the 2nd Battle Squadron, coming from the Moray Firth. At 05:00, it had to crash dive when the cruiser Duke of Edinburgh appeared from the mist heading toward it. It was followed by another cruiser, Boadicea, and eight battleships. U-66 got within 350 yd (320 m) of the battleships preparing to fire, but was forced to dive by an approaching destroyer and missed the opportunity. At 06:35, it reported eight battleships and cruisers heading north.
The courses reported by both submarines were incorrect, because they reflected one leg of a zigzag being used by British ships to avoid submarines. Taken with a wireless intercept of more ships leaving Scapa Flow earlier in the night, they created the impression in the German High Command that the British fleet, whatever it was doing, was split into separate sections moving apart, which was precisely as the Germans wished to meet it.
Jellicoe’s ships proceeded to their rendezvous undamaged and undiscovered. However, he was now misled by an Admiralty intelligence report advising that the German main battle fleet was still in port. The Director of Operations Division, Rear Admiral Thomas Jackson, had asked the intelligence division, Room 40, for the current location of German call sign DK, used by Admiral Scheer. They had replied that it was currently transmitting from Wilhelmshaven. It was known to the intelligence staff that Scheer deliberately used a different call sign when at sea, but no one asked for this information or explained the reason behind the query – to locate the German fleet.
The German battlecruisers cleared the minefields surrounding the Amrum swept channel by 09:00. They then proceeded north-west, passing 35 mi (30 nmi; 56 km) west of the Horn’s Reef lightship heading for the Little Fisher Bank at the mouth of the Skagerrak. The High Seas Fleet followed some 50 mi (43 nmi; 80 km) behind. The battlecruisers were in line ahead, with the four cruisers of the II scouting group plus supporting torpedo boats ranged in an arc 8 mi (7.0 nmi; 13 km) ahead and to either side.
The IX torpedo boat flotilla formed close support immediately surrounding the battlecruisers. The High Seas Fleet similarly adopted a line-ahead formation, with close screening by torpedo boats to either side and a further screen of five cruisers surrounding the column 5–8 mi (4.3–7.0 nmi; 8.0–12.9 km) away. The wind had finally moderated so that Zeppelins could be used, and by 11:30 five had been sent out: L14 to the Skagerrak, L23 240 mi (210 nmi; 390 km) east of Noss Head in the Pentland Firth, L21 120 mi (100 nmi; 190 km) off Peterhead, L9 100 mi (87 nmi; 160 km) off Sunderland, and L16 80 mi (70 nmi; 130 km) east of Flamborough Head. Visibility, however, was still bad, with clouds down to 1,000 ft (300 m).
Contact
HMS Warspite and Malaya, seen from HMS Valiant at around 14:00 hrs
By around 14:00, Beatty’s ships were proceeding eastward at roughly the same latitude as Hipper’s squadron, which was heading north. Had the courses remained unchanged, Beatty would have passed between the two German fleets, 40 mi (35 nmi; 64 km) south of the battlecruisers and 20 mi (17 nmi; 32 km) north of the High Seas Fleet at around 16:30, possibly trapping his ships just as the German plan envisioned. His orders were to stop his scouting patrol when he reached a point 260 mi (230 nmi; 420 km) east of Britain and then turn north to meet Jellicoe, which he did at this time. Beatty’s ships were divided into three columns, with the two battlecruiser squadrons leading in parallel lines 3 mi (2.6 nmi; 4.8 km) apart. The 5th Battle Squadron was stationed 5 mi (4.3 nmi; 8.0 km) to the north-west, on the side furthest away from any expected enemy contact, while a screen of cruisers and destroyers was spread south-east of the battlecruisers. After the turn, the 5th Battle Squadron was now leading the British ships in the westernmost column, and Beatty’s squadron was centre and rearmost, with the 2nd BCS to the west.
(1) 15:22 hrs, Hipper sights Beatty.
(2) 15:48 hrs, First shots fired by Hipper’s squadron.
(3) 16:00 hrs-16:05 hrs, Indefatigable explodes, leaving two survivors.
(4) 16:25 hrs, Queen Mary explodes, nine survive.
(5) 16:45 hrs, Beatty’s battlecruisers move out of range of Hipper.
(6) 16:54 hrs, Evan-Thomas’s battleships turn north behind Beatty.
At 14:20 on 31 May, despite heavy haze and scuds of fog giving poor visibility, scouts from Beatty’s force reported enemy ships to the south-east; the British light units, investigating a neutral Danish steamer (N J Fjord), which was stopped between the two fleets, had found two German destroyers engaged on the same mission (B109 and B110). The first shots of the battle were fired at 14:28 when HMS Galatea and Phaeton of the British 1st Light Cruiser Squadron opened on the German torpedo boats, which withdrew toward their approaching light cruisers. At 14:36, the Germans scored the first hit of the battle when SMS Elbing, of Rear-Admiral Friedrich Bödicker‘s Scouting Group II, hit her British counterpart Galatea at extreme range.
Beatty began to move his battlecruisers and supporting forces south-eastwards and then east to cut the German ships off from their base and ordered Engadine to launch a seaplane to try to get more information about the size and location of the German forces. This was the first time in history that a carrier-based aeroplane was used for reconnaissance in naval combat. Engadine‘s aircraft did locate and report some German light cruisers just before 15:30 and came under anti-aircraft gunfire but attempts to relay reports from the aeroplane failed.
Unfortunately for Beatty, his initial course changes at 14:32 were not received by Sir Hugh Evan-Thomas’s5th Battle Squadron (the distance being too great to read his flags), because the battlecruiser HMS Tiger—the last ship in his column—was no longer in a position where she could relay signals by searchlight to Evan-Thomas, as she had previously been ordered to do. Whereas before the north turn, Tiger had been the closest ship to Evan-Thomas, she was now further away than Beatty in Lion. Matters were aggravated because Evan-Thomas had not been briefed regarding standing orders within Beatty’s squadron, as his squadron normally operated with the Grand Fleet. Fleet ships were expected to obey movement orders precisely and not deviate from them. Beatty’s standing instructions expected his officers to use their initiative and keep station with the flagship.
As a result, the four Queen Elizabeth-class battleships—which were the fastest and most heavily armed in the world at that time—remained on the previous course for several minutes, ending up 10 mi (8.7 nmi; 16 km) behind rather than five. Beatty also had the opportunity during the previous hours to concentrate his forces, and no reason not to do so, whereas he steamed ahead at full speed, faster than the battleships could manage. Dividing the force had serious consequences for the British, costing them what would have been an overwhelming advantage in ships and firepower during the first half-hour of the coming battle.
With visibility favouring the Germans, Hipper’s battlecruisers at 15:22, steaming approximately north-west, sighted Beatty’s squadron at a range of about 15 mi (13 nmi; 24 km), while Beatty’s forces did not identify Hipper’s battlecruisers until 15:30. (position 1 on map). At 15:45, Hipper turned south-east to lead Beatty toward Scheer, who was 46 mi (40 nmi; 74 km) south-east with the main force of the High Seas Fleet.
Run to the south
Beatty’s conduct during the next 15 minutes has received a great deal of criticism, as his ships out-ranged and outnumbered the German squadron, yet he held his fire for over 10 minutes with the German ships in range. He also failed to use the time available to rearrange his battlecruisers into a fighting formation, with the result that they were still manoeuvring when the battle started.
At 15:48, with the opposing forces roughly parallel at 15,000 yd (14,000 m), with the British to the south-west of the Germans (i.e., on the right side), Hipper opened fire, followed by the British ships as their guns came to bear upon targets (position 2). Thus began the opening phase of the battlecruiser action, known as the “Run to the South”, in which the British chased the Germans, and Hipper intentionally led Beatty toward Scheer. During the first minutes of the ensuing battle, all the British ships except Princess Royal fired far over their German opponents, due to adverse visibility conditions, before finally getting the range. Only Lion and Princess Royal had settled into formation, so the other four ships were hampered in aiming by their own turning. Beatty was to windward of Hipper, and therefore funnel and gun smoke from his own ships tended to obscure his targets, while Hipper’s smoke blew clear. Also, the eastern sky was overcast and the grey German ships were indistinct and difficult to range.
Beatty’s flagship Lion burning after being hit by a salvo from Lützow
HMS Indefatigable sinking after being struck by shells from the German battlecruiser Von der Tann
Beatty had ordered his ships to engage in a line, one British ship engaging with one German and his flagshipHMS Lion doubling on the German flagship SMS Lützow. However, due to another mistake with signalling by flag, and possibly because Queen Mary and Tiger were unable to see the German lead ship because of smoke, the second German ship, Derfflinger, was left un-engaged and free to fire without disruption. SMS Moltke drew fire from two of Beatty’s battlecruisers, but still fired with great accuracy during this time, hitting Tiger 9 times in the first 12 minutes. The Germans drew first blood. Aided by superior visibility, Hipper’s five battlecruisers quickly registered hits on three of the six British battlecruisers. Seven minutes passed before the British managed to score their first hit.
The first near-kill of the Run to the South occurred at 16:00, when a 30.5 cm (12.0 in) shell from Lützow wrecked the “Q” turret amidships on Beatty’s flagship Lion. Dozens of crewmen were instantly killed, but far larger destruction was averted when the mortally wounded turret commander – Major Francis Harvey of the Royal Marines – promptly ordered the magazine doors shut and the magazine flooded. This prevented a magazine explosion at 16:28, when a flash fire ignited ready cordite charges beneath the turret and killed everyone in the chambers outside “Q” magazine. Lion was saved.
HMS Indefatigable was not so lucky; at 16:02, just 14 minutes into the gunnery exchange, she was hit aft by three 28 cm (11 in) shells from SMS Von der Tann, causing damage sufficient to knock her out of line and detonating “X” magazine aft. Soon after, despite the near-maximum range, Von der Tann put another 28 cm (11 in) shell on Indefatigable‘s “A” turret forward. The plunging shells probably pierced the thin upper armour, and seconds later Indefatigable was ripped apart by another magazine explosion, sinking immediately with her crew of 1,019 officers and men, leaving only two survivors. (position 3).
Hipper’s position deteriorated somewhat by 16:15 as the 5th Battle Squadron finally came into range, so that he had to contend with gunfire from the four battleships astern as well as Beatty’s five remaining battlecruisers to starboard. But he knew his baiting mission was close to completion, as his force was rapidly closing with Scheer’s main body. At 16:08, the lead battleship of the 5th Battle Squadron, HMS Barham, caught up with Hipper and opened fire at extreme range, scoring a 15 in (380 mm) hit on Von der Tann within 60 seconds. Still, it was 16:15 before all the battleships of the 5th were able to fully engage at long range.
At 16:25, the battlecruiser action intensified again when HMS Queen Mary was hit by what may have been a combined salvo from Derfflinger and Seydlitz; she disintegrated when both forward magazines exploded, sinking with all but nine of her 1,275 man crew lost.(position 4). Commander von Hase, the first gunnery officer aboard Derfflingler, noted:
The enemy was shooting superbly. Twice the Derfflinger came under their infernal hail and each time she was hit. But the Queen Mary was having a bad time; engaged by the Seydlitz as well as the Derfflinger, she met her doom at 1626. A vivid red flame shot up from her forepart; then came an explosion forward, followed by a much heavier explosion amidships. Immediately afterwards, she blew up with a terrific explosion, the masts collapsing inwards and the smoke hiding everything.
HMS Queen Mary blowing up
During the Run to the South, from 15:48 to 16:54, the German battlecruisers made an estimated total of forty-two 28 and 30.5 cm (11.0 and 12.0 in) hits on the British battlecruisers (nine on Lion, six on Princess Royal, seven on Queen Mary, 14 on Tiger, one on New Zealand, five on Indefatigable), and two more on the battleship Barham, compared with only eleven 13.5 in (340 mm) hits by the British battlecruisers (four on Lützow, four on Seydlitz, two on Moltke, one on von der Tann), and six 15 in (380 mm) hits by the battleships (one on Seydlitz, four on Moltke, one on von der Tann).
Shortly after 16:26, a salvo struck on or around HMS Princess Royal, which was obscured by spray and smoke from shell bursts. A signalman promptly leapt on to the bridge of Lion and announced “Princess Royal‘s blown up, Sir.” Beatty famously turned to his flag captain, saying “Chatfield, there seems to be something wrong with our bloody ships today.” (In popular legend, Beatty also immediately ordered his ships to “turn two points to port”, i.e., two points nearer the enemy, but there is no official record of any such command or course change.) Princess Royal, as it turned out, was still afloat after the spray cleared.
At 16:30, Scheer’s leading battleships sighted the distant battlecruiser action; soon after, HMS Southampton of Beatty’s 2nd Light Cruiser Squadron led by Commodore William Goodenough sighted the main body of Scheer’s High Seas Fleet, dodging numerous heavy-calibre salvos to report in detail the German strength: 16 dreadnoughts with six older battleships. This was the first news that Beatty and Jellicoe had that Scheer and his battle fleet were even at sea. Simultaneously, an all-out destroyer action raged in the space between the opposing battlecruiser forces, as British and German destroyers fought with each other and attempted to torpedo the larger enemy ships.
Each side fired many torpedoes, but both battlecruiser forces turned away from the attacks and all escaped harm except Seydlitz, which was hit forward at 16:57 by a torpedo fired by the British destroyer HMS Petard. Though taking on water, Seydlitz maintained speed. The destroyer HMS Nestor, under the command of Captain Barry Bingham, led the British attacks. The British disabled the German torpedo boat V27, which the Germans soon abandoned and sank, and Petard then torpedoed and sank V29, her second score of the day. S35 and V26 rescued the crews of their sunken sister ships. But Nestor and another British destroyer – HMS Nomad – were immobilised by shell hits, and were later sunk by Scheer’s passing dreadnoughts. Bingham was rescued, and won the Victoria Cross for his leadership in the destroyer action.
Run to the north
As soon as he himself sighted the vanguard of Scheer’s distant battleship line 12 mi (10 nmi; 19 km) away, at 16:40, Beatty turned his battlecruiser force 180°, heading north to draw the Germans toward Jellicoe. (position 5). Beatty’s withdrawal toward Jellicoe is called the “Run to the North”, in which the tables turned and the Germans chased the British. Because Beatty once again failed to signal his intentions adequately, the battleships of the 5th Battle Squadron – which were too far behind to read his flags – found themselves passing the battlecruisers on an opposing course and heading directly toward the approaching main body of the High Seas Fleet. At 16:48, at extreme range, Scheer’s leading battleships opened fire.
Meanwhile, at 16:47, having received Goodenough’s signal and knowing that Beatty was now leading the German battle fleet north to him, Jellicoe signalled to his own forces that the fleet action they had waited so long for was finally imminent; at 16:51, by radio, he informed the Admiralty so in London.
The difficulties of the 5th Battle Squadron were compounded when Beatty gave the order to Evan-Thomas to “turn in succession” (rather than “turn together”) at 16:48 as the battleships passed him. Evan-Thomas acknowledged the signal, but Lieutenant-CommanderRalph Seymour, Beatty’s flag lieutenant, aggravated the situation when he did not haul down the flags (to execute the signal) for some minutes. At 16:55, when the 5BS had moved within range of the enemy battleships, Evan-Thomas issued his own flag command warning his squadron to expect sudden manoeuvres and to follow his lead, before starting to turn on his own initiative. The order to turn in succession would have resulted in all four ships turning in the same patch of sea as they reached it one by one, giving the High Seas Fleet repeated opportunity with ample time to find the proper range. However, the captain of the trailing ship (HMS Malaya) turned early, mitigating the adverse results.
For the next hour, the 5th Battle Squadron acted as Beatty’s rearguard, drawing fire from all the German ships within range, while by 17:10 Beatty had deliberately eased his own squadron out of range of Hipper’s now-superior battlecruiser force.[55] Since visibility and firepower now favoured the Germans, there was no incentive for Beatty to risk further battlecruiser losses when his own gunnery could not be effective. Illustrating the imbalance, Beatty’s battlecruisers did not score any hits on the Germans in this phase until 17:45, but they had rapidly received five more before he opened the range (four on Lion, of which three were by Lützow, and one on Tiger by Seydlitz)
Now the only targets the Germans could reach, the ships of the 5th Battle Squadron, received simultaneous fire from Hipper’s battlecruisers to the east (which HMS Barham and Valiant engaged) and Scheer’s leading battleships to the south-east (which HMS Warspite and Malaya engaged). Three took hits: Barham (four by Derfflinger), Warspite (two by Seydlitz), and Malaya (seven by the German battleships). Only Valiant was unscathed.
The four battleships were far better suited to take this sort of pounding than the battlecruisers, and none were lost, though Malaya suffered heavy damage, an ammunition fire, and heavy crew casualties. At the same time, the 15 in (380 mm) fire of the four British ships was accurate and effective. As the two British squadrons headed north at top speed, eagerly chased by the entire German fleet, the 5th Battle Squadron scored 13 hits on the enemy battlecruisers (four on Lützow, three on Derfflinger, six on Seydlitz) and five on battleships (although only one, on SMS Markgraf, did any serious damage). (position 6).
————————————-
————————————-
The fleets converge
Jellicoe was now aware that full fleet engagement was nearing, but had insufficient information on the position and course of the Germans. To assist Beatty, early in the battle at about 16:05, Jellicoe had ordered Rear-AdmiralHorace Hood‘s 3rd Battlecruiser Squadron to speed ahead to find and support Beatty’s force, and Hood was now racing SSE well in advance of Jellicoe’s northern force. Rear-Admiral Arbuthnot‘s 1st Cruiser Squadron patrolled the van of Jellicoe’s main battleship force as it advanced steadily to the south-east.
At 17:33, the armoured cruiser HMS Black Prince of Arbuthnot’s squadron, on the far southwest flank of Jellicoe’s force, came within view of HMS Falmouth, which was about 5 mi (4.3 nmi; 8.0 km) ahead of Beatty with the 3rd Light Cruiser Squadron, establishing the first visual link between the converging bodies of the Grand Fleet.
At 17:38, the scout cruiser HMS Chester, screening Hood’s oncoming battlecruisers, was intercepted by the van of the German scouting forces under Rear-Admiral Bödicker.
Heavily outnumbered by Bödicker’s four light cruisers, Chester was pounded before being relieved by Hood’s heavy units, which swung westward for that purpose. Hood’s flagship HMS Invincible disabled the light cruiser SMS Wiesbaden shortly after 17:56. Wiesbaden became a sitting target for most of the British fleet during the next hour, but remained afloat and fired some torpedoes at the passing enemy battleships from long range. Meanwhile, Bödicker’s other ships turned toward Hipper and Scheer in the mistaken belief that Hood was leading a larger force of British capital ships from the north and east.
A chaotic destroyer action in mist and smoke ensued as German torpedo boats attempted to blunt the arrival of this new formation, but Hood’s battlecruisers dodged all the torpedoes fired at them. In this action, after leading a torpedo counter-attack, the British destroyer HMS Shark was disabled, but continued to return fire at numerous passing enemy ships for the next hour.
Fleet action
Deployment
(1) 18:00 Scouting forces rejoin their respective fleets.
(2) 18:15 British fleet deploys into battle line
(3) 18:30 German fleet under fire turns away
(4) 19:00 German fleet turns back
(5) 19:15 German fleet turns away for second time
(6) 20:00
(7) 21:00 Nightfall: Jellicoe assumes night cruising formation
In the meantime, Beatty and Evan-Thomas had resumed their engagement with Hipper’s battlecruisers, this time with the visual conditions to their advantage. With several of his ships damaged, Hipper turned back toward Scheer at around 18:00, just as Beatty’s flagship Lion was finally sighted from Jellicoe’s flagship Iron Duke. Jellicoe twice demanded the latest position of the German battlefleet from Beatty, who could not see the German battleships and failed to respond to the question until 18:14. Meanwhile, Jellicoe received confused sighting reports of varying accuracy and limited usefulness from light cruisers and battleships on the starboard (southern) flank of his force.
Jellicoe was in a worrying position. He needed to know the location of the German fleet to judge when and how to deploy his battleships from their cruising formation (six columns of four ships each) into a single battle line. The deployment could be on either the westernmost or the easternmost column, and had to be carried out before the Germans arrived; but early deployment could mean losing any chance of a decisive encounter. Deploying to the west would bring his fleet closer to Scheer, gaining valuable time as dusk approached, but the Germans might arrive before the manoeuvre was complete. Deploying to the east would take the force away from Scheer, but Jellicoe’s ships might be able to cross the “T”, and visibility would strongly favour British gunnery – Scheer’s forces would be silhouetted against the setting sun to the west, while the Grand Fleet would be indistinct against the dark skies to the north and east, and would be hidden by reflection of the low sunlight off intervening haze and smoke. Deployment would take twenty irreplaceable minutes, and the fleets were closing at full speed. In one of the most critical and difficult tactical command decisions of the entire war, Jellicoe ordered deployment to the east at 18:15.
Windy Corner
Meanwhile, Hipper had rejoined Scheer, and the combined High Seas Fleet was heading north, directly toward Jellicoe. Scheer had no indication that Jellicoe was at sea, let alone that he was bearing down from the north-west, and was distracted by the intervention of Hood’s ships to his north and east. Beatty’s four surviving battlecruisers were now crossing the van of the British dreadnoughts to join Hood’s three battlecruisers; at this time, Arbuthnot’s flagship, the armoured cruiser HMS Defence, and her squadron-mate HMS Warrior both charged across Beatty’s bows, and Lion narrowly avoided a collision with Warrior.
Nearby, numerous British light cruisers and destroyers on the south-western flank of the deploying battleships were also crossing each other’s courses in attempts to reach their proper stations, often barely escaping collisions, and under fire from some of the approaching German ships. This period of peril and heavy traffic attending the merger and deployment of the British forces later became known as “Windy Corner”.
Arbuthnot was attracted by the drifting hull of the crippled Wiesbaden. With Warrior, Defence closed in for the kill, only to blunder right into the gun sights of Hipper’s and Scheer’s oncoming capital ships. Defence was deluged by heavy-calibre gunfire from many German battleships, which detonated her magazines in a spectacular explosion viewed by most of the deploying Grand Fleet; she sank with all hands (903 officers and men). Warrior was also hit badly, but she was spared destruction by a mishap to the nearby battleship Warspite. Warspite had her steering gear overheat and jam under heavy load at high speed as the 5th Battle Squadron made a turn to the north at 18:19.
Steaming at top speed in wide circles, Warspite appeared as a juicy target to the German dreadnoughts and took 13 hits, inadvertently drawing fire from the hapless Warrior. Warspite was brought back under control and survived the onslaught, but was badly damaged, had to reduce speed, and withdrew northward; later (at 21:07), she was ordered back to port by Evan-Thomas.
Warspite went on to a long and illustrious career, serving also in World War II. Warrior, on the other hand, was abandoned and sank the next day after her crew was taken off at 08:25 on 1 June by Engadine, which towed the sinking armoured cruiser 100 mi (87 nmi; 160 km) during the night
Invincible blowing up after being struck by shells from Lützow and Derfflinger
As Defence sank and Warspite circled, at about 18:19, Hipper moved within range of Hood’s 3rd Battlecruiser Squadron, but was still also within range of Beatty’s ships. At first, visibility favoured the British: HMS Indomitable hit Derfflinger three times and Seydlitz once, while Lützow quickly took 10 hits from Lion, Inflexible and Invincible, including two below-waterline hits forward by Invincible that would ultimately doom Hipper’s flagship.
But at 18:30, Invincible abruptly appeared as a clear target before Lützow and Derfflinger. The two German ships then fired three salvoes each at Invincible, and sank her in 90 seconds. A 30.5 cm (12.0 in) shell from the third salvo struck Invincible‘s Q-turret amidships, detonating the magazines below and causing her to blow up and sink. All but six of her crew of 1,032 officers and men, including Rear-Admiral Hood, were killed.
Of the remaining British battlecruisers, only Princess Royal received heavy-calibre hits at this time (two 30.5 cm (12.0 in) by the battleship Markgraf). Lützow, flooding forward and unable to communicate by radio, was now out of action and began to attempt to withdraw; therefore Hipper left his flagship and transferred to the torpedo boat SMS G39, hoping to board one of the other battlecruisers later.
Crossing the T
By 18:30, the main battle fleet action was joined for the first time, with Jellicoe effectively “crossing Scheer’s T”. The officers on the lead German battleships, and Scheer himself, were taken completely by surprise when they emerged from drifting clouds of smoky mist to suddenly find themselves facing the massed firepower of the entire Grand Fleet main battle line, which they did not know was even at sea. Jellicoe’s flagship Iron Duke quickly scored seven hits on the lead German dreadnought, SMS König but in this brief exchange, which lasted only minutes, as few as 10 of the Grand Fleet’s 24 dreadnoughts actually opened fire.
The Germans were hampered by poor visibility, in addition to being in an unfavourable tactical position, just as Jellicoe had intended. Realising he was heading into a death trap, Scheer ordered his fleet to turn and disengage at 18:33. Under a pall of smoke and mist, Scheer’s forces succeeded in disengaging by an expertly executed 180° turn in unison (“battle about turn to starboard”, German Gefechtskehrtwendung nach Steuerbord), which was a well-practised emergency manoeuvre of the High Seas Fleet.
Scheer declared:
It was now obvious that we were confronted by a large portion of the English fleet. The entire arc stretching from north to east was a sea of fire. The flash from the muzzles of the guns was seen distinctly through the mist and smoke on the horizon, although the ships themselves were not distinguishable.
Conscious of the risks to his capital ships posed by torpedoes, Jellicoe did not chase directly but headed south, determined to keep the High Seas Fleet west of him. Starting at 18:40, battleships at the rear of Jellicoe’s line were in fact sighting and avoiding torpedoes, and at 18:54 HMS Marlborough was hit by a torpedo (probably from the disabled Wiesbaden), which reduced her speed to 16 knots (30 km/h; 18 mph).
Meanwhile, Scheer, knowing that it was not yet dark enough to escape and that his fleet would suffer terribly in a stern chase, doubled back to the east at 18:55. In his memoirs he wrote, “the manoeuvre would be bound to surprise the enemy, to upset his plans for the rest of the day, and if the blow fell heavily it would facilitate the breaking loose at night.” But the turn to the east took his ships, again, directly towards Jellicoe’s fully deployed battle line
Simultaneously, the disabled British destroyer HMS Shark fought desperately against a group of four German torpedo boats and disabled V48 with gunfire, but was eventually torpedoed and sunk at 19:02 by the German destroyer S54. Shark‘s Captain Loftus Jones won the Victoria Cross for his heroism in continuing to fight against all odds.
Commodore Goodenough’s 2nd Light Cruiser Squadron dodged the fire of German battleships for a second time to re-establish contact with the High Seas Fleet shortly after 19:00. By 19:15, Jellicoe had crossed Scheer’s “T” again. This time his arc of fire was tighter and deadlier, causing severe damage to the German battleships, particularly Rear-Admiral Behncke’s leading 3rd Squadron (SMS König, Grosser Kurfürst, Markgraf, and Kaiser all being hit, along with SMS Helgoland of the 1st Squadron),[81] while on the British side, only the battleship HMS Colossus was hit (twice, by SMS Seydlitz but with little damage done)
At 19:17, for the second time in less than an hour, Scheer turned his outnumbered and out-gunned fleet to the west using the “battle about turn” (German: Gefechtskehrtwendung), but this time it was executed only with difficulty, as the High Seas Fleet’s lead squadrons began to lose formation under concentrated gunfire.
To deter a British chase, Scheer ordered a major torpedo attack by his destroyers and a potentially sacrificial charge by Scouting Group I’s four remaining battlecruisers. Hipper was still aboard the torpedo boat G39 and was unable to command his squadron for this attack. Therefore, SMS Derfflinger, under Captain Hartog, led the already badly damaged German battlecruisers directly into “the greatest concentration of naval gunfire any fleet commander had ever faced”, at ranges down to 4 mi (3.5 nmi; 6.4 km).
In what became known as the “death ride”, all the battlecruisers except SMS Moltke were hit and further damaged, as 18 of the British battleships fired at them simultaneously.
Derfflinger had two main gun turrets destroyed. The crews of Scouting Group I suffered heavy casualties, but survived the pounding and veered away with the other battlecruisers once Scheer was out of trouble and the German destroyers were moving in to attack. In this brief but intense portion of the engagement, from about 19:05 to about 19:30, the Germans sustained a total of 37 heavy hits while inflicting only two; Derfflinger alone received 14.
While his battlecruisers drew the fire of the British fleet, Scheer slipped away, laying smoke screens. Meanwhile, from about 19:16 to about 19:40, the British battleships were also engaging Scheer’s torpedo boats, which executed several waves of torpedo attacks to cover his withdrawal. Jellicoe’s ships turned away from the attacks and successfully evaded all 31 of the torpedoes launched at them – though, in several cases, only just barely – and sank the German destroyer S35. British light forces also sank V48, which had previously been disabled by HMS Shark.
This action, and the turn away, cost the British critical time and range in the last hour of daylight – as Scheer intended, allowing him to get his heavy ships out of immediate danger.
The last major exchanges between capital ships in this battle took place just after sunset, from about 20:19 to about 20:35, as the surviving British battlecruisers caught up with their German counterparts, which were briefly relieved by Rear-Admiral Mauve’s obsolete pre-dreadnoughts (the German 2nd Squadron). The British received one heavy hit on Princess Royal but scored five more on Seydlitz and three on other German ships.
As twilight faded to night and HMS King George V exchanged a few final shots with SMS Westfalen, neither side could have imagined that the only encounter between British and German dreadnoughts in the entire war was already concluded.
Night action and German withdrawal
At 21:00, Jellicoe, conscious of the Grand Fleet’s deficiencies in night fighting, decided to try to avoid a major engagement until early dawn. He placed a screen of cruisers and destroyers 5 mi (4.3 nmi; 8.0 km) behind his battle fleet to patrol the rear as he headed south to guard Scheer’s expected escape route In reality, Scheer opted to cross Jellicoe’s wake and escape via Horns Reef. Luckily for Scheer, most of the light forces in Jellicoe’s rearguard failed to report the seven separate encounters with the German fleet during the night the very few radio reports that were sent to the British flagship were never received, possibly because the Germans were jamming British frequencies. Many of the destroyers failed to make the most of their opportunities to attack discovered ships, despite Jellicoe’s expectations that the destroyer forces would, if necessary, be able to block the path of the German fleet.
Jellicoe and his commanders did not understand that the furious gunfire and explosions to the north (seen and heard for hours by all the British battleships) indicated that the German heavy ships were breaking through the screen astern of the British fleet. Instead, it was believed that the fighting was the result of night attacks by German destroyers. The most powerful British ships of all (the 15-inch-gunned 5th Battle Squadron) directly observed German battleships crossing astern of them in action with British light forces, at ranges of 3 mi (2.6 nmi; 4.8 km) or less, and gunners on HMS Malaya made ready to fire, but her captain declined, deferring to the authority of Rear-Admiral Evan-Thomas – and neither commander reported the sightings to Jellicoe, assuming that he could see for himself and that revealing the fleet’s position by radio signals or gunfire was unwise.
While the nature of Scheer’s escape, and Jellicoe’s inaction, indicate the overall German superiority in night fighting, the results of the night action were no more clear-cut than were those of the battle as a whole. In the first of many surprise encounters by darkened ships at point-blank range, Southampton, Commodore Goodenough’s flagship, which had scouted so proficiently, was heavily damaged in action with a German Scouting Group composed of light cruisers, but managed to torpedo SMS Frauenlob, which went down at 22:23 with all hands (320 officers and men).
From 23:20 to approximately 02:15, several British destroyer flotillas launched torpedo attacks on the German battle fleet in a series of violent and chaotic engagements at extremely short range (often under 0.5 mi (0.80 km)). At the cost of five destroyers sunk and some others damaged, they managed to torpedo the light cruiser SMS Rostock, which sank several hours later, and the pre-dreadnought SMS Pommern, which blew up and sank with all hands (839 officers and men) at 03:10 during the last wave of attacks before dawn.
Three of the British destroyers collided in the chaos, and the German battleship SMS Nassau rammed the British destroyer HMS Spitfire, blowing away most of the British ship’s superstructure merely with the muzzle blast of its big guns, which could not be aimed low enough to hit the ship. Nassau was left with a 11 ft (3.4 m) hole in her side, reducing her maximum speed to 15 knots (28 km/h; 17 mph), while the removed plating was left lying on Spitfire‘s deck.
Spitfire survived and made it back to port. Another German cruiser, SMS Elbing, was accidentally rammed by the dreadnought Posen and abandoned, sinking early the next day. Of the British destroyers, HMS Tipperary, Ardent, Fortune, Sparrowhawk and Turbulent were lost during the night fighting.
Just after midnight on 1 June, SMS Thüringen and other German battleships sank HMS Black Prince of the ill-fated 1st Cruiser Squadron, which had blundered into the German battle line. Deployed as part of a screening force several miles ahead of the main force of the Grand Fleet, Black Prince had lost contact in the darkness and took a position near what she thought was the British line. The Germans soon identified the new addition to its line and opened fire. Overwhelmed by point-blank gunfire, Black Prince blew up, (857 officers and men – all hands – were lost), as her squadron leader Defence had done hours earlier. Lost in the darkness, the battlecruisers SMS Moltke and Seydlitz had similar point-blank encounters with the British battle line and were recognised, but were spared the fate of Black Prince when the captains of the British ships, again, declined to open fire, reluctant to reveal their fleet’s position.
At 01:45, the sinking battlecruiser Lützow – fatally damaged by Invincible during the main action – was torpedoed by the destroyer G38 on orders of Lützow‘s Captain Viktor von Harder after the surviving crew of 1,150 transferred to destroyers that came alongside. At 02:15, the German torpedo boat V4 suddenly had its bow blown off; V2 and V6 came alongside and took off the remaining crew, and the V2 then sank the hulk. Since there was no enemy nearby, it was assumed that she had hit a mine or had been torpedoed by a submarine.
At 02:15, five British ships of the 13th Destroyer Flotilla under Captain James Uchtred Farie regrouped and headed south. At 02:25, they sighted the rear of the German line. HMS Marksman inquired of the leader Champion as to whether he thought they were British or German ships. Answering that he thought they were German, Farie then veered off to the east and away from the German line. All but Moresby in the rear followed, as through the gloom she sighted what she thought were four pre-dreadnought battleships 2 mi (1.7 nmi; 3.2 km) away. She hoisted a flag signal indicating that the enemy was to the west and then closed to firing range, letting off a torpedo set for high running at 02:37, then veering off to rejoin her flotilla. The four pre-dreadnought battleships were in fact two pre-dreadnoughts, Schleswig-Holstein and Schlesien, and the battlecruisers Von der Tann and Derfflinger. Von der Tann sighted the torpedo and was forced to steer sharply to starboard to avoid it as it passed close to her bows. Moresby rejoined Champion convinced she had scored a hit.
Finally, at 05:20, as Scheer’s fleet was safely on its way home, the battleship SMS Ostfriesland struck a British mine on her starboard side, killing one man and wounding ten, but was able to make port. Seydlitz, critically damaged and very nearly sinking, barely survived the return voyage: after grounding and taking on even more water on the evening of 1 June, she had to be assisted stern first into port, where she dropped anchor at 07:30 on the morning of 2 June.
The Germans were helped in their escape by the failure of the British Admiralty in London to pass on seven critical radio intercepts obtained by naval intelligence indicating the true position, course and intentions of the High Seas Fleet during the night.
One message was transmitted to Jellicoe at 23:15 that accurately reported the German fleet’s course and speed as of 21:14. However, the erroneous signal from earlier in the day that reported the German fleet still in port, and an intelligence signal received at 22:45 giving another unlikely position for the German fleet, had reduced his confidence in intelligence reports. Had the other messages been forwarded, which confirmed the information received at 23:15, or had British ships reported accurately sightings and engagements with German destroyers, cruisers and battleships, then Jellicoe could have altered course to intercept Scheer at the Horns Reef. The unsent intercepted messages had been duly filed by the junior officer left on duty that night, who failed to appreciate their significance.
By the time Jellicoe finally learned of Scheer’s whereabouts at 04:15, the German was too far away to catch and it was clear that the battle could no longer be resumed.
Outcome
Reporting
At midday on 2 June, German authorities released a press statement claiming a victory, including the destruction of a battleship, two battlecruisers, two armoured cruisers, a light cruiser, a submarine and several destroyers, for the loss of Pommern and Wiesbaden. News that Lützow, Elbing and Rostock had been scuttled was withheld, on the grounds this information would not be known to the enemy. The victory of the Skagerrak was celebrated in the press, children were given a holiday and the nation celebrated. The Kaiser announced a new chapter in world history. Post-war, the official German history hailed the battle as a victory and it continued to be celebrated until after World War II.
—————————
Battle of Jutland 100th Celebrations – South Queensferry, Firth of Forth
—————————
In Britain, the first official news came from German wireless broadcasts. Ships began to arrive in port, their crews sending messages to friends and relatives both of their survival and the loss of some 6,000 others. Authorities considered suppressing the news, but it had already spread widely. Some crews coming ashore found rumours had already reported them dead to relatives, while others were jeered for the defeat they had suffered. At 19:00 on 2 June, the Admiralty released a statement based on information from Jellicoe containing the bare news of losses on each side. The following day British newspapers reported a German victory.
The Daily Mirror described the German Director of the Naval Department telling the Reichstag: “The result of the fighting is a significant success for our forces against a much stronger adversary”. The British population was shocked that the long anticipated battle had been a victory for Germany. On 3 June, the Admiralty issued a further statement expanding on German losses, and another the following day with exaggerated claims. However, on 7 June the German admission of the losses of Lützow and Rostock started to redress the sense of the battle as a loss. International perception of the battle began to change towards a qualified British victory, the German attempt to change the balance of power in the North Sea having been repulsed. In July, bad news from the Somme campaign swept concern over Jutland from the British consciousness.
Assessments
SMS Seydlitz was heavily damaged in the battle, hit by twenty-one main calibre shells, several secondary calibre and one torpedo. 98 men were killed and 55 injured.
At Jutland, the Germans, with a 99-strong fleet, sank 115,000 long tons (117,000 t) of British ships, while a 151-strong British fleet sank 62,000 long tons (63,000 t) of German ships. The British lost 6,094 seamen; the Germans 2,551. Several other ships were badly damaged, such as Lion and Seydlitz.
As of the summer of 1916, the High Seas Fleet’s strategy was to whittle away the numerical advantage of the Royal Navy by bringing its full strength to bear against isolated squadrons of enemy capital ships whilst declining to be drawn into a general fleet battle until it had achieved something resembling parity in heavy ships. In tactical terms, the High Seas Fleet had clearly inflicted significantly greater losses on the Grand Fleet than it had suffered itself at Jutland and the Germans never had any intention of attempting to hold the site of the battle, so some historians support the German claim of victory at Jutland.
However, Scheer seems to have quickly realised that further battles with a similar rate of attrition would exhaust the High Seas Fleet long before it reduced the Grand Fleet. Further, after the 19 August advance was nearly intercepted by the Grand Fleet, he no longer believed that it would be possible to trap a single squadron of Royal Navy warships without having the Grand Fleet intervene before he could return to port. Therefore, the High Seas Fleet abandoned its forays into the North Sea and turned its attention to the Baltic for most of 1917 whilst Scheer switched tactics against Britain to unrestricted submarine warfare in the Atlantic.
At a strategic level, the outcome has been the subject of a huge amount of literature with no clear consensus. The battle was widely viewed as indecisive in the immediate aftermath and this view remains influential.
Despite numerical superiority, the British had been disappointed in their hopes for a decisive victory[ comparable to Trafalgar and the objective of the influential strategic doctrines of Alfred Mahan. The High Seas Fleet survived as a fleet in being. Most of its losses were made good within a month – even Seydlitz, the most badly damaged ship to survive the battle, was repaired by October and officially back in service by November. However, the Germans had failed in their objective of destroying a substantial portion of the British Fleet, and no progress had been made towards the goal of allowing the High Seas Fleet to operate in the Atlantic Ocean.
Subsequently, there has been considerable support for the view of Jutland as a strategic victory for the British. While the British had not destroyed the German fleet and had lost more ships than their enemy, the Germans had retreated to harbour; at the end of the battle the British were in command of the area.
The German fleet would only sortie into the North Sea thrice more, with a raid on 19 August, one in October 1916 and another in April 1918. All three were unopposed by capital ships and quickly aborted as neither side were prepared to take the risks of mines and submarines.
Apart from these three abortive operations the High Seas Fleet – unwilling to risk another encounter with the British fleet – confined its activities to the Baltic Sea for the remainder of the war.Jellicoe issued an order prohibiting the Grand Fleet from steaming south of the line of Horns Reef owing to the threat of mines and U-boats. A German naval expert, writing publicly about Jutland in November 1918, commented, “Our Fleet losses were severe. On 1 June 1916, it was clear to every thinking person that this battle must, and would be, the last one”.
There is also significant support for viewing the battle as a German tactical victory, due to the much higher losses sustained by the British. The Germans declared a great victory immediately afterwards, while the British by contrast had only reported short and simple results. In response to public outrage, the First Lord of the Admiralty Arthur Balfour asked Winston Churchill to write a second report that was more positive and detailed.
A crew member of SMS Westfalen
At the end of the battle, the British had maintained their numerical superiority and had 23 dreadnoughts ready and four battlecruisers still able to fight, while the Germans had only 10 dreadnoughts.
One month after the battle, the Grand Fleet was stronger than it had been before sailing to Jutland. Warspite was dry docked at Rosyth, returning to the fleet on 22 July, while Malaya was repaired in the floating dock at Invergordon, returning to duty on 11 July. Barham was docked for a month at Devonport before undergoing speed trials and returning to Scapa on 8 July. Princess Royal stayed initially at Rosyth but transferred to dry dock at Portsmouth before returning to duty at Rosyth 21 July. Tiger was dry docked at Rosyth and ready for service 2 July. Queen Elizabeth, Emperor of India and HMAS Australia, which had been undergoing maintenance at the time of the battle, returned to the fleet immediately, followed shortly after by Resolution and Ramillies. Lion initially remained ready for sea duty despite the damaged turret, then underwent a month’s repairs in July when Q turret was removed temporarily and replaced in September.
A third view, presented in a number of recent evaluations, is that Jutland, the last major fleet action between battleships, illustrated the irrelevance of battleship fleets following the development of the submarine, mine and torpedo. In this view, the most important consequence of Jutland was the decision of the Germans to engage in unrestricted submarine warfare. Although large numbers of battleships were constructed in the decades between the wars, it has been argued that this outcome reflected the social dominance among naval decision-makers of battleship advocates who constrained technological choices to fit traditional paradigms of fleet action. Battleships played a relatively minor role in World War II, in which the submarine and aircraft carrier emerged as the dominant offensive weapon of naval warfare.
British self-critique
The official British Admiralty examination of the Grand Fleet’s performance recognised two main problems:
British armour-piercing shells exploded outside the German armour rather than penetrating and exploding within. As a result, some German ships with only 8 in (20 cm)-thick armour survived hits from 15-inch (38 cm) projectiles. Had these shells penetrated the armour and then exploded, German losses would probably have been far greater.
Communication between ships and the British commander-in-chief were comparatively poor. For most of the battle, Jellicoe had no idea where the German ships were, even though British ships were in contact. They failed to report enemy positions, contrary to the Grand Fleet’s Battle Plan. Some of the most important signalling was carried out solely by flag instead of wireless or using redundant methods to ensure communications—a questionable procedure, given the mixture of haze and smoke that obscured the battlefield, and a foreshadowing of similar failures by habit-bound and conservatively minded professional officers of rank to take advantage of new technology in World War II.
Shell performance
German armour-piercing shells were far more effective than the British ones, which often failed to penetrate heavy armour. The issue particularly concerned shells striking at oblique angles, which became increasingly the case at long range. Germany had adopted trinitrotoluene (TNT) as the explosive filler for artillery shells in 1902, while the United Kingdom was still using a picric acid mixture (Lyddite). The shock of impact of a shell against armour often prematurely detonated Lyddite in advance of fuze function while TNT detonation could be delayed until after the shell had penetrated and the fuze had functioned in the vulnerable area behind the armour plate.
The issue of poorly performing shells had been known to Jellicoe, who as Third Sea Lord from 1908 to 1910 had ordered new shells to be designed. However, the matter had not been followed through after his posting to sea and new shells had never been thoroughly tested. Beatty discovered the problem at a party aboard Lion a short time after the battle, when a Swedish Naval officer was present. He had recently visited Berlin, where the German navy had scoffed at how British shells had broken up on their ships’ armour.
The question of shell effectiveness had also been raised after the Battle of Dogger Bank, but no action had been taken.
Hipper later commented,
“It was nothing but the poor quality of their bursting charges which saved us from disaster”.
Admiral Dreyer, writing later about the battle, during which he had been captain of the British flagship Iron Duke, estimated that effective shells as later introduced would have led to the sinking of six more German capital ships, based upon the actual number of hits achieved in the battle. The system of testing shells, which remained in use up to 1944, meant that, statistically, a batch of shells of which 70% were faulty stood an even chance of being accepted. Indeed, even shells that failed this relatively mild test had still been issued to ships. Analysis of the test results afterwards by the Ordnance Board suggested the likelihood that 30–70% of shells would not have passed the standard penetration test specified by the Admiralty.
Efforts to replace the shells were initially resisted by the Admiralty, and action was not taken until Jellicoe became First Sea Lord in December 1916. As an initial response, the worst of the existing shells were withdrawn from ships in early 1917 and replaced from reserve supplies. New shells were designed, but did not arrive until April 1918, and were never used in action.
Battlecruiser losses
The British battlecruisers were designed to chase and destroy enemy cruisers from a range at which these ships could not reply. They were not designed to be ships of the line and exchange broadsides with the enemy. Although one German and three British battlecruisers were sunk, none of them were destroyed by enemy shells penetrating the belt armour and detonating the magazines; each of the British battlecruisers was penetrated through a turret roof and her magazines ignited by flash fires passing through the turret and shell-handling rooms. Lützow sustained 24 hits and her flooding could not be contained. She was eventually sunk by her escorts’ torpedoes after her crew had been safely removed. Derfflinger and Seydlitz sustained 22 hits each but reached port (although in Seydlitz’s case only just).
The disturbing feature of the battlecruiser action is the fact that five German battlecruisers engaging six British vessels of this class, supported after the first twenty minutes, although at great range, by the fire of four battleships of the “Queen Elizabeth” class, were yet able to sink ‘Queen Mary’ and ‘Indefatigable’….The facts which contributed to the British losses, first, were the indifferent armour protection of our battlecruisers, particularly as regards turret armour, and, second, deck plating and the disadvantage under which our vessels laboured in regard to the light.
— Sir John Jellicoe, Jellicoe’s official despatch
Jellicoe and Beatty, as well as other senior officers, gave an impression that the loss of the battlecruisers was caused by weak armour, despite reports by two committees and earlier statements by Jellicoe and other senior officers that Cordite and its management were to blame. This led to calls for armour to be increased, and an additional 1 in (2.5 cm) was placed over the relatively thin decks above magazines. To compensate for the increase in weight, ships had to carry correspondingly less fuel, water and other supplies. Whether or not thin deck armour was a potential weakness of British ships, the battle provided no evidence that it was the case. At least amongst the surviving ships, no enemy shell was found to have penetrated deck armour anywhere. The design of the new battlecruiser HMS Hood (which had started building at the time of the battle) was altered to give her 5,000 long tons (5,100 t) of additional armour.
Ammunition handling
British and German propellant charges differed in packaging, handling, and chemistry. The British propellant was of two types, MK1 and MD. The Mark 1 cordite had a formula of 37% nitrocellulose, 58% nitroglycerine, and 5% petroleum jelly. It was a good propellant but burned hot and caused an erosion problem in gun barrels. The petroleum jelly served as both a lubricant and a stabiliser. Cordite MD was developed to reduce barrel wear, its formula being 65% nitrocellulose, 30% nitroglycerine, and 5% petroleum jelly. While cordite MD solved the gun-barrel erosion issue, it did nothing to improve its storage properties, which were poor. Cordite was very sensitive to variations of temperature, and acid propagation/cordite deterioration would take place at a very rapid rate. Cordite MD also shed micro-dust particles of nitrocellulose and iron pyrite. While cordite propellant was manageable, it required a vigilant gunnery officer, strict cordite lot control, and frequent testing of the cordite lots in the ships’ magazines
British cordite propellant (when uncased and exposed in the silk bag) tended to burn violently, causing uncontrollable “flash fires” when ignited by nearby shell hits. In 1945, a test was conducted by the U.S.N. Bureau of Ordnance (Bulletin of Ordnance Information, No.245, pp. 54–60) testing the sensitivity of cordite to then-current U.S. Naval propellant powders against a measurable and repeatable flash source. It found that cordite would ignite at 530 mm/22″ from the flash and the current U.S. powder at 120 mm, /5″ the U.S. flashless powder at 25 mm./1″
This meant that about 75 times the propellant would immediately ignite when exposed to flash, as compared to the U.S. powder. British ships had inadequate protection against these flash fires. German propellant (RP C/12, handled in brass cartridge cases) was less vulnerable and less volatile in composition. German propellants show that they were not that different in composition from cordite—with one major exception: centralite. This was symmetrical Diethyl Diphenyl Urea, which served as a stabiliser that was superior to the petroleum jelly used in British practice. It stored better and burned but did not explode. Stored and used in brass cases, it proved much less sensitive to flash. RP C/12 – 64.13% nitrocellulose, 29.77% nitroglycerine, 5.75% centralite, 0.25% magnesium oxide and 0.10% graphite.
The Royal Navy Battle Cruiser Fleet had also emphasised speed in ammunition handling over established safety protocol. In practice drills, cordite could not be supplied to the guns rapidly enough through the hoists and hatches. To bring up the propellant in good time to load for the next broadside, many safety doors were kept open that should have been shut to safeguard against flash fires. Bags of cordite were also stocked and kept locally, creating a total breakdown of safety design features. By staging charges in the chambers between the gun turret and magazine, the Royal Navy enhanced their rate of fire but left their ships vulnerable to chain reaction ammunition fires and magazine explosions. This ‘bad safety habit’ carried over into real battle practices.
Furthermore, the doctrine of a high rate of fire also led to the decision in 1913 to increase the supply of shells and cordite held on the British ships by 50%, for fear of running out of ammunition. When this exceeded the capacity of the ships’ magazines, cordite was stored in insecure places.
The British cordite charges were stored two silk bags to a metal cylindrical container, with a 16-oz gunpowder igniter charge, which was covered with a thick paper wad, four charges being used on each projectile. The gun crews were removing the charges from their containers and removing the paper covering over the gunpowder igniter charges. The effect of having eight loads at the ready was to have 4 short tons (3,600 kg) of exposed explosive, with each charge leaking small amounts of gunpowder from the igniter bags. In effect, the gun crews had laid an explosive train from the turret to the magazines, and one shell hit to a battlecruiser turret was enough to end a ship.
A diving expedition during the summer of 2003 provided corroboration of this practice. It examined the wrecks of Invincible, Queen Mary, Defence, and Lützow to investigate the cause of the British ships’ tendency to suffer from internal explosions. From this evidence, a major part of the blame may be laid on lax handling of the cordite propellant for the shells of the main guns. The wreck of the Queen Mary revealed cordite containers stacked in the working chamber of the X turret instead of the magazine.
There was a further difference in the propellant itself. While the German RP C/12 burned when exposed to fire, it did not explode, as opposed to cordite. RP C/12 was extensively studied by the British and, after World War I, would form the basis of the later Cordite SC.
The memoirs of Alexander Grant, Gunner on Lion, suggest that some British officers were aware of the dangers of careless handling of cordite:
With the introduction of cordite to replace powder for firing guns, regulations regarding the necessary precautions for handling explosives became unconsciously considerably relaxed, even I regret to say, to a dangerous degree throughout the Service. The gradual lapse in the regulations on board ship seemed to be due to two factors. First, cordite is a much safer explosive to handle than gun-powder. Second, but more important, the altered construction of the magazines on board led to a feeling of false security….The iron or steel deck, the disappearance of the wood lining, the electric lights fitted inside, the steel doors, open because there was now no chute for passing cartridges out; all this gave officers and men a comparative easiness of mind regarding the precautions necessary with explosive material.
Grant had already introduced measures onboard Lion to limit the number of cartridges kept outside the magazine and to ensure doors were kept closed, probably contributing to her survival.
On 5 June 1916, the First Lord of the Admiralty advised Cabinet Members that the three battlecruisers had been lost due to unsafe cordite management.
On 22 November 1916, following detailed interviews of the survivors of the destroyed battlecruisers, the Third Sea Lord, Rear Admiral Tudor, issued a report detailing the stacking of charges by the gun crews in the handling rooms to speed up loading of the guns.
After the battle, the B.C.F. Gunnery Committee issued a report (at the command of Admiral David Beatty) advocating immediate changes in flash protection and charge handling. It reported, among other things, that:
Some vent plates in magazines allowed flash into the magazines and should be retro-fitted to a new standard.
Bulkheads in HMS Lion‘s magazine showed buckling from fire under pressure (overpressure) – despite being flooded and therefore supported by water pressure – and must be made stronger.
Doors opening inward to magazines were an extreme danger.
Current designs of turrets could not eliminate flash from shell bursts in the turret from reaching the handling rooms.
Ignition pads must not be attached to charges but instead be placed just before ramming.
Better methods must be found for safe storage of ready charges than the current method.
Some method for rapidly drowning charges already in the handling path must be devised.
Handling scuttles (special flash-proof fittings for moving propellant charges through ship’s bulkheads), designed to handle overpressure, must be fitted.
The United States Navy in 1939 had quantities of Cordite N, a Canadian propellant that was much improved, yet its Bureau of Ordnance objected strongly to its use onboard U.S. warships, considering it unsuitable as a naval propellant due to its inclusion of nitroglycerin.
Gunnery
British gunnery control systems, based on Dreyer tables, were well in advance of the German ones, as demonstrated by the proportion of main calibre hits made on the German fleet. Because of its demonstrated advantages, it was installed on ships progressively as the war went on, had been fitted to a majority of British capital ships by May, 1916, and had been installed on the main guns of all but two of the Grand Fleet’s capital ships.[152] The Royal Navy used centralised fire-control systems on their capital ships, directed from a point high up on the ship where the fall of shells could best be seen, utilising a director sight for both training and elevating the guns. In contrast, the German battlecruisers controlled the fire of turrets using a training-only director, which also did not fire the guns at once.
The rest of the German capital ships were without even this innovation. German range-finding equipment was generally superior to the British 9 ft (2.7 m) FT24, as its operators were trained to a higher standard due to the complexity of the Zeiss 3 m (9.8 ft) range finders. Their stereoscopic design meant that in certain conditions they could range on a target enshrouded by smoke The German equipment was not superior in range to the British Barr & Stroud 15 ft (4.6 m) rangefinder found in the newest British capital ships, and, unlike the British range finders, the German range takers had to be replaced as often as every thirty minutes, as their eyesight became impaired, affecting the ranges provided to their gunnery equipment.
The results of the battle confirmed the value of firing guns by centralised director. The battle prompted the Royal Navy to install director firing systems in cruisers and destroyers, where it had not thus far been used, and for secondary armament on battleships.
German ships were considered to have been quicker in determining the correct range to targets, thus obtaining an early advantage. The British used a ‘bracket system’, whereby a salvo was fired at the best-guess range and, depending where it landed, the range was progressively corrected up or down until successive shots were landing in front of and behind the enemy. The Germans used a ‘ladder system’, whereby an initial volley of three shots at different ranges was used, with the centre shot at the best-guess range. The ladder system allowed the gunners to get ranging information from the three shots more quickly than the bracket system, which required waiting between shots to see how the last had landed. British ships adopted the German system.
It was determined that 9-foot (2.7 m) range finders of the sort issued to most British ships were not adequate at long range and did not perform as well as the 15-foot (4.6 m) range finders on some of the most modern ships. In 1917, range finders of base lengths of 25 and 30 ft (7.6 and 9.1 m) were introduced on the battleships to improve accuracy .
Signalling
Throughout the battle, British ships experienced difficulties with communications, whereas the Germans did not suffer such problems. The British preferred signalling using ship-to-ship flag and lamp signals, avoiding wireless, whereas the Germans used wireless successfully. One conclusion drawn was that flag signals were not a satisfactory way to control the fleet. Experience using lamps, particularly at night when issuing challenges to other ships, demonstrated this was an excellent way to advertise your precise location to an enemy, inviting a reply by gunfire. Recognition signals by lamp, once seen, could also easily be copied in future engagements.
British ships both failed to report engagements with the enemy but also, in the case of cruisers and destroyers, failed to actively seek out the enemy. A culture had arisen within the fleet of not acting without orders, which could prove fatal when any circumstances prevented orders being sent or received. Commanders failed to engage the enemy because they believed other, more senior officers must also be aware of the enemy nearby, and would have given orders to act if this was expected. Wireless, the most direct way to pass messages across the fleet (although it was being jammed by German ships), was avoided either for perceived reasons of not giving away the presence of ships or for fear of cluttering up the airwaves with unnecessary reports.
Fleet Standing Orders
Naval operations were governed by standing orders issued to all the ships. These attempted to set out what ships should do in all circumstances, particularly in situations where ships would have to react without referring to higher authority, or when communications failed. A number of changes were introduced as a result of experience gained in the battle.
A new signal was introduced instructing squadron commanders to act independently as they thought best while still supporting the main fleet, particularly for use when circumstances would make it difficult to send detailed orders. The description stressed that this was not intended to be the only time commanders might take independent action, but was intended to make plain times when they definitely should. Similarly, instructions on what to do if the fleet was instructed to take evasive action against torpedoes were amended. Commanders were given discretion that if their part of the fleet was not under immediate attack, they should continue engaging the enemy rather than turning away with the rest of the fleet. In this battle, when the fleet turned away from Scheer’s destroyer attack covering his retreat, not all the British ships had been affected, and could have continued to engage the enemy.
A number of opportunities to attack enemy ships by torpedo had presented themselves but had been missed. All ships, not just the destroyers armed principally with torpedoes but also battleships, were reminded that they carried torpedoes intended to be used whenever an opportunity arose. Destroyers were instructed to close the enemy fleet to fire torpedoes as soon as engagements between the main ships on either side would keep enemy guns busy directed at larger targets. Destroyers should also be ready to immediately engage enemy destroyers if they should launch an attack, endeavouring to disrupt their chances of launching torpedoes and keep them away from the main fleet.
To add some flexibility when deploying for attack, a new signal was provided for deploying the fleet to the centre, rather than as previously only either to left or right of the standard closed-up formation for travelling. The fast and powerful 5th Battle Squadron was moved to the front of the cruising formation so it would have the option of deploying left or right depending upon the enemy position. In the event of engagements at night, although the fleet still preferred to avoid night fighting, a destroyer and cruiser squadron would be specifically detailed to seek out the enemy and launch destroyer attacks.
Controvers
At the time, Jellicoe was criticised for his caution and for allowing Scheer to escape. Beatty, in particular, was convinced that Jellicoe had missed a tremendous opportunity to annihilate the High Seas Fleet and win what would amount to another Trafalgar. Jellicoe was promoted away from active command to become First Sea Lord, the professional head of the Royal Navy, while Beatty replaced him as commander of the Grand Fleet.
The controversy raged within the navy and in public for about a decade after the war. Criticism focused on Jellicoe’s decision at 19:15. Scheer had ordered his cruisers and destroyers forward in a torpedo attack to cover the turning away of his battleships. Jellicoe chose to turn to the south-east, and so keep out of range of the torpedoes. If, instead, he had turned to the west, could his ships have dodged the torpedoes and destroyed the German fleet? Supporters of Jellicoe, including the historian Cyril Falls, pointed to the folly of risking defeat in battle when you already have command of the sea Jellicoe himself, in a letter to the Admiralty seventeen months before the battle, had stated that he intended to turn his fleet away from any mass torpedo attack (that being the universally accepted proper tactical response to such attacks, practised by all the major navies of the world ), and that in the event of a fleet engagement in which the enemy turned away he would assume that the intention was to draw him over mines or submarines and that he would decline to be so drawn. The Admiralty approved this plan and expressed full confidence in Jellicoe at the time (October 1914)
The stakes were high, the pressure on Jellicoe immense, and his caution certainly understandable. His judgement might have been that even 90% odds in favour were not good enough to bet the British Empire. The former First Lord of the AdmiraltyWinston Churchill said of the battle that Jellicoe “was the only man on either side who could have lost the war in an afternoon.”
The criticism of Jellicoe also fails to sufficiently credit Scheer, who was determined to preserve his fleet by avoiding the full British battle line, and who showed great skill in effecting his escape.
Beatty’s actions
On the other hand, some of Jellicoe’s supporters condemned the actions of Beatty for the British failure to achieve a complete victory. Although Beatty was undeniably brave, his mismanagement of the initial encounter with Hipper’s squadron and the High Seas Fleet cost considerable advantage in the first hours of the battle
His most glaring failure was in not providing Jellicoe with periodic information on the position, course, and speed of the High Seas Fleet. Beatty, aboard the battlecruiser Lion, left behind the four fast battleships of the 5th Battle Squadron – the most powerful warships in the world at the time – engaging with six ships when better control would have given him 10 against Hipper’s five. Though Beatty’s larger 13.5 in (340 mm) guns out-ranged Hipper’s 11 and 12 in (280 and 300 mm) guns by thousands of yards, Beatty held his fire for 10 minutes and closed the German squadron until within range of the Germans’ superior gunnery, under lighting conditions that favoured the Germans. Most of the British losses in tonnage occurred in Beatty’s force.
Losses
1916 German propaganda postcard, comparing nearly accurate data of the adversaries’ losses.
The total loss of life was 9,823 men, of which the British losses were 6,784 and German losses were 3,039.[173] No dreadnoughts were destroyed on either side during the battle.
In the years following the battle the wrecks were slowly discovered. Invincible was found by the Royal Navy minesweeper HMS Oakley in 1919. After the Second World War some of the wrecks seem to have been commercially salvaged. For instance, the Hydrographic Office record for SMS Lützow (No.32344) shows that salvage operations were taking place on the wreck in 1960. From 2000–2001 a series of diving expeditions involving veteran shipwreck historian and archaeologist Innes McCartney located the wrecks of Defence, Indefatigable and Nomad. It was discovered that Indefatigable too, had been ripped apart by salvors at some unknown time.[175][176] In 2003 McCartney led a detailed survey of the wrecks for the Channel 4 documentary “Clash of the Dreadnoughts”.
The film examined the last minutes of the lost ships and revealed for the first time how both ‘P’ and ‘Q’ turrets of Invincible had been blasted out of the ship and tossed into the sea before she broke in half. On the 90th anniversary of the battle, in 2006, the UK Ministry of Defence belatedly announced that the 14 British vessels lost in the battle were being designated as protected places under the Protection of Military Remains Act 1986.
The last surviving veteran of the battle, Henry Allingham, a British RAF (originally RNAS) airman, died on 18 July 2009, aged 113, by which time he was the oldest documented man in the world and one of the last surviving veterans of the whole war. Also among the combatants was the then 20-year-old Prince Albert, second in the line to the British throne, who would reign as King George VI of the United Kingdom from 1936 until his death in 1952. He served as a junior officer in the Royal Navy.
The Battle of Jutland was annually celebrated as a great victory by the right wing in Weimar Germany. This “victory” was used to repress the memory of the German navy’s initiation of the German Revolution of 1918–19, as well as the memory of the defeat in World War I in general. (The celebrations of the Battle of Tannenberg played a similar role in the Weimar Republic.) This is especially true for the city of Wilhelmshaven, where wreath-laying ceremonies and torch-lit parades were performed until the end of the 1960s.
In May 2016, the 100th Anniversary commemoration of the Battle of Jutland was held. On 29 May, a commemorative service was held at St Mary’s Church, Wimbledon, where the ensign from HMS Inflexible is on permanent display. On 31 May, the main service was held at St Magnus Cathedral in Orkney, attended by the British Prime Minister, David Cameron, and the German President, Joachim Gauck, along with Princess Anne and Vice Admiral Sir Tim Laurence.

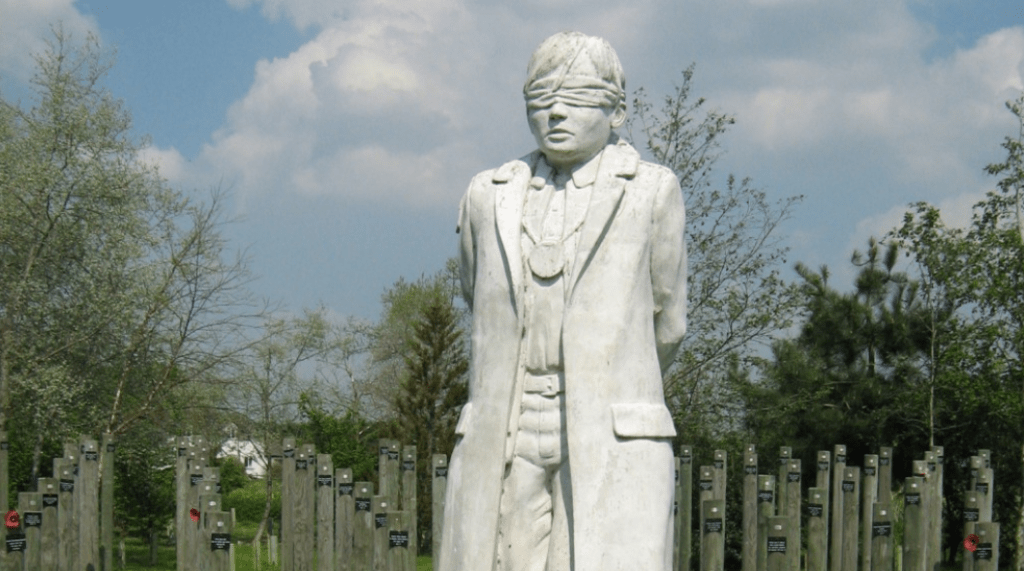


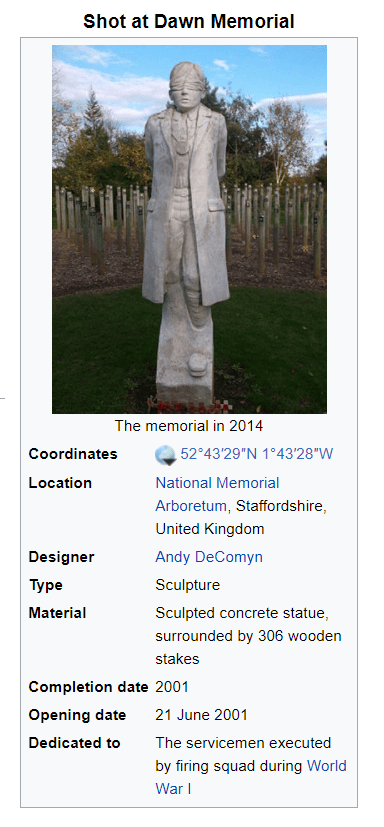
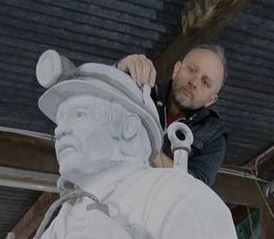

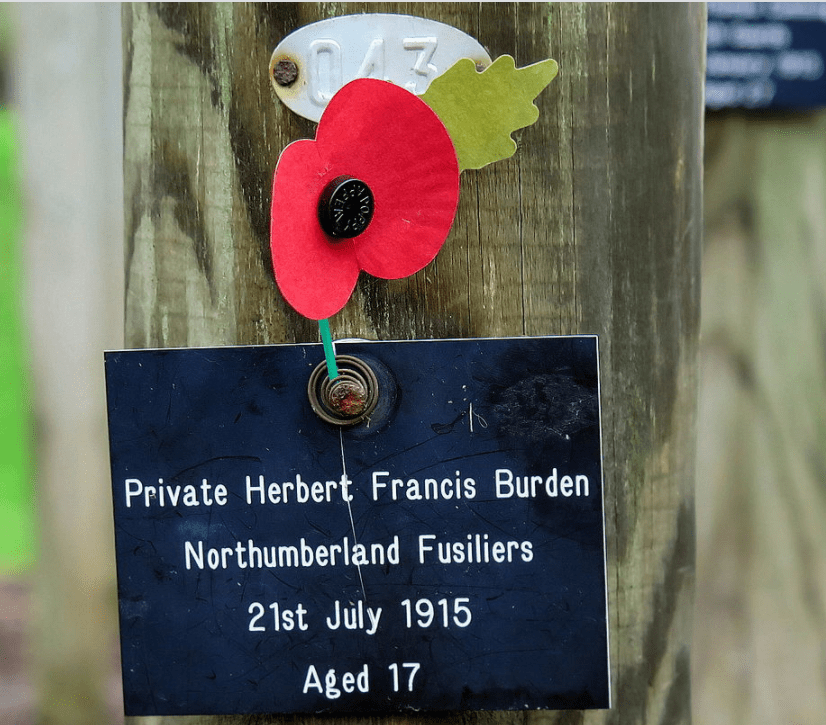
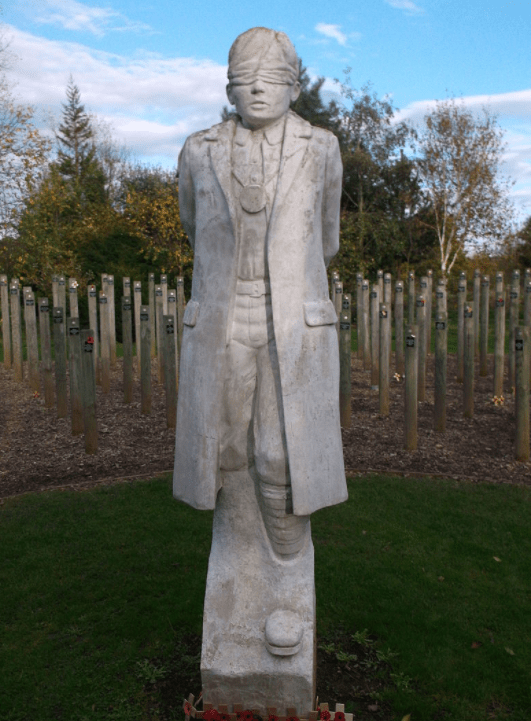
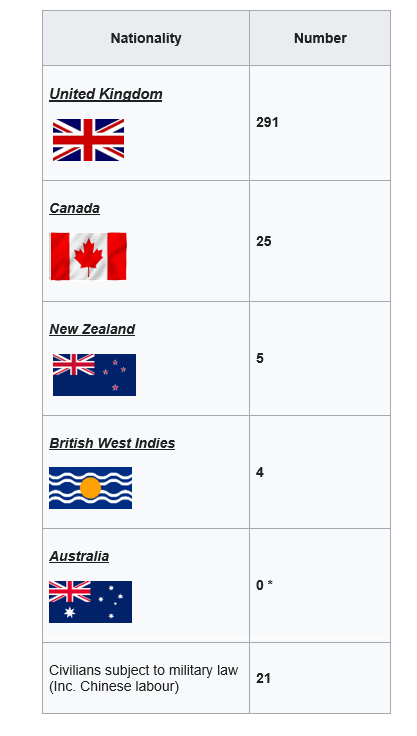
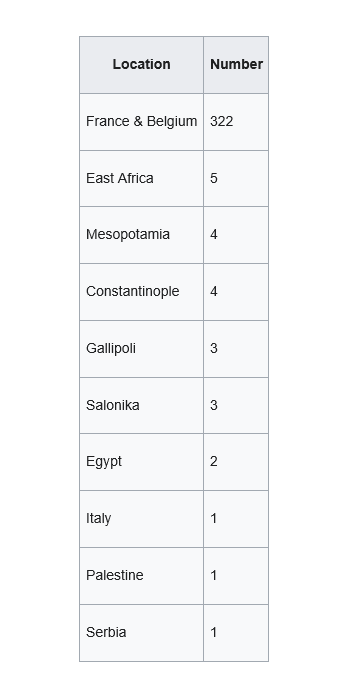
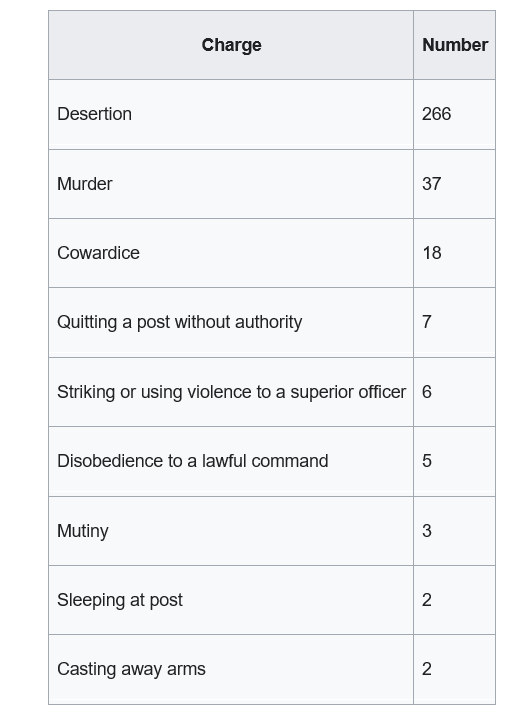

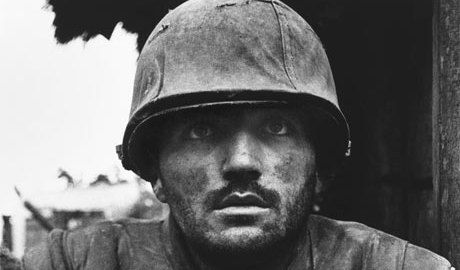


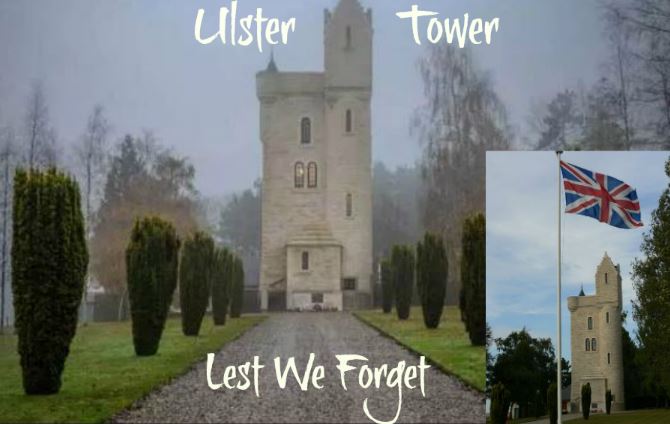


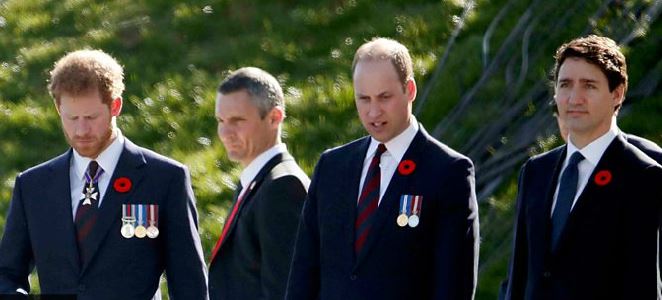 Vimy Ridge: Royals commemorate defining WW1 battle


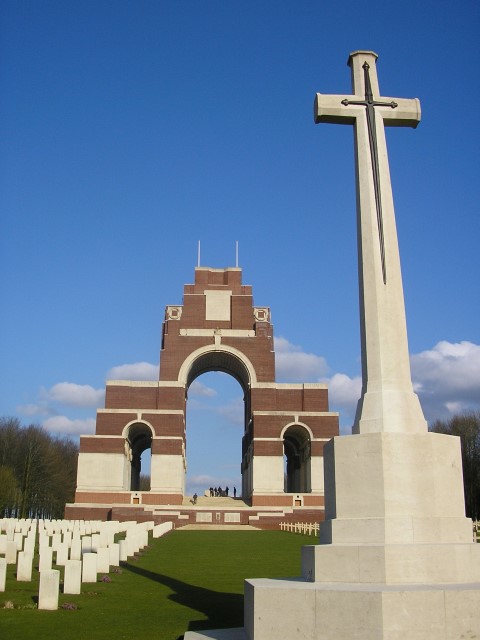
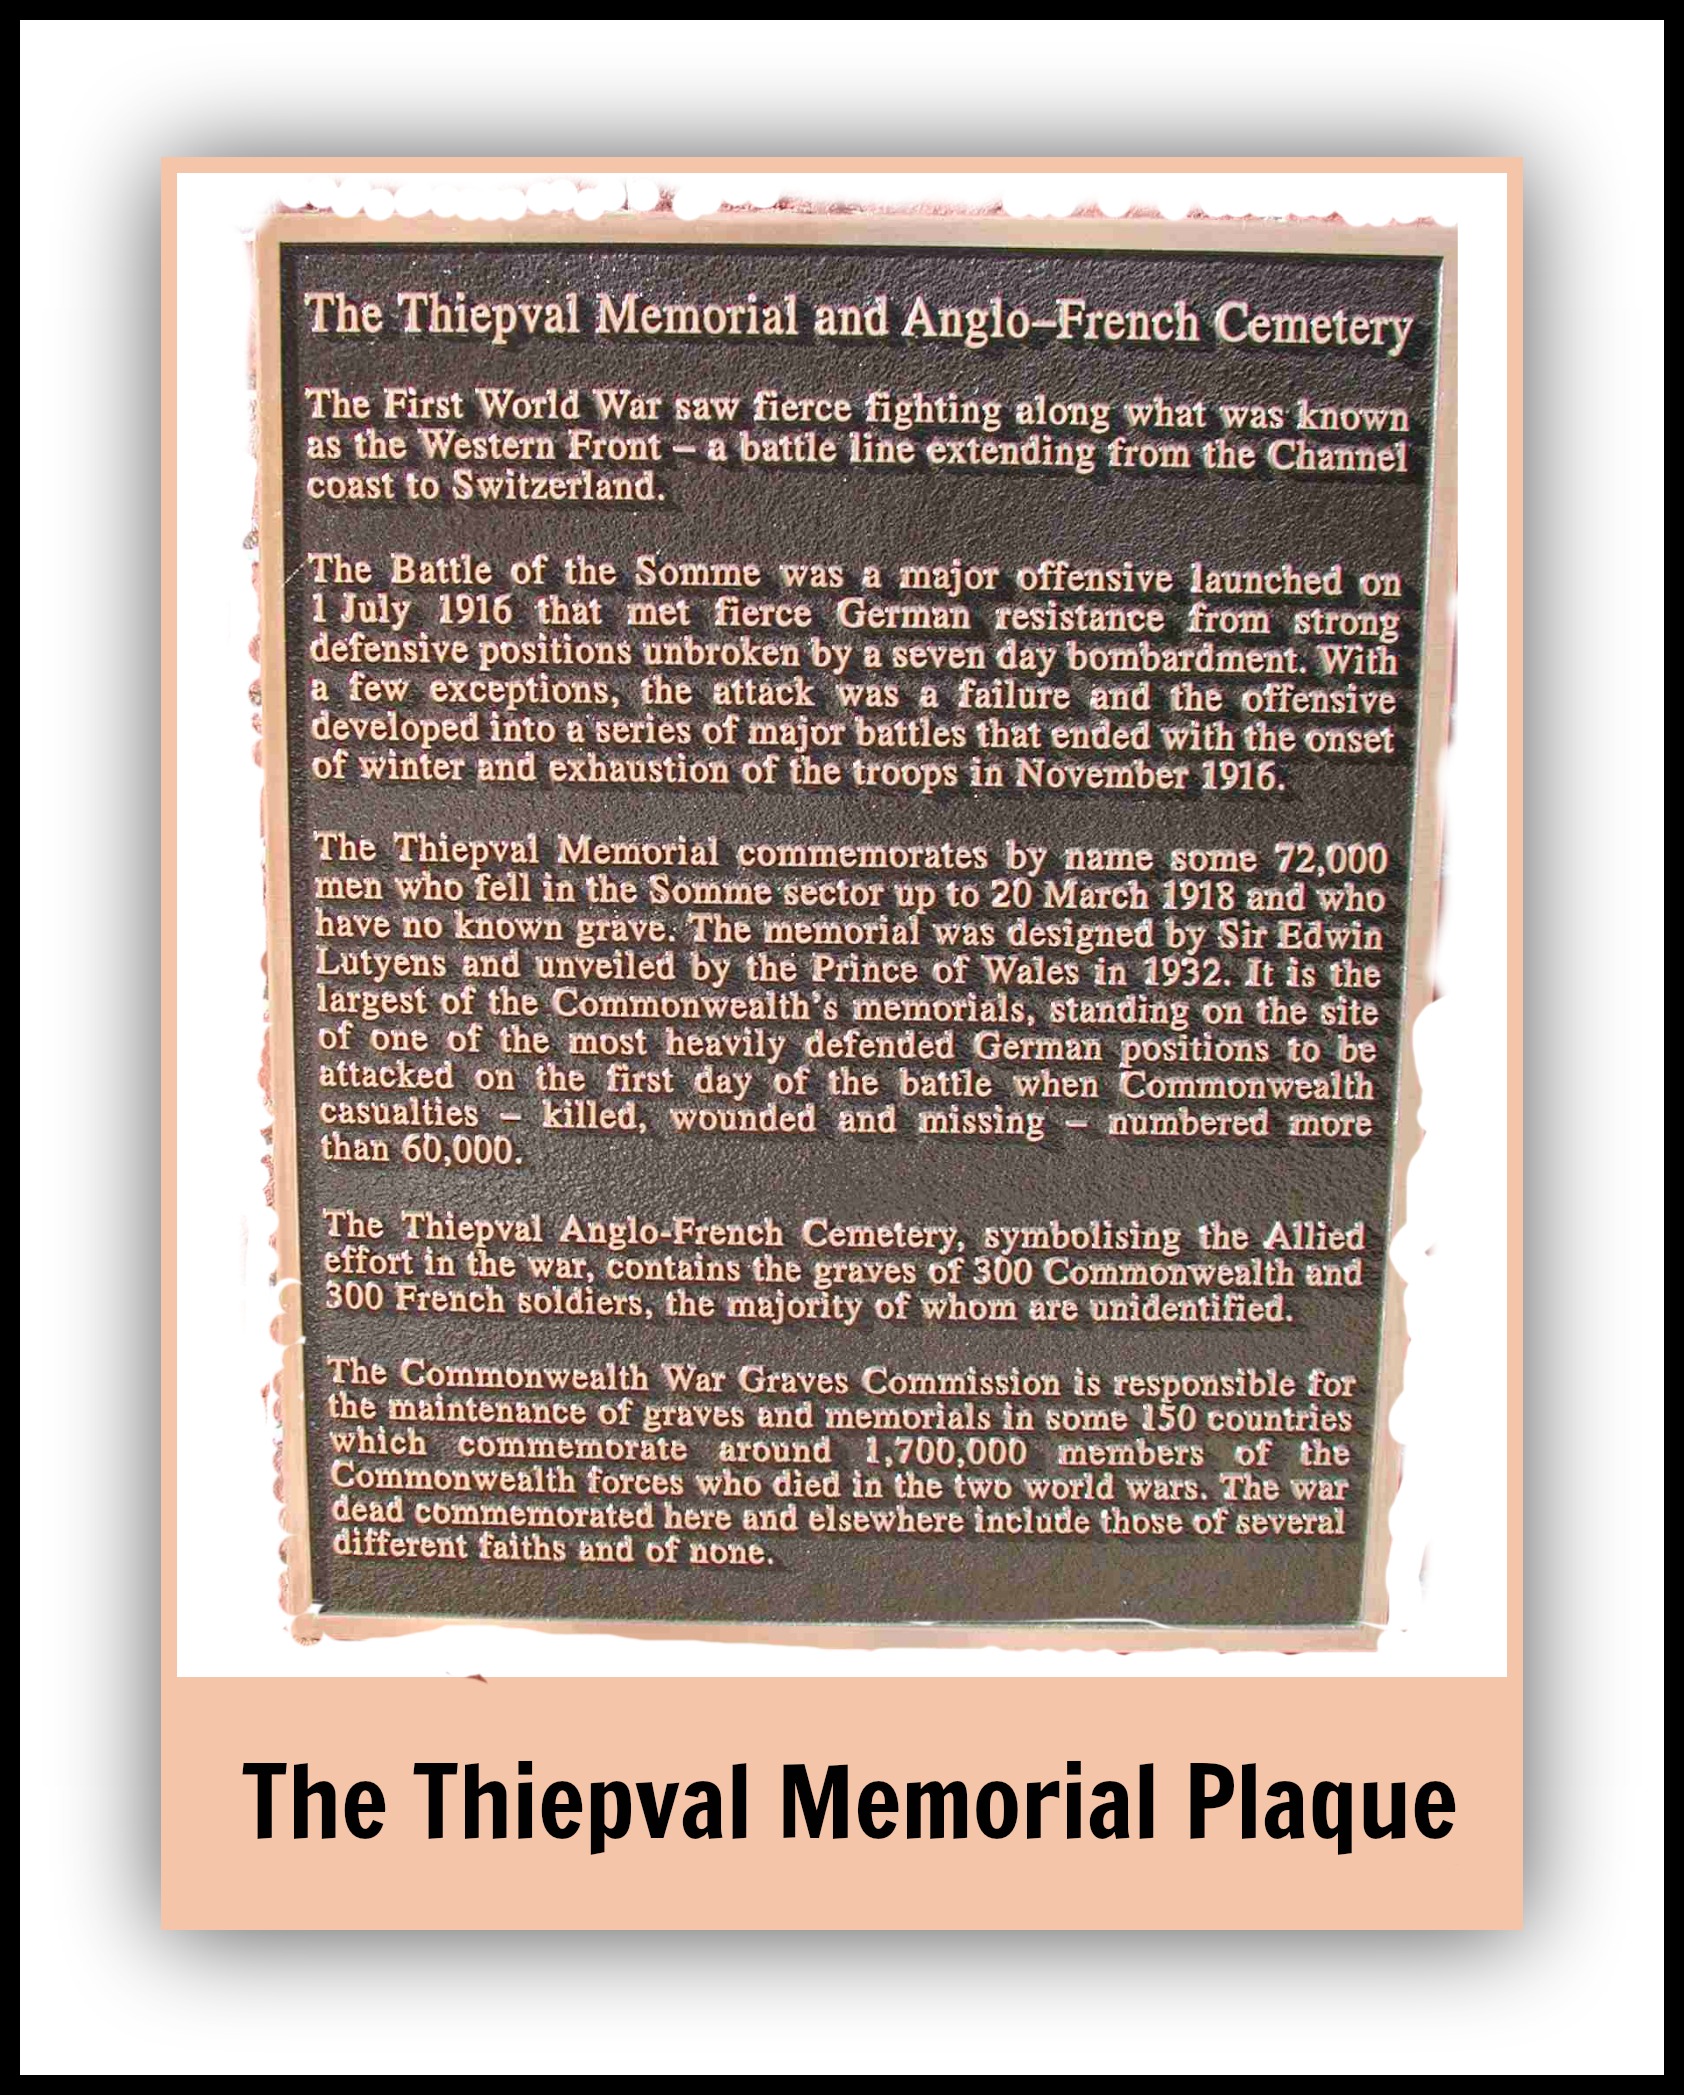


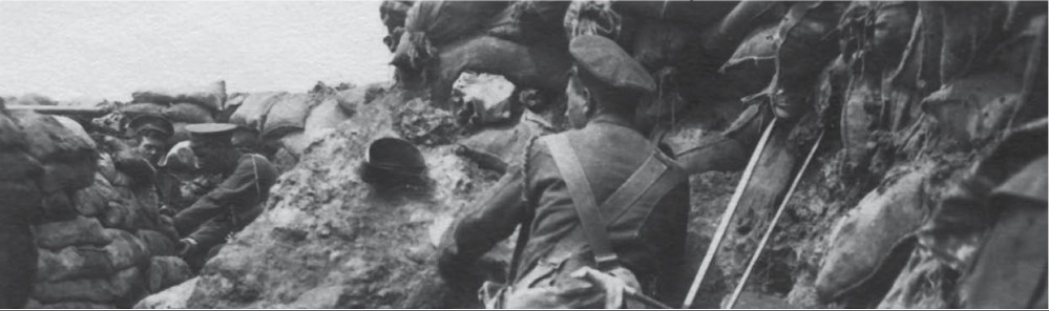


.jpg)

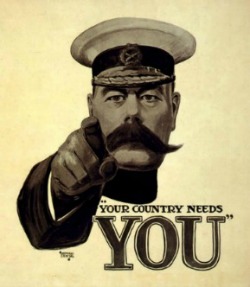


_Britons_(Kitchener)_wants_you_(Briten_Kitchener_braucht_Euch)._1914_(Nachdruck),_74_x_50_cm._(Slg.Nr._552).jpg)


.jpg)


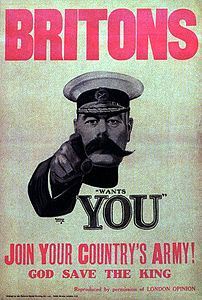


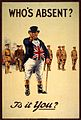


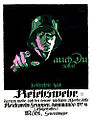
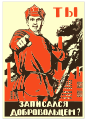
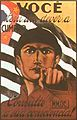


.png)


.svg)
.svg)


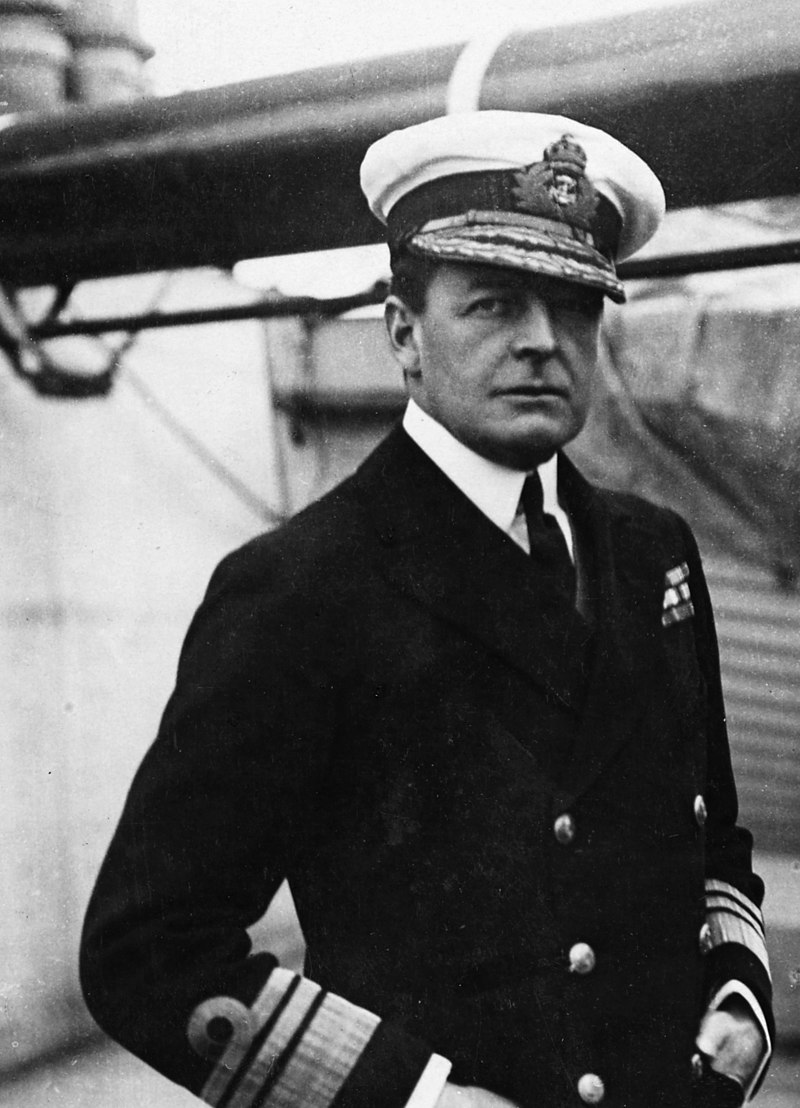


.jpg)


_Jutland.jpg)


